Right Backup
 What is Right Backup?
Right Backup is a simple and secure cloud storage solution which safeguards your valuable data. It helps you back up, share, restore and access your documents, photos, videos, music and more with a single click. Instantly backup all your work to the cloud and stay secure and up to date on the go.
If you need any help in purchasing or renewing your subscription, you can contact our support team at support@rightbackup.com
How much free space does Right Backup offer?
Right Backup offers up to 100 MB of free space for 30 days to back up your documents, photos, videos, music and more. Once the 30 days trial ends or you have consumed your 100 MB space (whichever comes first), you will have to purchase additional space.
If you need any help in purchasing or renewing your subscription, you can contact our support team at support@rightbackup.com
How can I get more space and how much does Right Backup cost?
If you have run out of space or your trial has expired, you can purchase additional storage.
To get additional space, please visit https://www.rightbackup.com/PlanPricing and click on ''Add to Shopping Cart'' to proceed with your purchase.
If you need any help in purchasing or renewing your subscription, you can contact our support team at support@rightbackup.com
How do I activate my subscription?
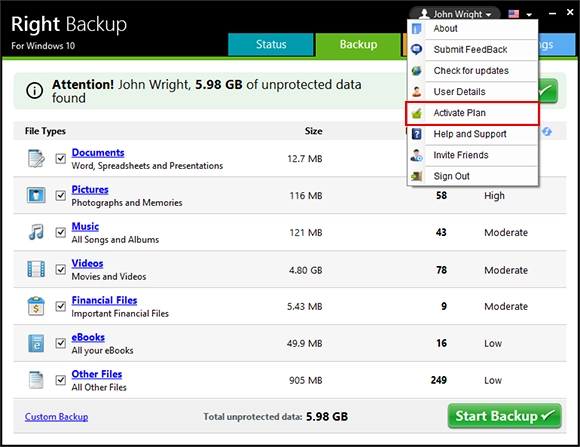
Once you have purchased more space, you will need to activate your subscription. To do so, follow the steps below:
- Launch Right Backup application.
- On the top right corner of the program, click on your profile name.
- From the drop down menu, click on Activate Plan.
- On the following screen, enter your Purchase Order ID / Number and click the Activate Plan button.
Your subscription will be activated.

I forgot my password. How do I reset it?
If you have forgotten your password and are unable to sign into your account, please follow the steps below to reset it:
- Launch Right Backup application or go to Right Backup website.
- To reset password from Right Backup website, click on SIGN IN. Click on Forgot Password option available on ‘Sign in’ window. It will show ‘Forgot your password?’ window.
To reset password from Right Backup application, launch the application and go to ‘Sign in’ window. Click on ‘Forgot Password’ option. It will take you to the Forgot your password https://www.rightbackup.com/ForgotPassword web page.
- Please enter the email address associated with your Right Backup account in the Email field and click on Reset Password button.
- You will receive an email with a Reset Password link.
- Click on the Reset Password link; it will take you to the “Reset your Password page”.
- Here enter your email address, new password and confirm password.
- Click on the Submit button.
If you need any help in purchasing or renewing your subscription, you can contact our support team at support@rightbackup.com
How do I change my password?
To change your password, please follow the steps below:
- Launch Right Backup program.
- On the top right corner of the program, click your profile name.
- From the drop down menu, click on User Details option.
- Click the Change Password option near the Password field.
- This will open the Right Backup Account Details page.
- Under Change Password option, enter your Current Password, New Password and Confirm Password.
- Click on Save All Settings button to save the changes.
Your password will be changed.


What is the difference between Smart (default) and Custom Backup?
Smart Backup automatically takes back up of all the documents, music, videos, pictures, eBooks, financial and other files found on your device. This helps you to easily backup all your important files without the need for manual selection and saves your precious time. However, you can choose which files you want to back up using the Custom Backup option.
Types of files which are included in Smart Backup are:
1. Documents
*.odt,*.ott,*.oth,*.odm,*.sxw,*.stw,*.sxg,*.doc,*.dot,*.docx,*.docm,*.dotx,*.dotm,*.wpd,*.wps, *.rtf,,*.csv,*.sdw,*.sgl,*.vor,*.uot,*.uof,*.jtd,*.jtt,*.hwp,*.602,*.pdb,*.psw,*.xls,*.xlw,*.xlt, *.xlsx,*.xlsm,*.xltx,*.xltm,*.xlsb,*.wk1,*.wks,*.123,*.dif,*.sdc,*.dbf,*.slk,*.uos,*.pxl,*.wb2, *.ppt,*.pps,*.pot,*.pptx,*.pptm,*.potx,*.potm,*.sdd,*.sdp,*.uop,*.cgm,*.pdf
2. Pictures
*.raw,*.wmp,*.tif,*.tiff,*.pict,*.cdr,*.bmp,*.gif,*.jpeg,*.jpg,*.ofx,*.pub,*.ps,*.psd,*.qxd,*.png, *.eps,*.dwg, *.dxf,*.ico,*.indd,*.iges,*.cr2,*.ai,*.3ds,*.pcx,*.sgv,*.wmf,*.met,*.pgm,*.ras,*.svm, *.xbm,*.emf,*.pbm,*.plt,*.sda,*.tga,*.xpm,*.pcd,*.pct,*.ppm,*.sgf
3. Music
*.wma,*.ses,*.ram,*.m4a,*.m4b,*.m4p,*.mid,*.midi,*.mp2,*.mp3,*.mso,*.ogg, *.cda,*.all,*.amr,*.ape,*.asf,*.aif,*.aiff,*.au,*.audiocd,*.dm,*.dss,*.dvf,*.wav
4. Videos
*.3g,*.3gp,*.3gpp,*.avi,*.divx,*.dv,*.f4v,*.flv,*.m2ts,*.m4v,*.mkv,*.mod, *.mov,*.mp4,*.mpe,*.mpeg,*.mpeg4,*.mpg,*.mts,*.nsv,*.ogm,*.ogv, *.qt,*.tod,*.ts,*.vob,*.wmv,*.rm,*.rmvb,*.ifo,*.asx,*.swf
5. Financial Files
*.mny,*.qbw,*.qel,*.qsd,*.qph,*.qbb,*.tax,*.t01,*.t02,*.t03, *.t04,*.t05,*.t06,*.t07,*.t08,*.t09,*.qdf,*.tax2009
6. eBooks
*.azw.?,*.mobi,*.epub
7. Other Files
Some other extensions like *.txt etc. Right Backup excludes extensions like *.edb, *.tmp, *.log, *.ini etc

To take backup of specific files, Click ‘Custom Backup’ link from the above screen and then select the desired files/folders for backup. After selecting the files, the program will begin analysis of files to be backed up and will show you the total size of data selected. Now click on ‘Start Backup’ button to begin the backup. Once the backup is finished, the program will notify you about the same.

What types of files are included in Smart (default) backup?
Types of files which are included in Smart Backup are:
1. Documents
*.odt,*.ott,*.oth,*.odm,*.sxw,*.stw,*.sxg,*.doc,*.dot,*.docx,*.docm,*.dotx,*.dotm,*.wpd,*.wps, *.rtf,,*.csv,*.sdw,*.sgl,*.vor,*.uot,*.uof,*.jtd,*.jtt,*.hwp,*.602,*.pdb,*.psw,*.xls,*.xlw,*.xlt, *.xlsx,*.xlsm,*.xltx,*.xltm,*.xlsb,*.wk1,*.wks,*.123,*.dif,*.sdc,*.dbf,*.slk,*.uos,*.pxl,*.wb2, *.ppt,*.pps,*.pot,*.pptx,*.pptm,*.potx,*.potm,*.sdd,*.sdp,*.uop,*.cgm,*.pdf
2. Pictures
*.raw,*.wmp,*.tif,*.tiff,*.pict,*.cdr,*.bmp,*.gif,*.jpeg,*.jpg,*.ofx,*.pub,*.ps,*.psd,*.qxd,*.png, *.eps,*.dwg, *.dxf,*.ico,*.indd,*.iges,*.cr2,*.ai,*.3ds,*.pcx,*.sgv,*.wmf,*.met,*.pgm,*.ras,*.svm, *.xbm,*.emf,*.pbm,*.plt,*.sda,*.tga,*.xpm,*.pcd,*.pct,*.ppm,*.sgf
3. Music
*.wma,*.ses,*.ram,*.m4a,*.m4b,*.m4p,*.mid,*.midi,*.mp2,*.mp3,*.mso,*.ogg, *.cda,*.all,*.amr,*.ape,*.asf,*.aif,*.aiff,*.au,*.audiocd,*.dm,*.dss,*.dvf,*.wav
4. Videos
*.3g,*.3gp,*.3gpp,*.avi,*.divx,*.dv,*.f4v,*.flv,*.m2ts,*.m4v,*.mkv,*.mod, *.mov,*.mp4,*.mpe,*.mpeg,*.mpeg4,*.mpg,*.mts,*.nsv,*.ogm,*.ogv, *.qt,*.tod,*.ts,*.vob,*.wmv,*.rm,*.rmvb,*.ifo,*.asx,*.swf
5. Financial Files
*.mny,*.qbw,*.qel,*.qsd,*.qph,*.qbb,*.tax,*.t01,*.t02,*.t03, *.t04,*.t05,*.t06,*.t07,*.t08,*.t09,*.qdf,*.tax2009
6. eBooks
*.azw.?,*.mobi,*.epub
Other Files
Some other extensions like *.txt etc. Right Backup excludes extensions like *.edb, *.tmp, *.log, *.ini etc
How to take backup of specific files?
To take backup of specific files, Click ‘Custom Backup’ link from the above screen and then select the desired files/folders for backup. After selecting the files, the program will begin analysis of files to be backed up and will show you the total size of data selected. Now click on ‘Start Backup’ button to begin the backup. Once the backup is finished, the program will notify you about the same.

How to get started with Right Backup?
You have to sign-up by creating an account before you can start backing up your data online.
To create an account, follow the steps below:
- Launch Right Backup program.
- When you start the program, you will see the “Sign up for your free backup service here” window.
- Enter your name in Full Name field.
- In the E-mail field, enter the email address with which you want to associate your Right Backup account.
- Provide the password of your choice in the Password field and click on the Continue button.
Your Right Backup account will be created and you will be signed-in automatically.
You can now start backing up your files. To do so, click on the “Start Backup Now” button on the main screen of the program.
The program will begin analyzing files to be backed up. Once the scan is complete, you will be presented with the File Types, Size, File Count and Urgency of the data. It will also show you the Total size of unprotected data which needs to be backed up.
Click ‘Start Backup’ to begin your first backup. Once the backup is finished, the program will notify you about the same.
If you need any help in purchasing or renewing your subscription, you can contact our support team at support@rightbackup.com
Where are my files stored and how secure is my data?
All backed up files are securely stored with AES-256 encryption on servers. Right Backup transfers your files securely with SSL encryption and your files are fully protected during and after the backup process.
If you need any help in purchasing or renewing your subscription, you can contact our support team at support@rightbackup.com
Which devices is Right Backup compatible with and can I use the same account for multiple devices?
Right Backup is compatible with Windows, Android and iOS devices.
Yes, you can back up your files from and restore to multiple devices using the same Right Backup account. There is no limit to the number of devices you can backup using the same account.
If you need any help in purchasing or renewing your subscription, you can contact our support team at support@rightbackup.com
How do I restore my files?
You can easily restore files using Right Backup. There are 3 types of restore options which you can choose from as per your needs, namely Smart Restore, Custom Restore and Search file.
By default, the Custom Restore option is selected; however, you can use Smart Restore to have all files back on your PC. Smart Restore categories uses the same extension list as available in Smart Backup while restore.
Steps to use Custom Restore:
- Launch Right Backup program and click on Restore tab.
- Select the device that contains the files you want to restore from the drop-down menu beside Source Selection (if there are multiple devices associated with your account).
- From the left panel, select the folders and files that you want to restore.
- To start restoring files, choose one of the following options:
Restore Now
Clicking the Restore Now button will restore the files to their original location. (You will have the option to specify if you want to replace the existing file or to save it with a new name).
Restore to
Clicking the Restore to button will ask you to choose a location to restore the files. Select the desired location and click OK to start restoring files.

Steps to use Smart Restore:
- Launch Right Backup program and click on Restore tab.
- Select the device that contains the files you want to restore from the drop-down menu beside Source Selection (if there are multiple devices associated with your account).
- Select the file type(s) that you want to restore.
- To start restoring files, choose one of the following options:
Restore Now
Clicking the Restore Now button will restore the files to their original location. (You will have the option to specify if you want to replace the existing file or to save it with a new name).
Restore to
Clicking the Restore to button will ask you to choose a location to restore the files. Select the desired location and click OK to start restoring files.

Steps to use Search File:
When you don’t know the location of the file you want to restore, you can use the Search File option to locate it.
To do so, follow the steps below:
- Launch Right Backup program and click on Restore tab.
- Select Search File option in Restore tab.
- Select the device that contains the files you want to restore from the drop-down menu beside Source Selection (if there are multiple devices associated with your account).
- Enter the File Name which you want to search and specify the date range when you took its backup.
- Click on the Search icon beside the date range.
- From the search results, check mark the file(s) you want to restore.
- To start restoring files, choose one of the following options:

Restore Now
Clicking the Restore Now button will restore the files to their original location. (You will have the option to specify if you want to replace the existing file or to save it with a new name).
Restore to
Clicking the Restore to button will ask you to choose a location to restore the files. Select the desired location and click OK to start restoring files.
How to uninstall Right Backup from my PC?
Windows 8:
To uninstall Right Backup, please follow the steps below:
-
Open the Control Panel. To do so, either:
Point the mouse at the upper or lower right corner of the screen and click on the Search icon.
Type Control Panel in the Search box and click on Control Panel option shown in left panel.
OR
Press the Windows + X keys together on your keyboard. A small menu will open. Here, click on the Control Panel option.
- In the Control Panel window, click on Programs > Uninstall a program option.
- On the next page, select Right Backup and click on Uninstall option.
- When prompted to confirm removal of the program, click Yes.
This will remove Right Backup from your system.
Windows 7 and Windows Vista:
To uninstall Right Backup, please follow the steps below:
- Click Start button on your taskbar and select Control Panel.
- Under Programs category, click on ''Uninstall a program'' option.
- In the new window that opens, select Right Backup and click the Uninstall option.
- If you are prompted to confirm the removal of the program, click Yes.
This will remove Right Backup from your PC
Windows XP:
To uninstall Right Backup, please follow the steps below:
- Click Start button on your taskbar and select Control Panel.
- Double-click the Add/Remove Programs icon. (On Windows 7 and Vista, double-click the Programs and Features icon.)
- If you are prompted to confirm the removal of the program, click Yes.
This will remove Right Backup from your PC
If you need any help in purchasing or renewing your subscription, you can contact our support team at support@rightbackup.com
How do I unsubscribe from your emails?
If you do not wish to receive any emails related to Right Backup, you can unsubscribe from our mailing list. To do so, please visit the link below:
https://www.rightbackup.com/unsubscribe
Please enter your registered email id in the Email field and click on Confirm button.
You will be unsubscribed from our mailing list and will no longer receive any correspondence from Right Backup team.
If you need any help in purchasing or renewing your subscription, you can contact our support team at support@rightbackup.com