Photo Organizer
 Maintain all photos
in one location. Remove duplicates
and save disk space. Makes Photos easy
to find & access.
Photo-Organizer – User Guide
Get all the information you need to understand this photo organizer tool
To import photos for the first time, follow the steps below :
- Launch Photo Organizer application.
-
Here, choose from either of the two options:
- System Scan (to scan complete system for photos).
- Folder Scan (to scan specific folder for photos).
If you choose to scan a Folder, you will get two options:
- Add Folder (to scan a complete folder).
- Add Photos (to scan specific photos).

- Click Next to go ahead.
-
By default, organized photos are saved into Windows Pictures folder.

- Click Next to continue.
-
Now, choose either of the options:
- Move photos to organized folder
- Copy photos to organized folder
-

- And click Next.
-
On the new screen you can either add folder or file extension that you wish to exclude from scanning.
Note: By default, the Minimum File Size included in scan is 20 KB.

-
To go ahead click Next to start importing photos.

-
Click Next to continue and start importing photos.

-
Once all photos are imported click Finish.
This will help you import and organized all the selected photos.
Note: Once the photos are organized you can use Import Photos option present in the left pane to re-import photos and start organizing them using Photo Organizer.

To export photos please follow the steps mentioned below :
-
Launch Photo Organizer application.

-
Next to export photos, click on the pop out icon .

-
In the new window that open, browse to the location and select the folder, where you want to export the photos.

-
Once the folder is selected the application will start exporting photos.

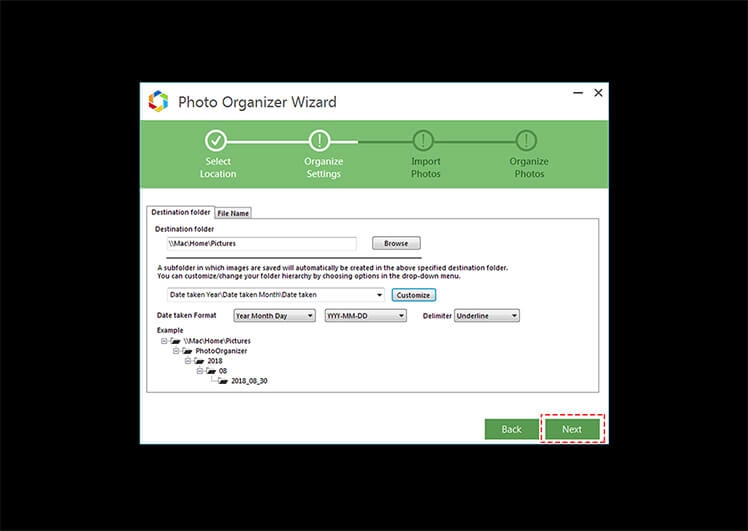
To create custom sub folder, follow the steps below :
- Launch Photo Organizer application.
-
Next, click Import Photos option present in the left panel.

-
In the window that open, click on Customize under Destination folder to change sub folder hierarchy.

-
Next, select the parameters in which you would want the sub folder to look.
Note: If you wish to create multiple folders a time, click on the tabs named Customer folder 1 and so on.

-
Next, click OK to continue.
You’re all done you will not be able to create sub folder with specified parameters.
To change organized photos location, follow the steps below :
- Launch Photo Organizer application.
-
Next, click Import Photos option > choose the scanning option and click Next.

-
Now under Destination folder, click on Browse to change the default folder where organized photos are stored.

-
And click Next to proceed.
You’re all set organized photos will now be saved at the changed location.
To remove duplicate images, follow the steps below :
- Launch Photo Organizer application.
-
Click on Import Photos > select scanning option > click next > and proceed until you reach the screen where you see option to move photos or to copy.

-
Here, beneath these options you can see a check box next to “Delete Duplicate Photos from source folders,” check mark the box.

-
And click Next to proceed.

You’ll be able to delete duplicate photos.
To exclude a folder from scanning follow the steps below :
- Launch Photo Organizer application.
-
Next, click on the Gear icon present at the top right corner > Settings.

-
Here, from the left pane click on Exclude.

-
Next click on Add Folder.
-
In the new window that open browse to the folder location that you wish to exclude.

-
Click OK.
This way you will be able to exclude a specific folder from being scanned.
To import photos for the first time, follow the steps below :
-
Last Import shows, all photos imported previously before recent photos are imported.

To change thumbnail view, follow the steps below :
- Launch Photo Organizer application.
-
Click on the four-square icon present at the top right corner, to open context menu.

-
From here select the view in which you would want to see the organized photos.

You’re all done, you can now see thumbnails the way you want.
To create a new album, follow the steps below:
- Launch Photo Organizer application.
-
From the left pane click ‘+’ next to Albums.

-
In new window that open name the album and click OK.

-
Next, select the photos you want to add to the album and click on Add Photos button beneath Moments.

You’re all done.
Photo Organizer is compatible with Windows XP, Vista and higher version of Windows.


To revert all organized photos to their original location, follow the steps below :
- Launch Photo Organizer application.
-
Click on the gear icon > Revert Options.

-
Here, select the destination folder and click on Revert to restore files to their original location.

To add photos to existing album, follow the steps below :
- Launch Photo Organizer application.
-
Next click on ‘+’ next to Albums.

- Here click on the drop-down arrow and select the album to which you would want to add images to.
-
Click on OK.

-
Next, select the photos you want to add to the album and click on Add Photos button beneath Moments.
This will add selected images to the album.
To organize photos based on Exif Info follow the steps below :
-
Launch the application > Import Photos > Next> here click on the drop-down arrow, to change folder hierarchy.
Note: By default, photos are organized by Year, Month and Date.

To create customized organized folder based on exif info follow the steps below :
-
Launch the application > click on Import Photos > Next > now click on Customize button to create Custom folder based on Exif info of your choice.


To rename photos with customized pattern based on exif info follow the steps below :
-
Launch the application > click on Import Photos > Next > click on File Name tab. From here, you can either chose from the options provided or can Customize the filename.


To browse photos of a specific date, follow the steps below :
- Click on the calendar icon present at the top right corner.
-
Next select the date from which you want to look for photos.


To mark a picture as favorite follow the steps below :
- Hover the move over an image.
-
Next, click on the ‘Heart’ icon present at the left corner of the image.


This way you can add your images to Favorites folder.
To delete or rename the Album follow the steps below :
- Double click on Albums option present in the left pane to unhide all the created albums.
- Next right click on the album that you wish to rename or delete.
-
From the context menu, select the option, Delete or Rename as per your wish.

To browse photos of organized folder, follow the steps below :
-
Launch the application > from the left pane double click on Organized Folders to unhide all the folders under which photos are organized by the program.

To open organized photo location, follow the steps below :
-
Launch the application > right click on any of the photo > Properties. Here, click on General tab > location.

You’ll be able to see location of organized photos.
To reset Organize settings follow the steps below :
-
Click the Gear icon present at the top right corner > click on Settings.

-
Here, click on "Reset Organize Settings".

-
You’ll receive a confirmation box, click OK to continue.

This will reset Organize settings to default.
-
Moments View displays how photos are categorized and organized in the application.


To remove the picture from the album, follow the steps below :
-
Select the Album, from which you want to delete the image.

- Next, select and right click the picture.
-
From the context menu select "Remove from Album."

This will remove the selected image from album.
To delete the picture from the album, follow the steps below :
- Select the Album, from which you want to delete the image.
-
Next, select and right click the picture.

-
From the context menu select "Delete"

This will delete the selected image from album as well as from organized photos