When trying to play games via Steam, are you unable to hear any sound? You are not alone; many users have reported problems. Some started facing the issue after updating Windows, while others said the problem occurred after installing Steam. However, there’s a catch the sound works well with non-gaming apps like VLC, Spotify, etc. but not with Steam games.
Fortunately, there’s a fix for the problem, and this post explains different ways to resolve Steam games; there is no sound problem.
Reasons For No Sound Issues with Steam
- Suppose you are using Windows 10 version latest than build 1803. In that case, there’s a possibility that 3rd-party sound managers like Sonic Studio II, MSI Audio, and others are interfering with the in-built sound manager.
- Two different Windows user accounts are logged in simultaneously.
- Some files are missing from the game folder, or the game cache folder is corrupt.
- Outdated or corrupt Realtek HD Audio driver. The best way to update the audio driver and fix the issue is to use Advanced Driver Updater. This driver updating tool quickly identifies outdated drivers and shows compatible updates. To learn more about it, Click Here.

How to Download and Update Realtek HD Audio Manager
So, these are the common reasons for sound not working with Steam games. Remember, since there are multiple reasons for the issue, not every fix will work for you. Therefore, go through each method to troubleshoot the problem & find a workable fix.
Note: While finding the solution for the problem, we found that the issue is not hardware-related. Usually, it is related to a problem with the general Audio drivers.
How To Fix No Sound In Games- Windows 10
Method 1 – Select the Suitable Sound Devices
Step 1: Press the Windows key + R to open the Run window.
Step 2: Type mmsys.cpl and press Enter key.

Step 3: Click the Playback tab > ensure the correct audio device is selected.
Step 4: Click the Recording tab to check if the correct device is selected.

After confirming that the correct device is selected, check if the problem is fixed. If not, move to the next fix.
Method 2: Log Out Other Users
You face the sound issue when two different users are simultaneously logged in. To fix the problem and avoid confusion that might make the Steam client redirect the sound to the wrong user, follow these steps:
- Click the Start menu > user icon > sign out.
- Log in with the username you want to use to play the Steam game.
- Now try and check if the audio issue is fixed.
Note: Merely switching the user will not fix the problem. To resolve it, you must log out from the current user and log in with the other user.
Method 3: Check Privacy Settings of the Microphone
After updating Windows, try changing the Microphone settings if you encounter the sound not working issue.
For Windows 10
Step 1: Type microphone privacy settings in the Windows Start search menu and click Open.

Step 2: Click the Change button under the Allow access to the microphone on this device section.

Step 3: Toggle the slider to the right to enable it.

Exit the Settings app and play Steam games. The problem should be fixed.
For Windows 11
- Like Windows 10, in Windows 11, look for Microphone Privacy settings.

- Ensure Microphone access and Let apps access your microphone are enabled.

Now, check the list of apps; the mic should be enabled for Steam.
Method 4: Use a Generic Windows Audio Driver
For some users switching back to the Generic Windows Audio Driver and updating drivers has worked.
Step 1: Right-click the Windows Start menu > select Device Manager.
Step 2: Go to the Sound, video, and game controllers section and double click on it to unhide view attached devices.
Step 3: Right-click on the connected audio device > Update driver.

Step 4: Select Browse my computer for drivers.

Step 5: Next, click ” Let me pick from a list of available drivers on my computer.”

Step 6: Check the box next to the Show compatible hardware option in the window.

Step 7: Choose Generic software device or High Definition Audio Device from the list > click Next.
Step 8: Restart the PC and run Steam to check whether the sound issues with Steam games are fixed. If not, try updating the driver.
The best way to update drivers and keep them updated without any problem is to use a third-party driver updater – Advanced Driver Updater. The tool helps detect outdated drivers and update them without any hassle. Also, it allows scheduling driver scanning and helps keep them updated.
To use it, follow the instructions below:
- Download and install Advanced Driver Updater.
- Launch the tool and click Start Scan Now to scan the PC for outdated sound and other drivers.

- Update the sound driver by clicking Update driver next to it.

- If you are a registered user, you can take advantage of the Update All button and update all outdated drivers. This will help update all missing, corrupt, and problematic drivers in a go.

- Restart the PC to apply changes and then run Steam games; you should not face any problems.
Method 5: Uninstall The Conflicting Programs
Suppose third-party sound managers like Asus Sonic Studio 3, Alienware Sound Center, Sonic Radar 3, or MSI Audio programs are running. There is a possibility that you face problems with Steam games. Therefore, to resolve the issue, uninstall conflicting programs.
Step 1: Press Windows + R to open the Run window.
Step 2: Type appwiz.cpl in the Run window and press Enter key.
Step 3: Select the third-party programs with which the suspect might be creating problems and click Uninstall Uninstall > confirm the action when prompted.
Once the uninstallation is done, reboot the computer. Now check if the sound problem is fixed or not.
Method 6: Set Steam to Run as Administrator
You might face an audio problem if the Steam app runs without admin privileges. Therefore, run the game app as the administrator:
Step 1: Right-click the Steam app shortcut.
Step 2: Select Run as administrator.
This will run the Steam app as administrator and check if you can hear the sound. If this does not help, make the Steam app run permanently as an administrator.
Step 1: In the Windows search bar, type Steam > right the best search result > select Open file location.
Step 2: Now > right-click on Steam > select Properties.

Step 3: Click the Shortcut tab. Make sure the Run Normal window is selected and click Open File Location.

Step 4: This will open the location of the Steam.exe.
Step 5: Right-click on it and select Properties.

Step 6: Click the Compatibility tab > select Run this program as an administrator in the Setting section.

Step 7: Click Apply > Ok.
This will run the Steam app as admin. You should now not face sound issues.
Method 7: Using the Steam App Run the Game as an Administrator
If the above steps did not help and you still face Steam games with no sound issue when playing a specific game, set that game to run as administrator.
Step 1: Launch the Steam app > click on the Games options > select View Games Library.

Step 2: Right-click on the game that makes you face the no sound problem > select Properties.

Step 3: Click on Local Files.

Step 4: Click on Browse.

Step 5: Right-click on the game file (.exe) > Properties > Compatibility tab > select Run this program as an administrator > Apply > Ok.

Method 8: Verify the Integrity of Game Cache
Still, if nothing has helped, the game cache or some files are corrupt. To fix this, verify the integrity of the game cache.
Step 1: Run Steam app > click LIBRARY tab > Home.

Step 2: Right-click on the game, giving trouble > Properties.

Step 3: Click on Local Files.
Step 4: Click on Verify integrity of tool files and wait for the app to finish the process.

When you get “All files successfully validated, “ click on Close & go back to the app.
Play the game; everything should be fine.
Method 9: Roll back Windows Update
Sometimes, the latest Windows update can also cause no sound issues. Therefore revert to the Windows update where everything was working fine.
Step 1: Press the Win + I to open Windows Settings app.
Step 2: Click on Update & Security.

Step 3: Next, click on the View update history.
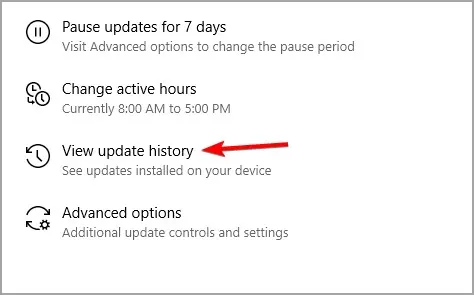
Step 4: Click on Recovery options in the View update history window.

Step 5: You will be re-directed to the Recovery page. Click the Get started button.

To roll back the Windows Update,> follow on-screen instructions. You will now get the previous version restored.

Close Settings app and check whether the issue is fixed or not.
*Note – The Get started button can only be used within 10 days of updating Windows. If it is more than that, you will need to uninstall updates.
Method 10: Uninstall Windows Updates
Step 1: Open Windows Settings. Right-click Start menu > select Settings.
Step 2: Click Update & Security option > View update history option > Uninstall updates.
Step 3: Select the latest update > click Uninstall.

Windows will auto restore to the previous version.
Step 4: Reboot PC to apply changes.
Method 11: Reset this PC
If neither restoring to the previous version nor uninstalling the Windows update worked for you, try resetting your PC.
Note: This method will uninstall the Steam app and other games. However, if you want, you can retain personal files.
Step 1: Press the Win + I to open the Settings window.
Step 2: Click on the Update & Security > Recovery option.
Step 3: Click on Get started under Reset this PC.

Step 4: Next, select from either of the options Keep my files or Remove everything and follow on-screen instructions to reset the PC.
*Note – The first option will keep personal files secure and remove the apps and settings. The second option will delete everything.
Reinstall the PC and run Steam games; the no sound problem should no longer be there.
How to Fix Steam Black Screen not Loading In 2022 (Try these fixes)
Wrap Up
Following the above mentioned methods, you can quickly fix the no sound in games problem on Windows 11 and 10. Until you find the right fix, you cannot skip any method because you don’t know which one will work for you. Please let us know which method works best for you in the comments section. Also, if you tried any other way that worked, please share the same with us.
Recommended-
How to Download Realtek Ethernet Controller Driver
How to Update Realtek Wi-Fi Driver in Windows PC
How to Download and Update Realtek Audio Console