Advanced Disk Recovery
 Recover all Types
of Data 100% Safe &
Hassle-Free Supports External
Devices

Advanced Disk Recovery - User Guide
Successfully Recover Deleted Data With Advanced Disk Recovery!
Introduction
Many users lose important data and don’t know how to recover it, unaware that the data is still on the hard disk; not visible, but present and recoverable using the latest and most powerful Advanced Disk Recovery utilities.
Advanced Disk Recovery is a software application made to effectively recover data that has been accidentally deleted. It retrieves lost files and folders swiftly and stores them in the user-defined location from which you can restore them back to the system.
The process of recovering deleted files has been divided into 5 major steps under the “Scan” tab:
-
Welcome
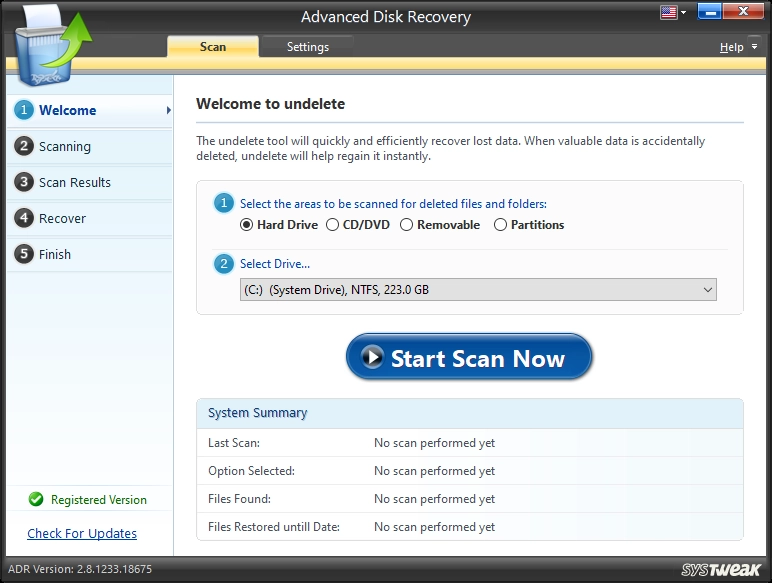
The main or Welcome screen of Advanced Disk Recovery lets you choose the areas and drives from which the deleted files and folders can be recovered. Selection of the locations to perform scans has been further divided in two steps.
In the first step, select the area to be scanned. In the second step choose an available option from the drop-down menu for the area selected in the first step.
The system has been divided in four areas.
- Hard Drive –this option and choose a drive from the drop-down menu. Advanced Disk Recovery will scan thoroughly through the selected drive for deleted files and folders and help in recovering them..
- CD/DVD –Select this option and choose a CD/DVD drive from the drop-down menu to retrieve lost data from the selected drive.
- Removable Select this option and choose a Removable drive from the drop-down menu to recover deleted files and folders.
- Partitions –Select this option and choose a Partition from the drop-down menu to run a comprehensive scan on it.
Once you have finished selecting as an area for scanning, you may click on the “Start Scan Now” button and initiate the process. But before performing an analysis of the selected drive/partition, Advanced Disk Recovery will prompt the user to choose a Scan Type.
After selecting the location from which you wish to Advanced Disk Recovery files and folders, you may click on the “Start Scan Now” button to initiate a thorough analysis.
Select Scan Type
Advanced Disk Recovery gives you a choice between two scan types Quick Scan and Deep Scan.

Quick Scan –information of the deleted files and folders from the Master File Table (MFT) and helps to retrieve them. It is quicker method of scanning.
Deep Scan –Performs a detailed sector-wise scanning to identify deleted files on the basis of signatures.
The default way of scanning is the Quick Scan and the recommended scan type is the Deep Scan. You may choose either of the two and click on “Scan Now” button.
You may revert to the default scan type by clicking on “Default” button. The “Settings” tab also allows you to configure scan settings as per your choice and need.
-
Scanning
The second step shows the progress of the scan. Advanced Disk Recovery analyzes the selected drive/partition and also judges the condition of each deleted file whether it is in a recoverable or unrecoverable state. To cancel the scan operation, you may click on the “Cancel” button any time during the process. Once stopped, Advanced Disk Recovery will ask the user to save the scan results of the current incomplete session.
If the results are saved, you may continue with the same session. An option “Last Session” will populate in the Welcome screen under the heading “Select the areas to be scanned for deleted files and folders” for this purpose. You may select this option and complete the scan operation of that particular session.
-
Scan Results
The results of the scan are displayed in a table format once the scan is through. Check the items from the list which you wish to recover and click on the “Recover” button. Before recovering any file or folder, click on “Preview” button to preview the contents. You may click on the “Filter Options” button to filter and refine the results as per your requirements. To close this window, click on the “Cancel” button.
Table of Scan Results (explanation):

All the items of the selected drives are listed in the table under 8 columns : File Name, Extension, Location, Size, Last Modified, Attribute, State and Comment. The items listed can be sorted out by clicking on the column headings.
Against each item in the table, a check box is placed. You will also see a small arrow button against many items. When you click on the “White Arrow” button, it turns to a “Black Arrow” button and shows the extended folder tree. The folder tree can be further extended following the same procedure of the arrow buttons.
The items which are marked red are the deleted files and folders. You may check these items and click on the “Recover” button to retrieve them.
You can view this table of contents in the full view mode by clicking on the “Full Screen” in the lower right corner.
Context Menu Options

When you right-click on any item in the table, a context menu appears showing five options.
Click on “Preview” to preview the selected deleted file/folder. Click on “Recover” to restore data back to system. To select all items, click on “Select All” or click on “Deselect All” to deselect all items in the list. An “Invert” option is given which will helps to revert the selection Using the items which are checked will be unchecked and vice versa.
Note: ((Please see the detailed explanation under the “Settings” tab))
-
Recover
The selected files and folders for recovery are stored in the user specified location on the system. For this, you may browse through your system and select location. You may also “Create New Folder” for restoring the files and folders.
Note: Files and folders to be restored should not be restored in their original locations because this may make them unrecoverable and defeat the purpose of retrieval.
Whenever you will restore the selected files and folders to their original locations, Advanced Disk Recovery will prompt you and ask if you want to continue the process of recovery. You may click on “Yes” button to continue and click on “No” button to chose an alternative location.
Recovering Deleted File(s) and Folder(s)
In this step, Advanced Disk Recovery will recover the selected files to a user defined location. The recovery progress can be easily seen from the progress bar. Advanced Disk Recovery also maintains the original hierarchical structure of file(s) and folder(s) during the recovery process.
-
Finish
Once the recovery process is completed, a summary of the recovery process is displayed. The summary shows the total number of files scanned, total number of deleted files found, number of files selected for recovery, number of files recovered and total number of files remaining to be recovered.
You may return to the Welcome screen to restart the Advanced Disk Recovery process for any other drive on the system by clicking on “Finish” button.
3. Settings
Under the Settings tab, in the left panel you will see two options, “Scan Options” and “Filter Options" in the left panel.
-
Scan Options
You may configure scan settings under this section. Scan options are divided into segments:
-
General
There are a few important choices given under this segment.
- Check file header for extensions -Files can be identified with their header information. Files with wrong extensions can also be identified using the file header information. If you check this option, Advanced Disk Recovery will examine each file closely and check the file header information for correct file extensions and conduct a more logical search. The other two choices are grayed out unless this option is checked.
- Check all files both deleted and existing -If you check this option, all deleted and existing (not yet deleted) files will be included in the search. (This option is grayed out unless the first option is checked)
- Add correct extension if necessary –You may check this option to rectify the wrong file extensions on the basis of file header information. Correct extensions will be added to the files with wrong extensions and then included in the search. (This option is grayed out unless the first option is checked)
- Show Scan Types before scan starts - You may check this option to allow Advanced Disk Recovery tool to show the Scan Types (Quick Scan and Deep Scan) prior to the scan operation. You may choose the scan type of your choice and proceed further.
-
Scan Types
You may choose the type of scan you wish to scan the selected areas for deleted files and folders.
- Quick Scan -Each file on the system is a part of MFT (Master File Table). MFT contains all the information for all files, with their respective characteristics and attributes. When a file is deleted, it still can be traced from MFT and can be retrieved. Quick Scan helps to identify deleted files and folders from MFT. This is a faster but a less comprehensive scan type.
- Deep Scan (Recommended) -Deep Scan helps to carry out a sector-wise scanning of the hard disk in which the deleted files and folders are searched on the basis of the unique signatures they carry. This is a slower but a more comprehensive scan type.
To apply the changes done in the scan settings, click on the “Save Settings” button.

-
Filter Options
You may filter and refine the search results using various filter options which are divided in two broad sections and subdivided further.
General Filter Options
- Show Only Deleted Files –this option to show only the deleted files and folders in the scan results.
- Show Empty Files –Check this option to show empty files and folders in the scan results.
- File Name Wildcard You may type text/characters in this box and accordingly filter search results.-
Advanced Filter Options
- Time filter –You may filter search results based on date and time. Set a date under the “Date/Time” section and use filters (less than, less than equal to, equal to, greater than and greater than equal to) to get the desired results.
- Size filter -You may filter the search based on file size. Set a figure in “Size” section and use filters (less than, less than /equal to, equal to, greater than and greater than/ equal to) to get the desired results.
- File Health filter -You may filter the search results on the basis of the current recoverable status of the files. There are 6 options under this filter section : Unrecoverable (files which cannot be recovered), Bad (partially recoverable), Poor (cannot be recovered at all), Good (recoverable), Excellent (fully recoverable) and Existing (files which have not been deleted). You may check one or multiple options for customizing search.
- Attribute filter -The search can be filtered based on the file attributes. There are 6 attributes given under this filter section namely Archive, Read Only, Hidden, System, Compressed and Encrypted. You may check one or multiple options for customizing search.
The changes done in Settings should be saved by clicking on the “Save Settings” button in the lower right corner.
4. Frequently Asked Questions
How can files be recovered?
When a file is deleted from the system, the space on the hard disk where the file was present is freed, but the content of the file remains intact. The space which is freed can be reused for new files and folders overwriting the old data. But this does not happen immediately. Therefore, there are chances of recovery.
Some recovery tools are technically advanced to retrieve the data from the worst of the conditions.