
Did your favorite Snipping tool fail to work or launch on Windows 11,10 or 7? No worries, there are different fixes to get the Microsoft Snipping tool working again.
Windows Snipping Tool is known for its lightweight, screen-capturing capabilities and clutter-free interface. However, the flaws and glitches make it less favorable to use. If you are encountering any issues, there is no need to get infuriated. We will explain how to fix Windows 10 snipping not working.
Reasons for Snip and Sketch Not Working
- Faulty or problematic graphics driver interferes with the working of the Snipping tool. The best way to update the driver is to use a driver updating tool like Advanced Driver Updater.

- Third-party apps conflict makes Snip and Sketch non-functional.
- The installation file gets corrupted after upgrading to Windows 11.
- Snipping tools running with a certificate which was expired on 31-10-20121 and caused Snipping Tool to stop working.
Must Read: How To Take A Partial Screenshot
How To Fix Snipping Tool Not Working on Windows 11, 10, and 7?

Below are some proven ways to fix the “Snipping tool not working” or Snip and Sketch not working error on Windows. Follow these steps individually to find the right fix for your PC.
Fix 1. Reset or Repair the Snipping Tool – Windows 11
Once in a while, a bug or misconfigured files can cause programs or system files to malfunction. However, it can be easily fixed by repairing the application. Follow these steps to learn how to do that.
- In the Windows Search field, type Snipping Tool.
- Right-click Snipping Tool app > App settings.

- Scroll down and click the Reset option

- You will be asked to confirm the action click Reset.

- Now try to run the Snipping Tool app. Remember, resetting will make you lose all your app data.
Must Read: How to Take Screenshot on Netflix on Different Devices (2022)
Fix 2. Update Windows and Microsoft Store App
You might face issues with the Snipping tool if you run an outdated version of Windows and Microsoft apps. Here’s how to update the PC and slow the Snipping tool issue.
- Press Windows + I to open Windows Settings.
- Click Windows Update > Check for updates.
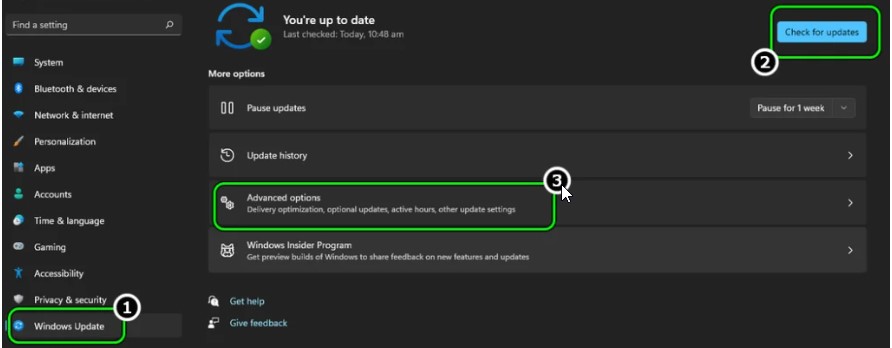
- Suppose updates are available; download and install them. Reboot the PC to save changes.
- Afte this again go to Windows Update option > click Additional Options > Optional Updates.

- Install them and restart the PC.
- Now, in the Windows search, type Microsoft Store.

- Click the Library tab > click the Get updates button.

- Install the updates. You will not find the app with the Snipping tool name on Microsoft Store. Instead, you will find Snip and Sketch. Update it and restart the PC.

- The app should now be working fine.
Fix 3. Update the Graphics Driver of the System to the Latest Build
If the graphics driver is outdated, then the possibility is that you will face an issue with Snipping Tool. Therefore, to fix the problem, we suggest updating the graphics driver. The easiest way to update drivers is to use a driver updating tool. Below we will explain how using Advanced Driver Updater, you can update the driver and fix the Snipping Tool not-working issue.
- Download and install Advanced Driver Updater.
- Launch the tool and click Start Scan Now.

- Now update the graphics driver by clicking Update driver next to it. However, if you want to update all outdated drivers, you can use the Update All button.

- But remember, if you are not a registered user, you will not be able to use it. To use it, you need to upgrade to the full version of Advanced Driver Updater, which comes with a 60-day money-back guarantee.

- Restart the PC and try to run the Snipping tool.
Fix 4. Disable Focus Assist
To help focus and increase productivity, Focus Assist filters out unwanted notifications. Sometimes this also causes problems with the Snipping Tool and prevents it from launching. To fix it, turn off Focus Assist.
- Go to Windows Settings. Press Windows + I > Systems > Focus assist.

- Select the Priority only option and click on the Customize priority list.
- Click on Add an app > look for the Snipping Tool and exit the window.

- Now try launching the app. It should work.
Must Read: How To Take Full Webpage Screenshots In Chrome
Fix 5. Disable Auto Copy Feature
- In the Windows search field, type Snipping Tool. (avoid opening it from the Shortcut.)
- Click the three dots > select Settings.

- Disable Auto copy to clipboard using the slider.

- Re-launch the Snipping tool. This should help. If not, launch the Snipping tool and add a delay of 3 seconds while taking a snip.
Fix 6. Perform a Clean Boot
Sometimes third-party apps and antivirus software interfere with the working of the Snipping tool. To ensure that is not the case, perform a clean boot.
- Press Win + R to open the Run dialog box > type msconfig and click Ok.
- Click the Services
- Check the Hide all Microsoft services box and click Disable all button to stop all other applications from running.
- After disabling third-party services, click the Startup tab > Open Task Manager.
- Right-click unknown third-party programs one at a time > Disable
- Restart the PC and try to run the Snipping tool.
Fix 7. Use Previous Version of Snipping Tool
- Press Windows + E to open File Explorer.
- Double click System drive partition (usually it is C:\).
- Next, double click old folder to open it > double click system32 folder.
- Look for exe. Double-click on it. This will launch the older version of Snipping Tool.
- Hope you don’t face issues when using it.
Fix 8. Use Regedit
- In the Windows search field, type Regedit and select the best search results.
- Go to HKEY_LOCAL_MACHINE & follow the path SOFTWARE > Policies > Microsoft.
- Locate the TabletPC If you cannot find it, right-click on Microsoft, select New > Key, and name it TabletPC.
- Right-click on the new TabletPC key > New > DWORD (32-bit) Value. Rename it to
- Double-click on DisableSnippingTool set the Value data to 0, and select the Hexadecimal
- Exit Registry Editor and try to run the Snipping tool. It should work.
Fix Snipping Tool not Working
When you want to take screenshots, the Snipping tool comes in handy. However, if it doesn’t work, try the above fixes. If this doesn’t help, download Snip and Sketch from the Microsoft Store. Also, you can give the TweakShot Screen Capture tool a try. Like Snipping Tool, this app also helps take screenshots and edit them. If you want, you can download the trial version by clicking the button below.
Get TweakShot From Here
Recommended-
How To Capture Youtube Video Screen on Windows PC
How To Recover Deleted Screenshots on Windows?


