
Intel Wireless AC 9560 adapter is a CRF-supporting integrated 802.11 AC solution. Therefore, connectivity issues and Code: 10 or 45 errors are encountered when this Wi-Fi connector runs with an outdated driver.
Problem – My laptop’s WiFi driver is giving an issue. It gives Code 10 in the device manager. Resetting the network adapter did help but that was only temporary. Can anyone help me find a permanent solution?

Solution – No one fix will help resolve the issue. Updating drivers works for some, power management works for some, and other fixes work for others. Therefore, we enlist all the workable fixes to help eliminate the issue. You can try them individually and see which works best for you.
The problem usually signifies an error with the Wi-Fi drive or the adapter. In addition to this, sometimes, when the WLAN AutoConfig service is not running, you might face an error. Below are the workable fixes to troubleshoot the Intel Wireless AC 9560 Code 10 error. Let us check out all methods and find the best solution for you.
If you are short on time, first try restarting your PC. However, if this doesn’t work, you should try updating the Network Adapter driver. The easiest way to update a driver is to use a driver updating software like Advanced Driver Updater.
Get Advanced Driver Updater

Why is Intel Wireless AC 9560 Not Working?
There are several reasons why the Intel Wireless AC 9560 keeps disconnecting. Below, we explain the common ones:
- Issues with the Internet connection.
- WLAN AutoConfig service is not running.
- Missing or faulty wireless driver.
- Misconfigured BIOS or UEFI setting.
- Hardware issue with Intel Wireless AC 9560 adapter.
- Faulty Windows update or corrupt temporary files.
- Power management settings.
- Network congestion.
How To Fix Intel Wireless AC 9560 Cannot Start?
Below, we explain the advanced fixes that will help fix the Intel Wireless AC 9560 that is not working issue.
Note : As the Wi-Fi is not working to connect to the internet, you might have to use an ethernet cable.
Advanced Fixes
Fix 1. Power Cycle Computer
When you face any issues, including the Intel Wireless 9560 keeps disconnecting, the first thing you should try is to power cycle your PC. This allows hardware components, including the Intel Wireless adapter, to reboot and start afresh. Generally, this resolves most minor issues.
To perform a power cycle, follow these steps:
- Shut down the PC and disconnect all connected peripherals.
- Unplug it from the power supply. If you use a laptop with a removable battery, detach it too.
- Restart the PC after 20-30 seconds & connect all devices. To drain all charges, laptop users must press and hold the power button for 20 seconds.
- After this, attach the battery > connect the peripherals, and try using the Wi-Fi.
It should be working correctly. If not, move to the next step.
Must Read: USB Wi-Fi Adapter Not Working – How to Fix The Issue?
Fix 2: Ensure Wi-Fi is Enabled
Certain laptops have a hardware switch or a key combination to enable/ disable Wi-Fi. Therefore, ensure Wi-Fi is turned on before moving on to other fixes.
Refer to the screenshot below for assistance.
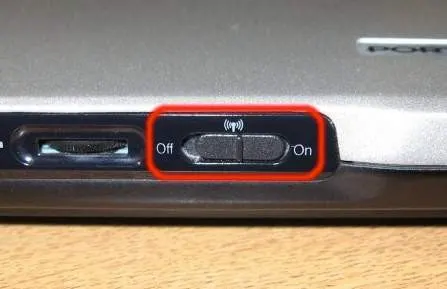

If this doesn’t help, or you cannot find the Wi-Fi key, move to the next fix.
Fix 3: Re-enable the AC-9560 adapter.
Sometimes, due to a glitch in Windows, you can face an Intel Wireless AC 9650 cannot start issue. To fix it, try disabling and re-enabling the device.
- Press Windows + X on your keyboard and select Device Manager.
- Double-click Network adapters to expand the category. After that, right-click Intel(R) Wireless-AC 9560 > select Disable device. If you cannot find the AC-9560 adapter, try using Advanced Driver Updater to find the missing drivers.

- Restart your computer and re-enable the AC-9560 adapter using the above steps.
Fix 4: Update the Intel AC-9560 Driver
When devices are not detected or stopped working, outdated drivers are behind them. One of the most effective ways to fix this is to update the driver. But be advised to update drivers manually, through Device Manager, or from the Intel driver download page (in this case).
You need technical knowledge, time, and patience. However, using a driver updating tool like Advanced Driver Updater, you can bypass all these requirements. The tool will detect outdated drivers and automatically download and install the updates. To use Advanced Drive Updater for Intel Wireless AC-9650 driver update, follow these steps:
- Download and install Advanced Driver Updater.
- Launch the driver updating the program and click Start Scan now. Advanced Driver Updater will scan the PC for outdated drivers without asking to provide any information.

- After scanning, examine the results and click Update All to download and install the correct version of the problematic and faulty driver automatically.

- (You need the registered version to update all outdated drivers. If you don’t have it, you’ll be asked to upgrade to the full version. No worries. You can still update the driver if you don’t want to purchase the product. All you need to do is click Update driver next to the Wi-Fi driver you wish to update.)

The registered version of Advanced Driver Updater gives you access to a larger database of drivers. It comes with priority technical support and even offers a 60-day money-back guarantee.
- After updating the driver, restart the PC to apply changes.
Fix 5: Enable the WLAN AutoConfig Service
The Windows WLAN AutoConfig service is responsible for how Wi-Fi works. When the service is disabled, Wi-Fi stops working. Therefore, to fix issues with Intel Wireless AC-9560, you must ensure it is set to running automatically.
- Press Windows + R keys to open the Run
- Type msc > click OK.
- In the Services window, locate WLAN AutoConfig. Right-click> select Properties.

- Here, the Startup type should be set to Automatic. And the Service status should be Running.

- If it isn’t, make it Automatic,> click Apply > Ok.
- Restart the PC to use Intel Wireless AC-9650 and connect to the internet.
Must Read: Here’s How To Fix Wi-Fi Network Not Showing Up
Fix 6 – Check Power Management Settings
To save power, the Wi-Fi driver settings include an option to disable it during sleep. Windows sometimes fail to turn it on when required. This is why you encounter Intel Wireless AC 9560 code 10 issue. To fix it, disable the setting.
- Right-click the Start menu and select Device Manager.
- Double-click Network adapters.
- Right-click on Intel Wireless AC 9560 > select Properties.
- Click the Power Management tab.
- Uncheck “Allow the computer to turn off this device to save power” > click Ok.

Now, try to connect. You should not face any problems connecting with Intel Wireless AC 9560.
Fix 7 – Reset Network Components
When you face a wireless AC 9560 cannot start issue, try refreshing the network settings.
Here are the steps:
- Open the elevated Command Prompt. (Run as administrator)
- Enter the following commands in the Command Prompt window:
- ipconfig/flushdns
- ipconfig /release
- ipconfig /renew
- netsh winsock reset
- netsh int ip reset
- Wait for the operation to finish.
- Restart the PC and then try to connect to the internet. This should certainly help.
Fix 8 – Update Windows
If nothing has worked so far, try updating Windows, as most users encountered Error code 10 after Microsoft released a feature update for Windows 10. To update Windows, connect the internet via an ethernet cable. Once connected, follow these steps to install pending updates.
1. Press Windows + I to access Windows settings.
2. Click Windows Update from the left pane.

3. On the next screen, you will get the Download & Install button if there are any updates. However, if you see Check for updates, click on it to check for available updates and install them.
4. Wait for updates to install and restart the PC to apply changes.
5. Now, try connecting to Wi-Fi. You should no longer face the Wireless AC 9560 code 10 error.
Fix 9 – Set Power Saving Mode to Maximum Performance
When power settings interrupt the power supply to the network card, the probability of you encountering a Code 10 error increases, luckily, the issue can be fixed by modifying the current plan settings and switching it to Maximum Performance.
Before trying these fixes, ensure the laptop is not plugged into a power source. After removing it from the power source, try these steps to change the power plan.
1. Press Windows + R to open the Run window.
2. Type powercfg.cpl and press Ctrl + Shift + Enter keys.
3. Grant UAC permission.
4. You will now be accessing Power Settings. Click Change plan settings.
5. Click on Change advanced power settings.
6. Scroll down and click Advanced Settings to locate Wireless Adapter Settings.
7. Expand Power Saving Mode Settings and click “+” button.
8. Next, confirm that the settings for Plugged in and On battery are set to Maximum Performance > click Apply.
9. Restart the PC. The issue should now be resolved.
Must Read: How To Solve The “Wi-Fi connected but no internet” Problem
Fix 10 – Uninstall Wi-Fi Driver
For some users, uninstalling and reinstalling the driver has worked. Therefore if nothing has helped so far you can give it a try. To do so, follow these steps :
1. Press Windows + X and select Device Manager.
2. Double-click on the Network Adapters category.
3. Right-click your Intel Wireless Adapter and choose to uninstall device.
 4. Follow on-screen instructions to complete the process and restart the PC.
Restarting the PC will install the generic driver. Now try to connect to the Wi-Fi. You should not face any problems.
If you have tried all the methods mentioned above and still your problem is not resolved. Try the following steps that I found from various forums/communities.
- Remove any hardware you may added to the computer before the Code 10 error message.
- Perform a clean installation of drivers.
- Check if the device is compatible with your version of Windows. You can always check with the OEM (Original Equipment Manufacturer)
- Try to reset the BIOS settings.
- If hardware is not a problem of the error, you could try a repair install of Windows. You may also try a clean install of Windows if nothing works. I personally do not recommend performing either before you have replaced the hardware. However, you can give them a try if you’re out of other options.
Fixed – Intel Wireless AC-9560 stopped working
So, this is all about how to fix the Intel Wireless AC-9560 code 10 error. Make sure you follow all the solutions. However, if the problem persists, try resetting the BIOS.
Alternatively, check the motherboard and placement of the Wi-Fi adapter. If everything is perfect, it seems that there is some hardware problem. To confirm, try using an alternate network adapter. If this helps, you know where the problem lies. Hopefully, you can solve the Intel Wireless Ac 9560 driver not working using the steps above. If you have any questions, drop us a line in the comment section.
Recommended-
How To Update and Download Intel Wi-Fi and Bluetooth Driver For Windows 11
How to Download & Install Intel Wi-Fi 6 AX200 Drivers


Hi Preethi,
Life saver. Thanks for this blog. I tried the power clean method and it works. Thank you so much.
Thanks Jananie for your kind words.
Power Cycle Computer worked for me! THANKS!
Thankyou!!! This information helped me to fix my laptop.
Power Flush worked, thanks a lot
Step 3 fixed it for me thank you so much
Thank you ??
After disabled enable
It’s working
I can’t thank you enough!
My WiFi suddenly stopped working and I was disconnected.
After going through your article, I just disabled and enabled again and voila!
It worked instantly (*chef’s kiss)
Thanks you,
My device is repaired and again wifi and Bluetooth options show..
Perfectly explained, solved it quickly. Thanks!
Thank you very much.After restart-normal upstart-and disabled-enable its working again.
Step 3 fixed it for me!
Thanks Preeti
Network Wifi driver Disable and Re-enable resolve my Wifi issue.
Thank you so much this was literally the easiest and fastest method I could find
Thank you Preeti…
I tried everything including device driver update before trying out the power clean method. First time it didn’t work. But when I pressed the ON key for almost 30second and rebooted it… Voila… It worked…
Thank you, I used one of the solution and it worked
God bless you.
Fix #3 resolved the problem.
Omg! Thank you so much. Disabling, restarting and enabling it again worked. I was so sacred I’d have to reset my laptop like another website suggested
Thank you so much as one your solutions solved my problem I’ve had for some time
I appreciate it very much
Very helpful. Thank you.
Turns out i needed to change property value from Dual Band 802.11a/b/g to 2.4Ghz 802.11. That fixed the problem.
Hello.
Thank you in advance for your help in solving these types of problems.
The message I get is “Windows couldn’t automatically bind the IP protocol stack to the network adapter”.
My WiFi was working perfectly when suddenly it stopped working.
Do you have a suggestion?
Dear Shimshon
Thank you for writing to us.
To troubleshoot “Windows couldn’t automatically bind the IP protocol stack to the network adapter” we suggest you first update network adapter driver. For this, you can use Advanced Driver Updater. Once this is done, follow these fixes:
1. Restore to the Default Network Adapter Settings
Step 1. Press Win + R keys to open the Run dialog box. Type ncpa.cpl and hit Enter key.
Step 2. Right-click the network adapter you are facing issues with and select Properties.
Step 3. Click Networking tab, and check the items mentioned below. Uncheck everything else and click Ok to save changes.
File and Printer Sharing for Microsoft Networks
QoS packet scheduler
Link-Layer Topology Discovery Responder
Internet Protocol Version 4 (TCP/IPv4)
Link-Layer Topology Discovery Mapper I/O driver
Internet Protocol Version 6 (TCP/IPv6)
Microsoft LLDP Protocol Driver
Client for Microsoft Networks
This will restore to default network adapter properties settings. Now try connecting your PC. You should no longer get Windows couldn’t automatically bind the IP protocol stack to the network adapter error.
2. Change the Startup Type of WLAN AutoConfig Service
Step 1. Press Win + R keys to open the Run dialog box, and then type services.msc click OK.
Step 2. Scroll down and double-click on the WLAN AutoConfig service.
Step 3. Change the Startup type to Automatic and click on the Start button.
Step 4. Click Apply > OK to save the change.
Restart your computer the issue should be fixed.
3. Reset the Winsock and Flush the DNS Cache
Step 1. Run Command Prompt as administrator.
Step 2. In the elevated command prompt, type the following commands one by one and hit Enter after each one.
netsh winsock reset
netsh int ip reset
run netsh winsock reset command
Step 3. Restart your PC and again open Command Prompt with admin right. This time enter the following commands and flush DNS cache.
Note – Press Enter key after entering each command.
ipconfig /release
ipconfig /flushdns
ipconfig /renew
Now try to use the PC you should no longer face the problem.
Thanks and Regards
Thank you very very much , step 3 worked and I now have internet
Thank you soo much it is an extremely helpful blog and it actually diagnosed my problem at fix 3!
I’ve had this problem twice before;wound up having to do factory resets both times to fix it. Thanks a billion for showing me a way to fix stupid problem without having to do a reboot
(Step 3 worked for me btw)
Excellent help!
Thank you.
Fix 1 was bulls eye. Thanks!!
Thank you SO much. You are a life saver. The disable enable technic did wonderful.
Great job… had to shut down to enable.
Thank you It worked , I uninstalled the Driver from device manager > network adaptors > intel wireless thank you so much again
This happened to me multiple times and every time I follow the steps, it is working and today, I tried this steps and it is not working anymore. Can someone help me?
Hello Dwight,
As you have uninstalled, reinstalled and updated the driver several times, to resolve the issue we suggest you to update BIOS.
If you do not know how to do it you can check the post https://www.intel.com/content/www/us/en/gaming/resources/how-to-update-bios.html or can take help of a technician.
Hope this helps.
Regards
Support Team
Hola Preeti, muchas gracias por compartir y ayudarnos con la información que nos brindas, me funcionó el paso 3
Bendiciones y saludos cordiales!
Muchas gracias Preeti, funcionó el paso 3
Saludos y bendiciones!
@Lety
Thanks for Comment