
Is your Windows PC sluggish, or does it crash often? The chances of invalid registry entries causing this behavior are high. This makes cleaning invalid entries from the Windows registry essential. But how to clean the invalid registry value on Windows 10?
Can it be done manually, or a third-party tool will be needed?
Truth be told, manual cleaning of registry entries is not recommended, nor can a layman do it, as it is not easy to identify invalid entries. So, what to do?
This is when the professional registry cleaner for Windows 10 offered by Advanced System Optimizer comes into action. Using it, you can clean invalid entries and fix registry errors.
Download Advanced System Optimizer

What is Windows Registry?
A registry is the central database of the Windows operating system comprising the settings, configurations, and options for Windows to function. Every time a program is installed, registry entries linking to the files on the system are created, and when uninstalled, they are removed. However, if these entries stay in the registry, they affect the system’s performance, causing application crashes or frequent run-time errors. This is why optimizing the registry and cleaning invalid entries is recommended.
But what is the invalid value of the registry, and is it safe to clean these entries?
What does the invalid value of the registry mean?
Simply put, the registry entry that doesn’t correspond to any installed application is invalid. These entries, with time, clutter the Windows Registry and increase the data access time, eventually affecting system speed. To avoid all these errors, cleaning these entries using a trusted Windows Registry Cleaner is suggested. It will help clean and streamline Windows Registry regularly.
Is it OK to clean the registry?
Generally, you will find people opposing optimizing and cleaning the registry. However, if you do it once a month using a tested and trusted registry cleaner that comes with an advanced scan engine, you can clean the registry. A Registry Cleaner can deeply scan through the Windows Registry and identify invalid, obsolete entries that do not point to valid references on the system and cause errors.
How Does Registry Cleaner Help?
Registry, as explained, is a critical part of Windows, and users with no little knowledge should never modify or tamper with it. But, as Windows Registry is constantly used, it accumulates clutter. Hence, Registry Cleaner for Windows 10 can be used to maintain and clean these obsolete entries regularly.
How Are Invalid Entries Created?
Reasons for Invalid Registry Entries:
The two most common reasons are:
- Entries related to uninstalled programs stay in Windows Registry.
- The entries become invalid when they point to document files, sound files, help files, font files, history files, and application paths that no longer exist on the system or have been moved from their original physical locations.
To deal with this problem and remove such entries, Registry Cleaner uses an expert mechanism that helps distinguish between valid and invalid registry entries. The detected invalid entries/errors can then be wiped out from the Registry and prevent the Registry from being disorganized.
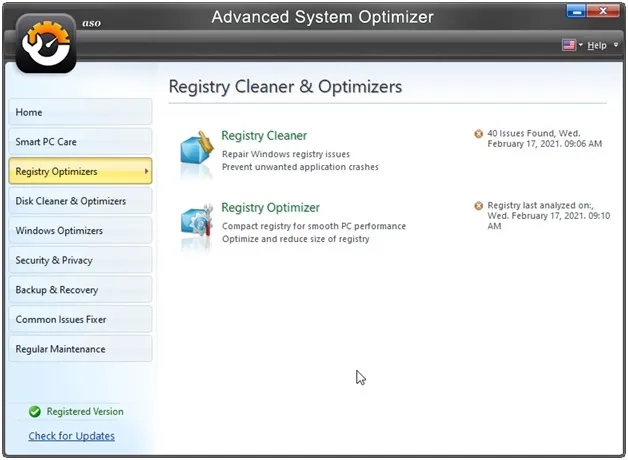
How To Clean Registry Using Registry Cleaner

Registry Cleaner has an uncomplicated structure and can be used with ease. It has four tabs on the top, Scan, Undo Changes, Settings, and Schedule, and they have different functionalities.
Registry scanning and cleaning are done under the Scan tab. The unwelcoming changes can be undone under the Undo Changes tab. The Settings tab helps reset the scan settings and add genuine entries to the Exclusion List, and under the Schedule tab, you may schedule automatic unattended Registry scans.
Must Read: How to Deep Clean a PC the Right Way?
Scan Tab
Under the “Scan” tab, the scanning operation is performed. After that, the scan results are shown, and the detected errors are cleaned in the end.
The left panel of the module explains the cleaning process in 5 easy steps:
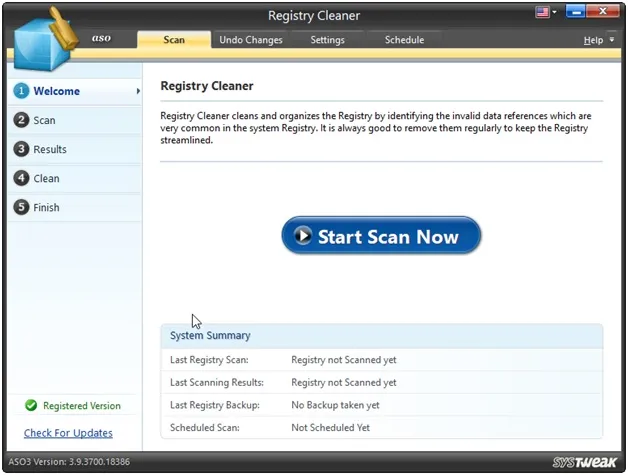
Step1: Welcome
Step2: Scan
Step3: Results
Step4: Clean
Step5: Finish
Step1: Welcome
With time, the volume of invalid entries increases and clutters the Registry. Therefore, regular cleaning of the registry to remove invalid entries that might give fatal results in the future is recommended.
From the Welcome screen of the Registry Cleaner, you can scan the registry and get a summary of the last scan performed on the system. The scheduled date and time of the next scan can also be viewed from this screen.
The scanning can be initiated by clicking the “Start Scan Now” button. Registry Cleaner will then thoroughly scan the Registry and read through each entry and the respective reference points.
System Summary will also be displayed, showing the details of the Last Scan Date, Last Scan Results, Last Registry Backup, and Next Scheduled Scan.
Step2: Scan
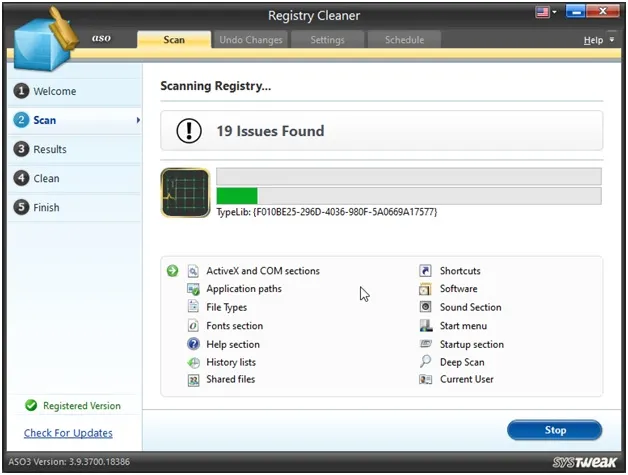
Scanning Registry
The second step shows the scanning progress.
Registry Cleaner checks each Registry section in detail, leaving no loopholes. It is divided into 14 areas and allows canceling the scanning process by clicking the “Stop” button.
ActiveX and COM
ActiveX and COM program comprises a set of rules that tells how programs should share information. ActiveX and COM components are installed on the system while browsing the internet or installing any application, and as their size increases, the size of the registry also increases. This might contribute to the malfunctioning of many programs on the system, in system crashes, application failures, and loss of information.
Application Paths
Application Paths are system-wide setting Registry keys stored in HKEY_LOCAL_MACHINE\Software\Microsoft\Windows\Current Version.
Each app path key refers to a file name and a file path of an application installed on the system. Launching an application can directly type the app in Start=>Run instead of typing the complete file path.
Sometimes applications are uninstalled or moved from their original physical locations. In such scenarios, the app paths become invalid, referring to wrong file paths and application file names, thus causing problems while executing other applications. Registry Cleaner identifies such invalid app paths and removes them from Registry.
File Types
Registry stores information regarding all file types, their extensions, attributes, functionalities, and specific actions that can be performed individually. Any file on the system will be associated with a particular file type in the context to Registry. Some modifications can create invalid file-type entries. Registry Cleaner helps remove such invalid entries from Registry.
Fonts
The registry contains information regarding the installed font types. The key, which refers to a specific font type, contains its filename and file path. If the paths are edited or names are changed, invalid entries are created. These can cause problems; therefore, these invalid font entries should be removed from the Registry.
Help Files
Help files create Registry entries referring to the file paths and file names. When help files are removed or moved from their original location, these entries become invalid. Registry Cleaner identifies such invalid Help file references existing in Registry and helps to remove them.
History Lists
The registry also stores entries of files and documents accessed recently. The entries become invalid when the files are moved from the original physical location or deleted from the system. Registry Cleaner scans and finds such orphaned entries and cleans them from Registry.
Shared Files
Registry entries include paths of shared files and program libraries (DLLs) used by various programs. These entries become invalid when they point to the shared files that are moved from the original locations or have been deleted. Registry Cleaner intelligently scans and identifies such invalid Registry entries.
Shortcuts
Program shortcuts are also stored in Registry. Some shortcuts refer to programs that do not exist on a system. Such entries that refer to invalid shortcuts increase the size of the Registry. Registry Cleaner also targets such entries and reports the user of the same.
Software
When a software application is installed on a system, it also creates a few Registry entries storing all the information regarding its configurations and settings. But when these software applications are uninstalled from the system, the associated Registry entries are not removed, thereby cluttering the Registry. It is essential to remove such invalid entries.
Sounds
Registry stores information related to all the sound files on the system. Some entries in the Registry may point to sound files that do not exist on the system or have been relocated from the original physical locations. Registry Cleaner helps to get rid of invalid sound entries.
Start Menu
Programs in Start Menu are read from Registry before being launched at startup. The Registry entries that refer to startup programs moved from the original location or no longer on the system will become invalid. Registry Cleaner contributes to identifying all such invalid entries and cleans them from the Registry.
Startup
Some programs are scheduled to run at Windows startup. The registry maintains the entries of such programs. In many cases, the entries become invalid, pointing to programs no longer on the system or moved from their original physical locations. Registry Cleaner finds the invalid entries that bloat the Registry and reports the user.
Deep Scan
A deep Scan is a more comprehensive model of scanning and thus takes longer. It scans everything in the HKEY_LOCAL_MACHINE Registry hive and identifies more erroneous entries pointing to invalid data references than any other type of scanning.
Current User
Current User refers to the profile of the user contained in HKEY_CURRENT_USER currently logged on to the computer system. The user profile includes environment variables, personal program group settings, desktop settings, network connection settings, printer settings, and application preference settings. Registry Cleaner will identify erroneous entries in the HKEY_CURRENT_USER subtree and inform the user.
Step3: Results
Scan Results
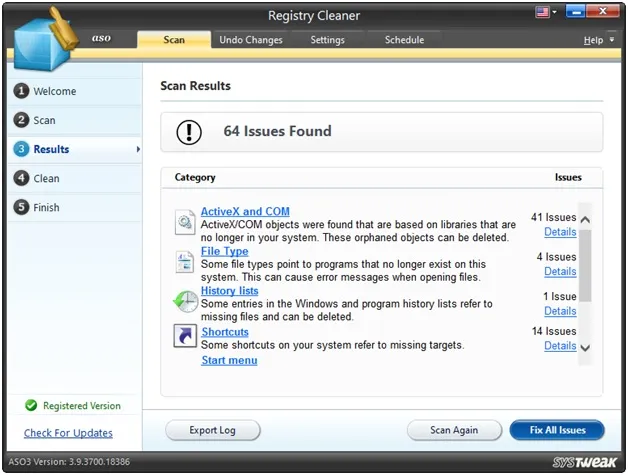
Once the scanning is done, the number of errors detected under each category/area is shown separately. The details can be viewed by clicking the ” Details ” link or the category headings. You may click the “Fix All Issues” button to remove all detected errors. To return to the Welcome screen and rescan Registry for errors, click the “Scan Again” button.
When you click on the category headings or click on the“Details” link, in either of the cases, the details of the errors detected can be viewed in a separate window. Corresponding to each erroneous Registry entry, a checkbox is positioned. You may checkmark the entries to be deleted or select the option “Select All” to select all entries in one go. After you select, you may click the “OK” button to continue.
Step4: Clean
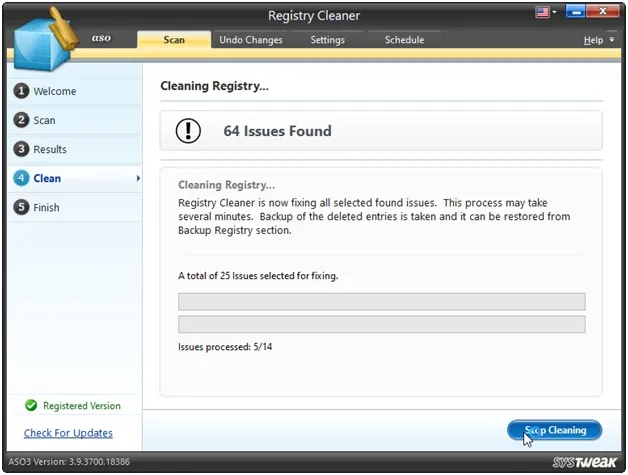
Cleaning Registry
The selected errors in the previous step are cleaned from the Registry, and an automatic backup is taken as a precaution. If the changes are unsatisfactory, the backups can be restored using the options under the “Undo Changes” tab.
The cleaning process can be stopped at any point by clicking on the “Stop Cleaning” button.
Note: Although changes can be undone, one must be very careful before deleting Registry entries from the system.
Step5: Finish
Registry Cleanup Summary
In the last step, the cleanup summary shows the details viz, Scan Results, Issues Repaired, and Issues Remaining to be repaired.
You may click on the “Scan Again” button to rescan the Registry for errors, and the “Finish” button takes you back to the Welcome screen, where again, you may choose to rescan the Registry.
Undo Changes Tab
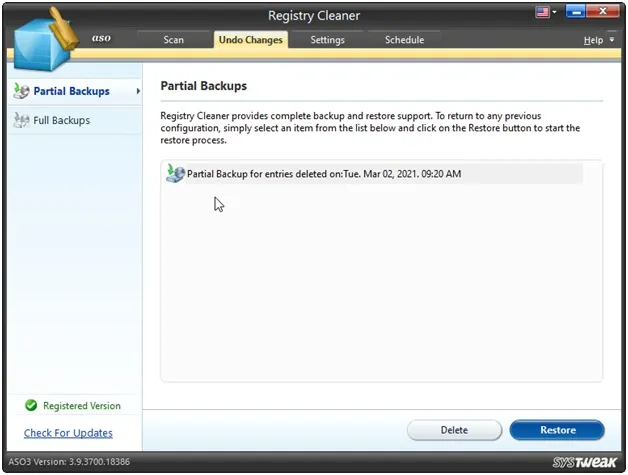
Registry Cleaner facilitates an option to undo changes. A backup is automatically taken each time a change is done in the Registry. Without fail, the current backup should be taken to revert to any of the best-known configurations if needed.
Must Read : Best Way to Optimize Memory and Manage System Cache
Backups can be taken in two ways:
Partial Backups
Following the scanning process, all detected errors/selected errors may be removed from the Registry. But before any action is taken, a backup of the erroneous entries should be taken.
The list of all such backups taken occasionally can be viewed under the section “Partial Backups” (accessible from the left panel).
To restore any partial backup item from the list, you may select the item and click on the “Restore” button, and to remove the unwanted items, click on the “Delete” button.
Full Backups
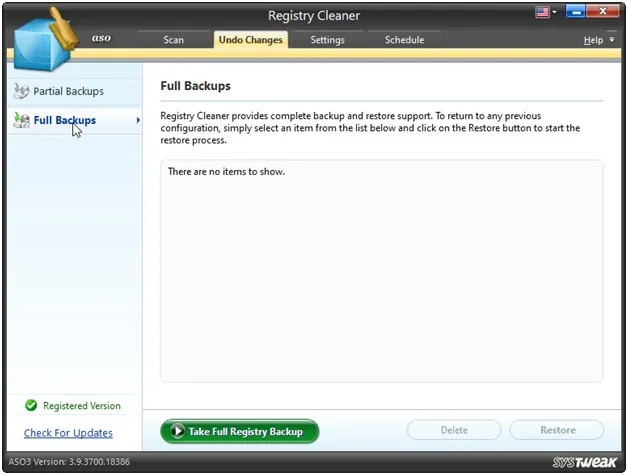
This undo option helps back up the entire Registry before changes are attempted in it. The full backup can be restored, and the system can be reverted to the last known good configuration in case the changes made in the Registry crop up serious issues.
You may click on the “Take Full Registry Backup” button to take the whole Registry backup.
The list of the full backups taken previously can be viewed under the section “Full Backups” (accessible from the left panel).
To restore any full backup item from the list, you may select the item and click on the “Restore” button, and to remove the unwanted items, click on the “Delete” button.
Settings Tab
The settings tab lets you change the default settings. The left panel shows two items:
Scan Settings
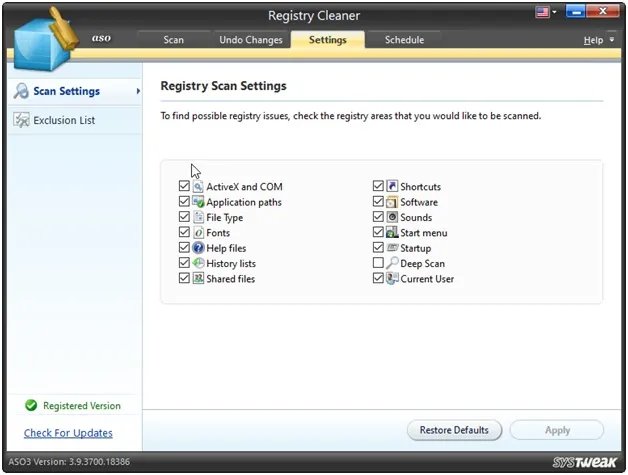
The registry has been divided into 14 areas/categories. During the scan, by default, all the areas are scanned. You may change the default settings and select the areas per your need and preferences. All the selected areas will then be scanned by excluding the unchecked areas during the Registry scanning operation.
Changes in the default settings can be applied by clicking the “Apply” button.
The original/default settings can be restored by clicking the “Restore Defaults” button.
Must Read: Fix – Windows 11 Won’t Sleep
Exclusion List
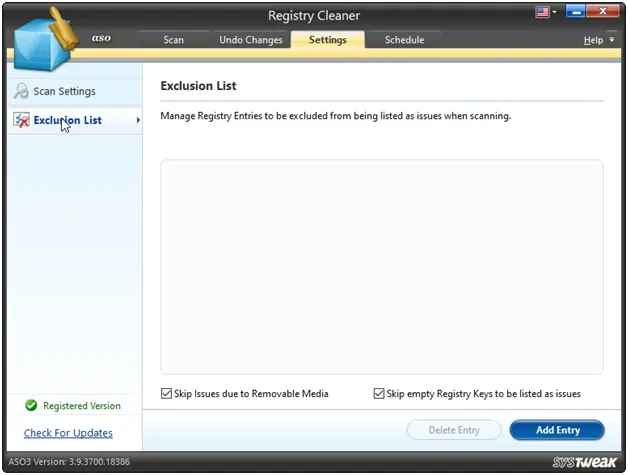
Registry Cleaner includes an Exclusion list where the Registry entries added are meant to be skipped while scanning. The Registry entries considered to be genuine can be added to the list. The specified entries will not be scanned and marked as errors until removed from the list.
Skip entries referring to Removable Media (Recommended)
It is recommended that this option remains checked during the Registry scan.
Explanation: When Removable Media is attached to the system, some associated entries are created in the Registry. When the Removable Media is removed, these associated entries become invalid. But these entries may be required when the Removable Media is re-attached. Therefore, it is highly recommended that such entries should be ignored when Registry Cleaner is scanning for errors. To do this, please keep this option checked and save these entries to be detected as errors.
Schedule Tab
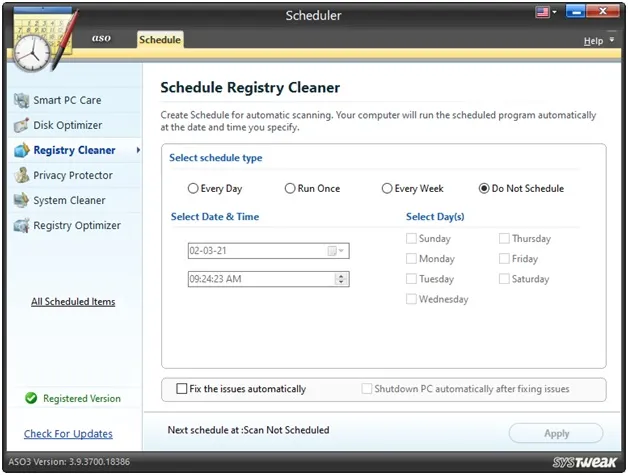
For a system to run smoothly, the registry should be constantly monitored and made free from invalid entries that clutter. This helps maintain consistency in system speed and performance. Hence, Registry cleaning is regularly recommended.
The scheduler helps to schedule automatic Registry scans. This important task will be done on a predefined day, date, and time without remembering. This is a helpful mechanism, as we might skip doing this quite often.
You may set the scan time by using the various options given.
Options to schedule scan:
“Every Day”
OR
“Run Once”
OR
“Every Week”
OR
“Do Not Schedule” scan (undo the scheduled scans)
This is how you can use the Registry Cleaner module to clean invalid values in the registry.
FAQs
Q1. How do I clean a corrupted registry?
The corrupted registry can be cleaned by –
- Checking disk for errors.
- Running system file checker and DISM command.
- Reverse overclocking.
However, using a registry cleaner program is the easiest way to clean invalid registry entries. You can use Registry Cleaner offered by Advanced System Optimizer.
I hope you have learned how to clean the Windows registries using these simple steps and this best free registry cleaner. Do share your feedback and suggestions in the comments section below. If you have any questions regarding the product, email our support team at support@systweak.com.
Must Read :
How To Wipe Hard Drive Completely?
How To Perform Automatic PC Cleaning?


