Lost photos stored on USB? Want to recover deleted photos from a USB? You are in the right place.
What happened? Were you trying to remove a single file but ended up deleting the folder? Did you use the Shift+Del command out of habit and permanently delete photos from USB? These situations keep arising when you are too busy to pay attention or have something else on your mind.
Either way, deleting photos from a USB flash drive unknowingly can cause severe issues. The only thing that comes to mind in such situations is, “Is there a way to recover deleted photos from your USB flash drive?” Well, if you, too, were worried about the same, then worry no more, as this post is the perfect solution!
Keep reading as we discuss some interesting and working methods to get your picture back on a USB Flash Drive
Reasons Behind Loss of Images from USB Drive
Several users themself delete the files unknowingly. However, that is not always the case. There are several reasons behind losing images saved on a USB drive, accidental deletion being the most prominent.
In addition to accidentally deleting images, other reasons responsible for data loss without warning are –
- Unintentional formats
- Removing the flash drive while it is in use,
- Using multiple copy operations to fetch the same files
- Cutting files and forgetting to paste, etc.
- You may also face loss of images if the drive has a virus or malware.
Read Also: How to Recover Deleted Photos From PC
Working Ways to Recover Deleted Images From a USB Flash Drive
Regardless of the reason, to ensure you recover a maximum number of deleted pictures from a USB flash drive, try the method explained below. They can help resolve the issue and recover deleted photos with or without using a tool.
Method 1 – Try Windows File Recovery Application
The first method we recommend is using the Windows File Recovery application. On your Windows PC, open the Microsoft Store and look up Windows File Recovery. The application works fine with Windows 11 PCs and can be used with Windows 10, too. You may use this application to initiate file recovery on your PC.
Note : Avoid downloading or recovering the data on the same drive from which data is deleted as it will overwrite data and will minimize the chances of recovery.
After downloading the files, work your way through the following steps.
Step 1 – Connect the USB flash drive to the computer.
Step 2 – Use the Start menu to open CMD as administrator.
Step 3 – Use the command: Winfr E: C: /extensive(E refers to the drive letter of the USB flash drive; C refers to the drive letter of the drive where you want to store the recovered files) and press Enter
Step 4 – Wait for the process to complete.
After you have finished the process, check if the lost files are recovered. If they are not overwritten and can be recovered the application will be able to bring the photos back. However, if things do not go well, do not worry; we have other methods, too.
Note : Please ensure that the USB drive is connected to the PC and is detected.
Method 2- Recover Deleted Photos Using Windows File Recovery (Free Tool)
The first method we recommend is using the Windows File Recovery application. On your Windows PC, open the Microsoft Store and look up Windows File Recovery. The application works fine with Windows 11 PCs and can be used with Windows 10, too. You may use this application to initiate file recovery on your PC.
To recover your files, we suggest using Windows File Recovery application. Simply open the Microsoft Store on your Windows PC and search for Windows File Recovery. This app is compatible with both Windows 11 and 10. Once you have it installed on your computer, connect you USB drive that contains the lost files.
Follow through the on-screen instructions to select the appropriate recovery mode and file types you want to recover. Now you can use it to start the file recovery process on your computer.
Note : Avoid downloading or recovering the data on the same drive from which data is deleted as it will overwrite data and will minimize the chances of recovery.
After downloading the files, work your way through the following steps.
Step 1 – Connect the USB flash drive to the computer.
Step 2 – Use the Start menu to open CMD as administrator.
Step 3 – Use the command: Winfr E: C: /extensive(E refers to the drive letter of the USB flash drive; C refers to the drive letter of the drive where you want to store the recovered files) and press Enter
Step 4 – Wait for the process to complete.
After you have finished the process, check if the lost files are recovered. If they are not overwritten and can be recovered the application will be able to bring the photos back. However, if things do not go well, do not worry; we have other methods, too.
Note : Please ensure that the USB drive is connected to the PC and is detected.
Method 3 – Restoring Pictures Using CHKDSK Command
To use this method, you run Command Prompt as an admin. To learn how to do that and run commands that will recover deleted photos, follow the steps below:
1. Connect the USB drive to the PC
2. In the Windows search bar, type Command Prompt > right-click > Run as Administrator
3. Next, type chkdsk E: /f in the cmd window and hit Enter.
Note : E denotes the drive letter of the USB flash drive. You must change it to the letter assigned to your USB drive.

4. Type ATTRIB -H -R -S /S /D E:*.* > Enter key.
Remember to replace E with the drive letter of your USB drive.
5. Wait for the process to finish. You will now see deleted images saved on the USB drive in your created folder.
This way, you can manually restore deleted pictures. In addition, if the Previous Version feature is enabled on the flash drive before the picture was lost, you can use that, too.
Method 4 – Restore Files From Previous Versions
1. Connect the USB drive to your PC.
2. Double-click This PC to open it and see all the storage devices.
3. Right-click on the USB from which you want to undelete data and select Properties.
4. Click the Previous Versions tab and check if you can find a list of recovery options.
5. Select Previous Version and click Restore.

If no previous versions are available, you cannot use this method.
Method 5- Use the Photos Recovery Tool
Both methods may seem too much work, and the worst part is that they do not ensure 100% recovery.
Fortunately, Photos Recovery can recover deleted images from a USB and hard drive. You needn’t be an IT nerd to use this image recovery tool. A novice user without training can start using the tool and perform USB-deleted photo recovery.
As the name explains, this photo recovery tool helps undelete permanently deleted images. It comes with two scanning modes—Quick and Deep—that help restore deleted pictures. As long as the space in
A data recovery tool is the best method to recover lost or deleted files because it provides an efficient, user-friendly, and thorough way to retrieve a wide range of file types from various storage devices, even when they are accidentally erased or corrupted.
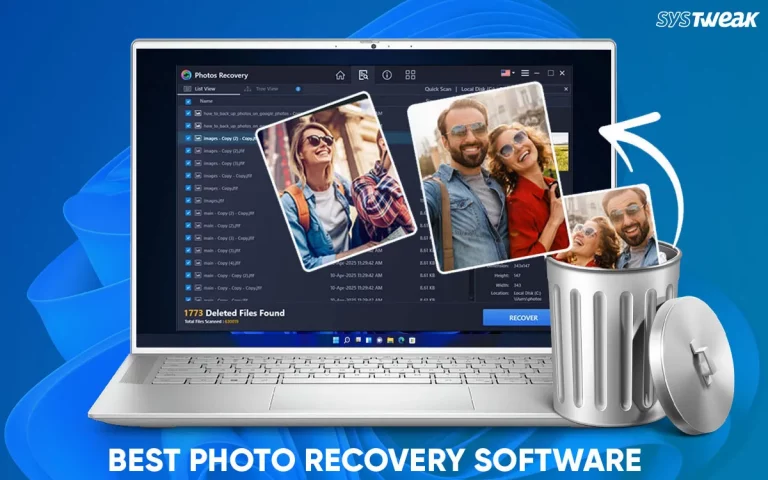
Photos Recovery by Systweak Software is a powerful tool designed to help you recover lost photos from internal and external drives including USB drives on Windows PCs. This application is compatible with Windows 11, 10, 8.1, 8 and 7 (both 32-bit and 64-bit).
Key features:
- Comprehensive Recovery: Retrieves deleted photos, videos and audio files from USB drives, SD cards and hard drives.
- Deep Scan: Offers a deep scan mode that can effectively scan the storage space to detect and recover the lost files.
- Preview before recovery: Photos Recovery lets you preview the scanned files before starting the recovery process.
Note : Since we are recovering images from a USB drive, ensure it is connected before you run Photos Recovery – the best picture recovery tool for Windows.
1. Download and install Photos Recovery

2. Run the best photo recovery tool on Windows.
3. Click the Removable Drive tab

Note : If the Removable tab is greyed out, the USB is not properly connected. Check the USB and then try to use Photos Recovery.
4. Thereafter, select the scan type – Quick Scan or Deep Scan.
Quick Scan – This scan type for deleted photos looks for references.
Deep Scan – It thoroughly scans each folder, and subfolder, for the deleted photos.
Tip : Use Deep Scan to recover pictures lost long back.
5. After selecting the scan type, click START SCAN NOW and wait for the scan to finish.

6. Once done, you will see the number of photos that can be recovered.

7. Select the photographs > browse the location where you want to save recovered photos.
Tip : When saving recovered photos, ensure you do not save them on the same disk from which you are recovering them, as this decreases data recovery chances.
8. Click RECOVER and wait.
9. After completing the task, you will have a summary of the action performed. This includes the Number of Photos Recovered, Total Photos Found, Total Photos Selected, and Total Photos Recovered.

In addition to this, by clicking the Open file location, button, you can browse to the location where the recovered picture is saved. To rescan the system, click RECOVER MORE.
Before using the tool you should read this review provided by the Vendor
That’s it; using this automatic way, you can flawlessly recover deleted pictures from flash drives.
Recovering Deleted Photos From a USB Flash Drive is EASY!
We hope we answered how to recover deleted photos from the pen drive.
Using either of the steps, you can quickly recover deleted photos on your Windows. However, if you are looking for our recommendation and the easiest way, try Photos Recovery. This best image recovery tool for Windows is the answer for how to recover deleted photos from a pen drive. Using it, you can get back the maximum number of deleted photos.
Let us know which one you picked to restore permanently deleted photos and why in the comments section.
We are confident this guide was successful in helping you recover your deleted photos from a USB flash drive. We would love to hear about your experience! Which recovery method worked best for you? If you found this blog post helpful, share it with others. We would like to know your thoughts in the comments section below.
FAQ's- USB Flash Drive Photo Recovery
Read Also: How to Recover Permanently Deleted Wedding Photos