
To save photos in an organized way, Windows offers a dedicated folder. But sadly, keeping all pictures in it is not easy. For instance, images downloaded from the internet go to the Downloads folder.
Other times, edited photographs are saved in a folder chosen by the user. This makes identifying duplicate, similar and edited photos difficult. However, with a tool like Duplicate Photos Fixer Pro, you can locate edited photos and copies saved in any folder on your computer. The article below explains how to identify edited images.
Why do we need a tool to identify edited photos in Windows?
Each version of the Windows operating system comes with several features. But, it seems the developers at Microsoft have forgotten to offer a way to detect duplicate and edited images. This is why such images get piled up and clutter the storage space.
But we can’t blame Windows entirely because some third-party photo editing applications save a copy of the edited images instead of overwriting the original image. But this is not something that can’t be dealt with. You can identify edited pictures using a powerful and dedicated duplicate image finder tool.


How To Identify Edited Photos in Windows?
You can use the Photos app if you have a handful of images. However, the Windows Photos app might not be the perfect solution if hundreds and thousands of photographs exist. So, if you are looking for an easy way, using a third-party tool that allows you to customize the matching level can help. Luckily, we know of one such tool and recommend you to use it.
Why Use Duplicate Photos Fixer Pro?
Designed and developed by Systweak Software, Duplicate Photos Fixer is among the top-ranking duplicate picture finder. But only a few know how edited images can be detected using the amazing Matching Level feature.
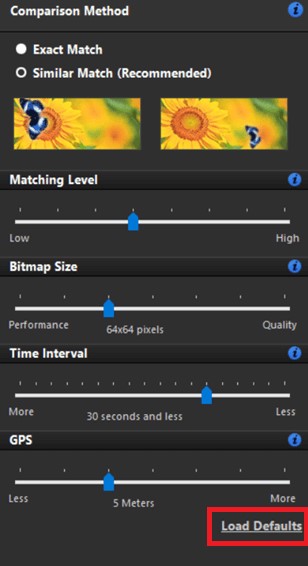
Matching Level
With the help of this setting, you can quickly identify images with a high & low level of differentiation. Simply adjust the slider to suit your preference and detect edited photos.
For better understanding, please refer to the screenshot below:

As we move the slider to the Low level, the difference in the images widens. In the image on your left, you’ll see a butterfly sitting on the flower, while the right shows the butterfly far away from the flower. This is what happens when the matching level is set to low.
In contrast, the search for similar images occurs when the matching level is set in the middle. For better understanding, refer to the screenshot below:
Lastly, the high matching level will be set when you move the slider to the extreme right. This setting reduced the similarity and showed almost identical images. To find exact duplicates, keep the level high.

Bitmap Size this second setting helps detect images based on quality and size. You can adjust the slider as per your preference and identify images based on either performance or quality.

Time Interval: If you habitually click images in burst mode, this setting is best for you. Using it, you can detect edited or duplicate photos based on the time gap ranging from 1 second to 24 hours. When the slider is to the left, you will see images with a larger time gap, whereas when it’s to the right, it will show pictures with a lesser time gap.

GPS – find edited images based on geotags.

These settings will help identify edited photos in Windows. In addition, you can customize scan settings and set Selection Assistant how you want to auto-mark duplicate and edited images.
How To use Duplicate Photos Fixer Pro?
- Download and install Duplicate Photos Fixer Pro.
- Launch the edited and duplicate image finder.
- Drag and drop the folders you want to scan for edited images.
- Set the Matching Level.
- Click Scan for Duplicates to start the process.

- Preview the images > select the ones you want to remove. You can also check the Metadata of each image.
- Use the Auto-Mark feature to select images in bulk. This will leave one picture in each group unmarked.
- Click Delete Marked.
- This will give you a managed folder with images you want to keep.
Must Read: What Is The Best App For Deleting Duplicate Photos
Common Ways to Manually Identify Edited Photographs
Manually, identifying edited photos isn’t easy, but if you know the common pointers, you can detect them. Here we list them for you:
- Check the Edges – You know it is edited if you see jagged edges around images.
- Reversed Text – Sometimes, people flip them without thinking about the text to manipulate an image. This makes identifying such photos easy as the text will not be displayed correctly.
- Check for shadows – Another big giveaway is missing out on shadows. The incorrect use of the drop shadow effect is a common mistake and an identifier to know the image is edited.
- Images without Reflection
- Look at the image and ask yourself, is it possible to see all the details I can in the photograph?
- Inconsistent Lightning
Wrap Up – How to Identify Edited Photos
Locating edited images from a bunch of pictures is not easy. You can use Duplicate Photos Fixer Pro to search for edited photos. Consider common signs when using the Photos App to find edited images. We hope you like our shared information and will use the instructions. Let us know if you have questions.
Must Read: How To Delete Duplicate Photos From iCloud


