Is your camera not working on Microsoft Teams? Read along to learn how to fix the Microsoft Teams camera not working.
Meeting colleagues virtually on Microsoft Teams has become the new normal. However, things get messed up when the camera stops working, or Microsoft Teams is not working.
But don’t panic; luckily, there are ways to fix the camera that isn’t working in Microsoft Teams. This article will discuss them, thereby helping troubleshoot the camera-not-working issues.
Why is the Camera Not Working?
The camera might not work due to a missing diver after a recent Windows update. Antivirus blocking the camera due to privacy settings or the camera is not properly connected.
Let us learn different ways to fix the issue without further delay. There is a high chance that the issue is caused due to some software error or outdated driver. Therefore, before getting into details, we suggest you use Advanced Driver Updater, an automatic way to update outdated and missing camera drivers for Windows 10.
The driver updating tool auto-detects system configuration and outdated drivers when installed and run. This helps users know which webcam drivers & other drivers are outdated. Using either the Trial or Registered version, you can update outdated drivers.
However, there’s a catch when using the trial version; you will need to update outdated drivers one by one. While using the registered version, you can update all outdated drivers simultaneously. Also, you can set a schedule for driver scanning.
To get this excellent driver updater, click the download button below:

Let’s discuss other possible ways to get the webcam working with MS Teams again.
Read Also- How To Download AMD RX 570 Drivers for Windows 10
Best Ways to Fix Camera Problems with Microsoft Teams
1. Configure Microsoft Teams Camera Settings
Generally, without any additional configuration, Microsoft Teams identifies the camera. However, if the camera is not working when attending meetings on MS Teams, it seems there is some problem with the app settings. To fix this problem and set up a camera, follow these steps:
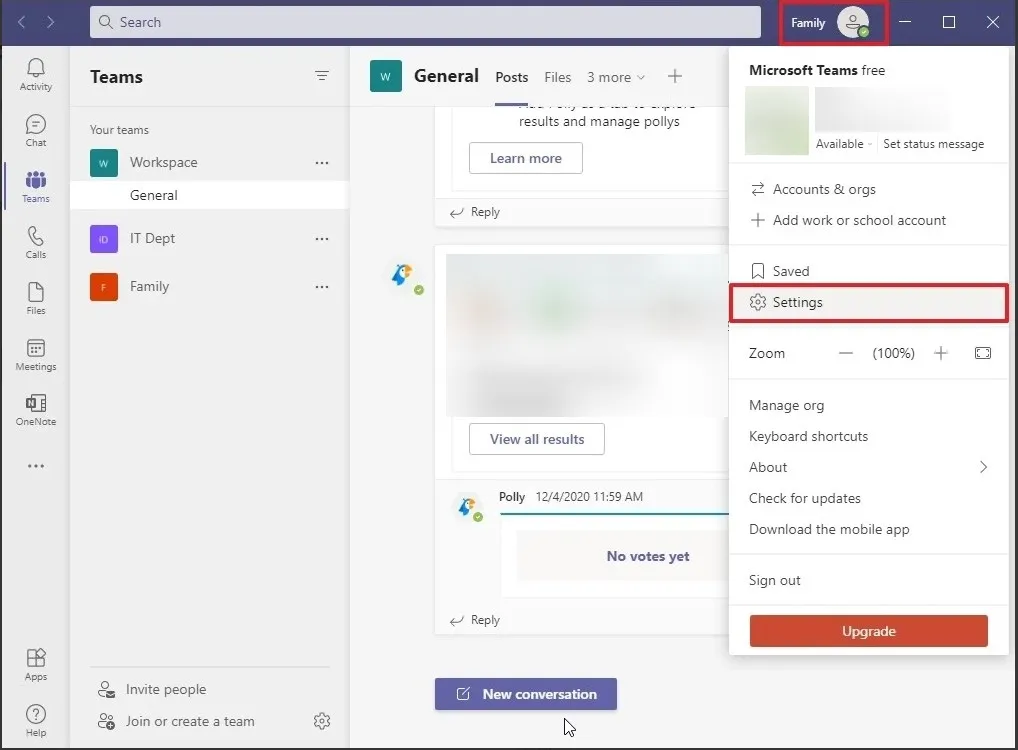
1. Launch Microsoft Teams > click the profile icon > Settings
2. Click on Devices > click the down arrow next to the Camera section and select the camera you want to use.
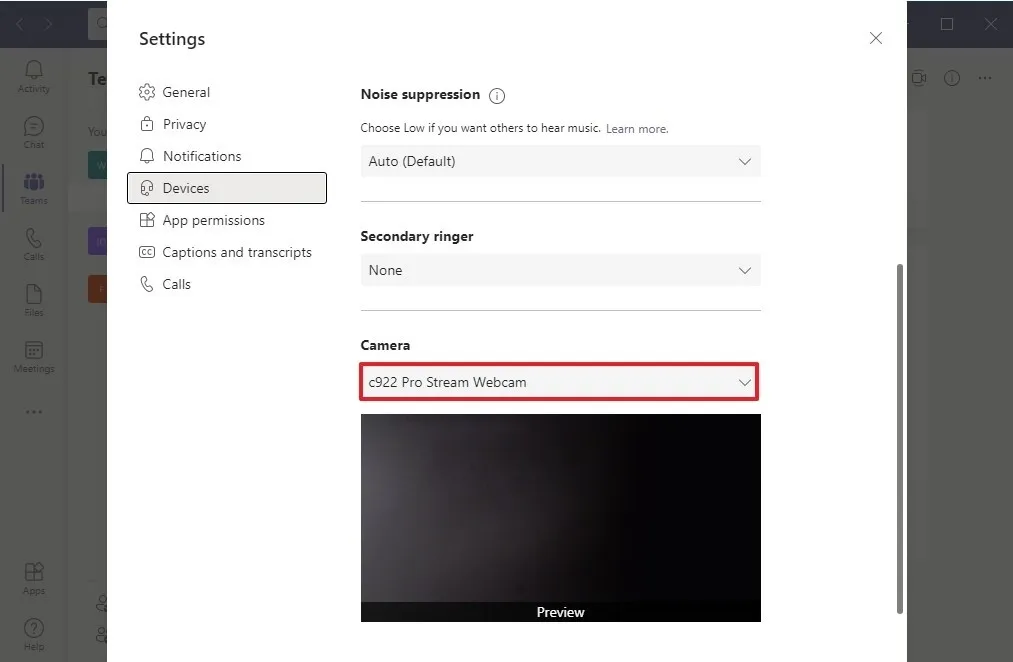
3. Check the preview; the camera should now be working.
Once done, make a test call or call someone to see if the camera is working or not.
2. Disable Additional Devices
If the camera is not detected in MS Teams, try disconnecting & reconnecting the camera. In addition, close other apps that might be accessing the camera (like Zoom or Skype) & restart the PC. If you have already performed these basic steps and the problem persists, try these advanced troubleshooting steps:
1. If you are using multiple cameras, try disconnecting them and see if the built-in camera works.
2. If that doesn’t work, disable the built-in camera from Device Manager and then try using a USB camera. Before following the steps, disable the external camera.
To do so, follow these steps:
- Press Windows + X > Device Manager
- Double click on Sound, video, and game controllers > look for the webcam
- Right-click > Disable device.
Next, launch MS Teams > connect and use an external camera to make a video call. This should fix the camera on Teams, which is not working issues.
Remember: You can undo the change by selecting Enable device instead of Disable device in Step 3.
Must Read- How To Download AMD Ryzen 5 2600 Drivers
3. Enable Privacy Settings
If MS Teams cannot access the camera, make changes to the security settings. To do so, follow these steps:
Allow Camera:
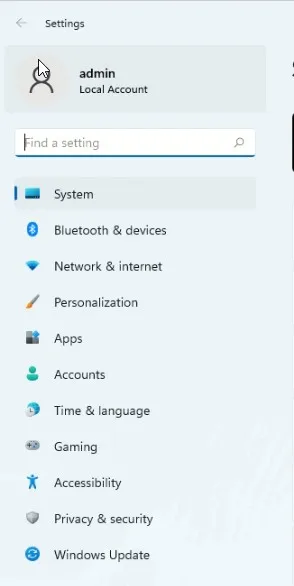
1. Press Windows + I to open Settings > Privacy & Security

2. In the right pane, look for Camera,> double click to unhide it.
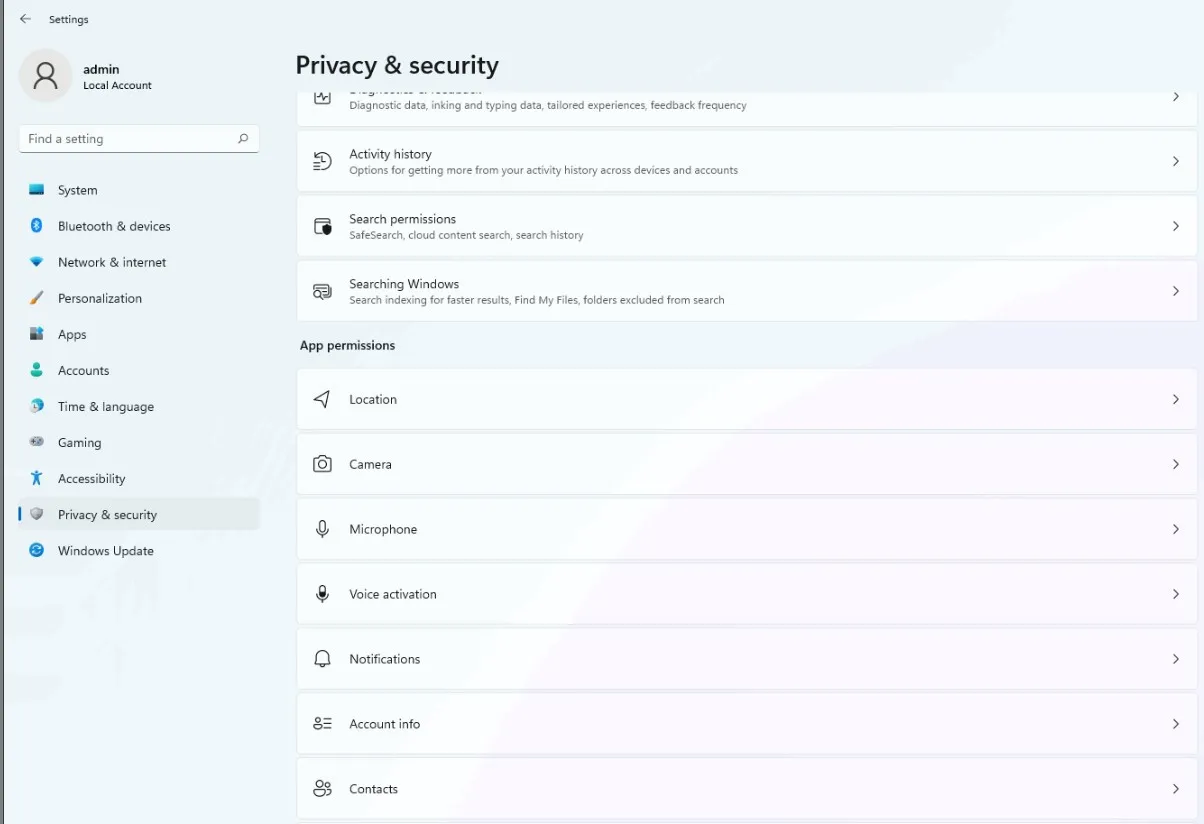
3. Under the “Allow access to the camera on this device” section, click the Change button.
4. Enable Camera access for this device, Allow apps to access your camera, and Allow desktop apps to access the camera.
5. Once both options are enabled, you should now be able to access the camera when using Teams.
Allow Microphone
If the camera you use comes with a built-in microphone, you will have to allow Teams to access it too. To do so, follow these steps:
1. Press Windows + I to open Settings > Privacy & Security
2. In the right pane, look for Microphone, > double click to unhide it.

3. Under the “Allow access to the microphone on this device” section, click the Change button.
4. Enable Microphone access for this device, Allow apps to access your microphone, and Allow desktop apps to access the microphone.
This will grant access to the microphone of the connected webcam.
4. Update the Camera Driver
Even after following the above steps, if the problem persists, try updating the webcam driver to Windows 10. To install the camera driver in Windows 10, you can use Advanced Driver Updater, the best tool to update drivers without any problem.
To use it, follow these steps:
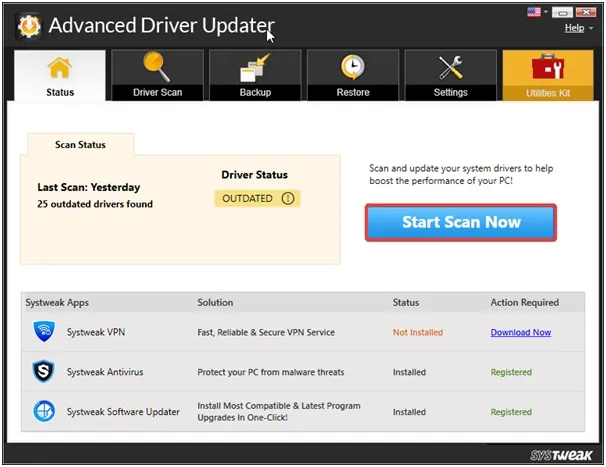
1. Download and install Advanced Driver Updater.
2. Launch the tool and click Start Scan Now to perform the scan.
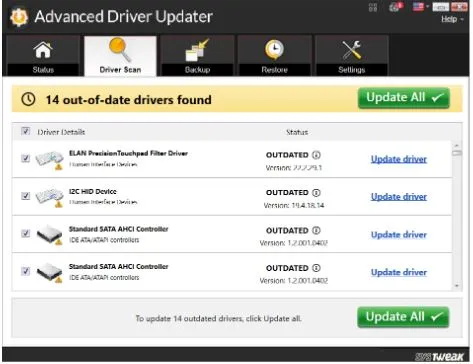
3. Wait for the scan to finish > review scan results
4. Now download the webcam driver & update the Webcam driver.
5. Restart the PC to apply changes, and that’s it. Now try using the camera. This should fix the problem.
Alternatively, you can try updating the driver via Device Manager.
Remember, manually updating drivers is time-consuming and involves risk. To update the camera driver via Device Manager, follow these steps:
1. Press Windows + X > Device Manager > double click Sound, video, and gamer controllers > right-click the camera you wish to update > Update driver > Search automatically for drivers > wait for Windows to look for an update (if available, it will be automatically downloaded and installed.
2. Restart the PC, and that’s it.
Read This- How To Update AMD Drivers On Windows 10
5. Temporarily Disable Antivirus
Sometimes the third-party security solution you run on your PC interferes with the working of Teams and doesn’t allow the app to use the camera. In such a case, temporarily disabling the antivirus is recommended.
Once that is done, try using MS Teams with the camera, you should not face any problems.
6. Allow App Access to Media
At times when there is a problem with Microsoft Teams permissions, then you might face the camera not working on Teams issue. To fix it, you will need to allow Teams add-ons to access the peripherals.
1. Launch Microsoft Teams.
2. Click the profile icon > Settings > App permissions > toggle the button next to Media (Camera, microphone, speakers).
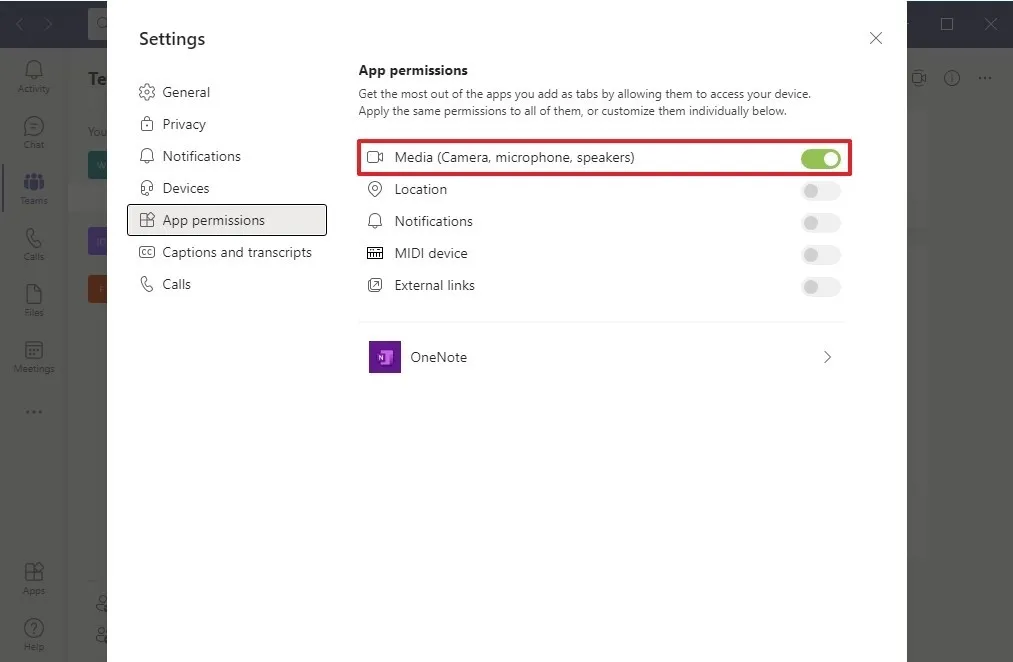
Doing so will allow the app add-on to access the webcam.
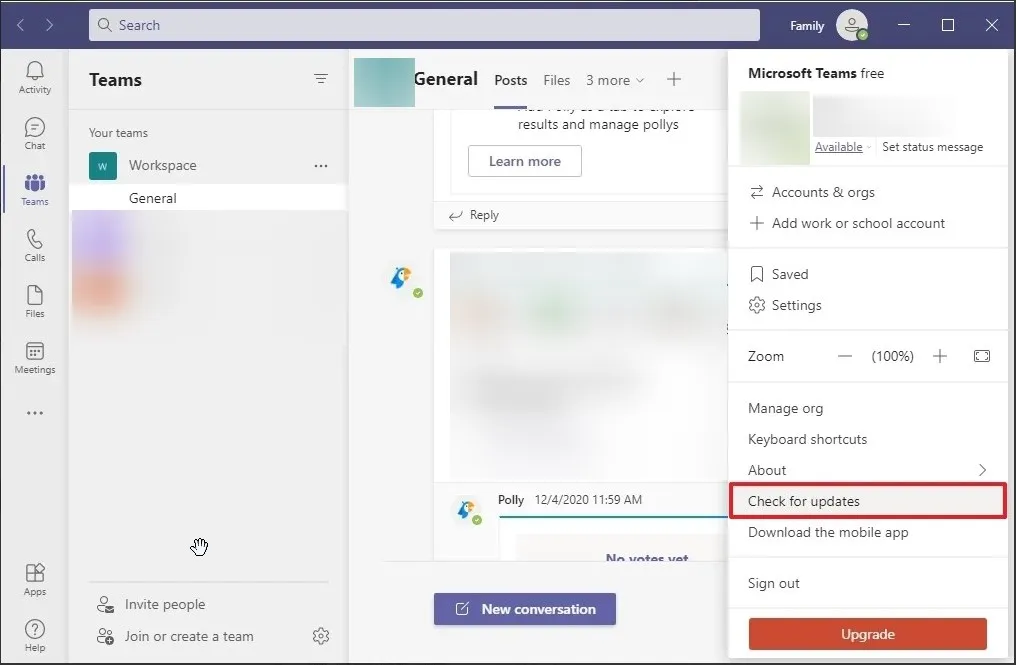
7. Update Microsoft Teams
Running an outdated app sometimes causes a problem. To resolve the Teams video not working, try updating the app.
1. Launch Microsoft Teams > click your Profile pic > Check for updates.
If an update is available, it will be automatically downloaded and installed.
2. Exit the app after the update and then run MS Teams to see if the camera is working or not.
8. Reinstall Microsoft Teams
To uninstall Teams, follow these steps:
1. Press Windows + I > Apps > Apps & features
2. Select Microsoft Teams > Uninstall
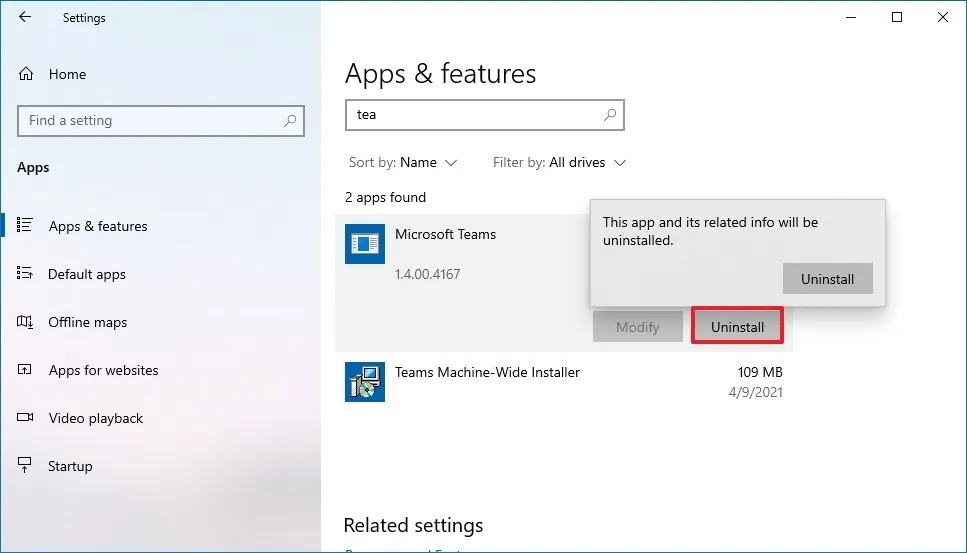
3. Confirm the action by clicking Uninstall again.
Restart the PC and then reinstall Microsoft Teams. Now try to use the camera while running Teams; this should fix the problem.
See This- How To Update Bluetooth Driver Windows 10
9. Use the Web Browser
If the above steps haven’t worked so far, and you are in a hurry, try running MS Teams in a web browser.
1. Launch your preferred web browser.
2. Open Microsoft Teams > sign in > the Chat menu and select contact.
3. New Meeting > Start meeting > allow your browser to access the camera and microphone.
If the browser does not ask for permission, you will need to configure the settings.
Google Chrome
1. Open Google Chrome > click the three dots > choose Settings from the context menu.
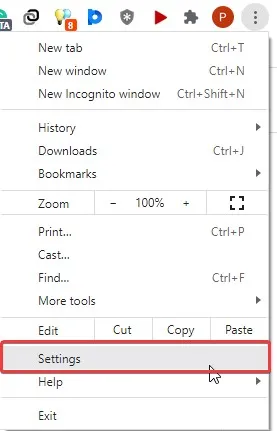
2. Click Privacy and Security > Site Settings.
3. Open Permissions > Camera > Microsoft Team site
4. Expand the menu next to Camera & Microphone > Allow.

Don’t forget to allow microphone access permission to Microsoft Teams. A camera with a built-in microphone will need it.
Microsoft Edge
1. Launch the browser > press Alt + F > Settings > Cookies and site permissions > All sites.
2. Select Microsoft Teams site > from the drop-down next to Camera and Microphone > Allow.

Note: Browsers like Firefox, Explorer 11, and Safari do not support Microsoft Teams.
10. Run Hardware and Devices Troubleshooter
If you double that, the problem is caused by the device malfunctioning; therefore, try running Hardware and Device troubleshooter. To do so, follow these steps:
1. Run elevated Command Prompt
2. Type msdt.exe -id DeviceDiagnostic, then press Enter
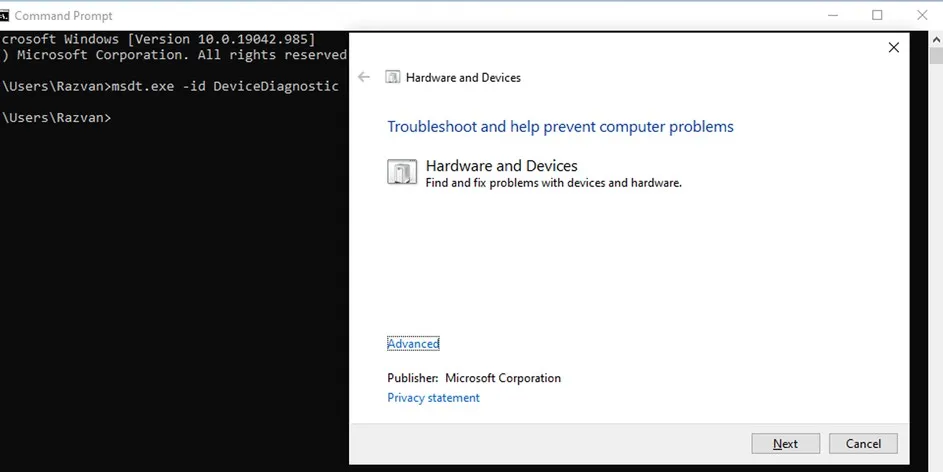
3. This will open Hardware and Device troubleshooter > click Next to perform scanning.
If any issues are found, they will be automatically fixed by the Hardware and Device troubleshooter.
11. Check for Windows Update
Lastly, check the system for available Windows updates.
1. Press Windows + I > Settings > Update & Security > Windows Update > Check for Updates.
2. If an update is available, you will get an option to Download & install it.
3. Click the button and follow the on-screen instructions.
4. Restart the PC to apply changes.
Now try to run MS Teams with the camera.
FAQ-Microsoft Teams Camera Not Working
Wrap-Up – Get Camera Working in Teams
Identifying the root cause of the problem might not be easy, as it can be an outdated driver, privacy settings, an antivirus application, or a defective USB port. Regardless of what caused the camera not working issue on Teams, these solutions will help troubleshoot the problem and get Teams camera working. The easiest way to update the camera driver, the most common reason is to use Advanced Driver Updater, a powerful tool that quickly and effectively updates all outdated drivers.
I hope you liked the post, do share your comments below.
Recommended-
How to Fix the Microsoft Print to PDF Feature Not Showing
How to Fix Microsoft Teredo Tunneling Adapter Missing
How to Fix Realtek Audio Issues in windows 11, 10