
Are you worried about what to do with the “The drive is inaccessible. Access has been restricted” error? Reformatting the partition will help, but it will come at the cost of data loss.
To keep data safe and restore deleted data after formatting the drive, try Advanced Disk Recovery. This data recovery tool helps get back data even from a formatted drive.

Unable to open up a file or folder in a drive on Windows? Are you dealing with the “The drive is not accessible. Access has been restricted” error? Reformatting the partition can resolve this issue, but it comes with the risk of data loss. To ensure your data remains safe and recover any lost files after formatting, consider using Advanced Disk Recovery. This powerful tool helps you retrieve data even from a formatted drive.
Quick Fixes
- Take Ownership of the Drive
- Run CHKDSK Command
- Assign a Different Drive Letter:
- Check for BitLocker Encryption:
- Update Drivers
- Scan for Viruses
Why Does the Error Say D:\ Drive is Not Accessible
Note : The Drive D: is just taken as an example. The error can vary depending on the Driver letter the problematic drive uses.
Users usually think that the “Drive is not accessible – Access is denied” or D:\ Drive is not accessible, is encountered due to a hardware issue, or is because the drive is in use. They are not wrong as they are a potential cause. However, that is not always the case. There are several other reasons that cause the error. Here, we enlist the core factors -error occurs due to the following reasons –
- The drive does not have the required permissions.
- It is infected with a virus.
- It is locked by BitLocker.
- The hard drive is corrupt or damaged.
- Outdated Drivers
- User Permission Errors
Therefore, before following the troubleshooting steps, ensure the drive is not locked.
What Are the Different Types of Disk Errors?
There are many types of error messages that one can get while facing disk errors. Here are the most common ones.
Drive is not accessible. The parameter is incorrect. When the Windows OS reads any storage device, external or internal, but fails because there is a mismatch of the drive’s settings, connection, or structure, this error message is displayed.
Drive is not accessible. Incorrect function. If this error message is displayed, then it means that Windows OS has detected the drive successfully. However, when Windows tries to carry out any operation (read, open, write, query), the drive does not carry out that task or function.
Drive is not accessible. The file or directory is corrupted and unreadable. In this case, the operating system has successfully detected the drive and the partition, but cannot read the file system structure, which includes folders, metadata, and indexes, due to severe corruption.
How Do you Unlock the BitLocker Encrypted Drive?
To unlock the drive locked by BitLocker, right-click the drive > Unlock drive > type the password, and that’s it.

Once you are sure it is not locked, follow these steps to fix the issue.
How to Fix Drive is not Accessible “Access is Denied” Error?
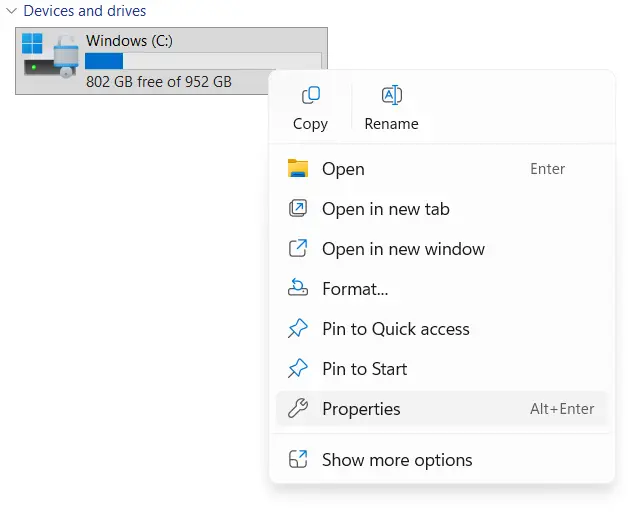
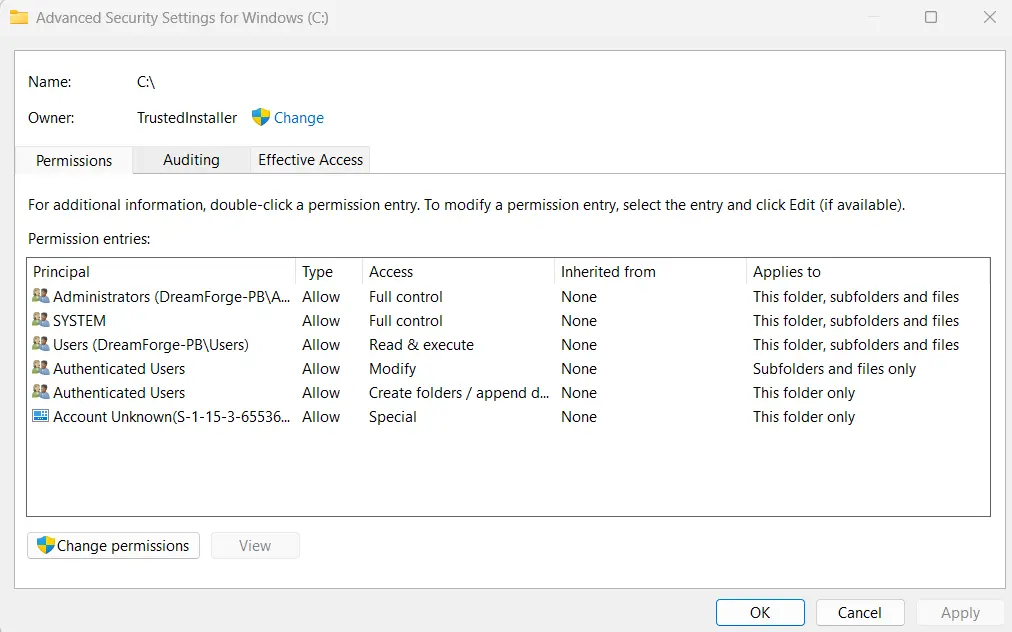
Fix 1: Fix Drive Is Not Accessible via Properties
When the external hard drive displays location is not available, access is denied, or “The drive is inaccessible. Access has been restricted, ” it means you don’t have the correct privilege settings. To fix the issue, you need to take ownership. To do so, follow these steps:
1. Go to My PC.
2. Right-click the inaccessible hard drive > Properties

3. Click the Security tab > Advanced > Edit > click Change > enter the user account name and click Check Name > modify the ownership.


Read Here – Solved – Unable To Terminate Process Access Is Denied in Windows
Fix 2: Run CHKDSK Command
When the “drive is not accessible” issue is followed by the “Access is Denied” message, the possible reasons for this problem are disk errors, bad sectors, or a corrupt file system. To fix this, you’ll need to run the CHKDSK command. To do so, follow these steps:
1. Connect the external hard drive.
2. Open the elevated Command Prompt. Type Command Prompt > right-click > Run as administrator.
3. Type chkdsk D: /f /r in the Command Prompt window. (Here, D is the disk’s drive letter, which shows the “drive is not accessible” error.)
4. Click Yes to proceed.
Now, try to access the drive; you should not face any problems. However, if you still face the problem, you must format the drive. In such a case, we recommend using Advanced Disk Recovery to get back the data that will be deleted.
Fix 3: Assign a Different Drive Letter
If changing properties and running the CHKDSK command on the disk does not work, you should probably try to reassign a drive letter.
To do so, follow these steps –
1. Press Win+X to bring up the quick access menu.

2. From the menu, click on Disk Management to open the tool.
3. In the Window, select the partition of the drive that you cannot open and right-click on it.

4. Find the Change Drive Letter option in the menu and click on it.

5. Click on Change to initiate the process and select the drive letter.
6. Select a letter from the dropdown that has not already been used.

7. Click OK to save the change.
Restart your PC after changing the driver letter. This way, you can resolve the accessibility issue if it was due to the assigned drive letter. If not, do not worry, as we have one more fix left.
Fix 4: Format the Drive
After you have tried everything, you should save the drive and keep it usable. If the current data on it has gone corrupt and is not allowing the drive to open, you may not have a choice other than formatting it. Use the NTFS file system to format the drive you should be able to use it again.
You may need to format the drive if none of these fixes work. Make a cautious decision to backup any vital files before starting, though, as formatting will remove all data from the device. Here are steps to follow to proceed with the formatting of the inaccessible drive.
1. Press Win+X to bring up the quick access menu.
2. From the menu, click on Disk Management to open the tool.
3. In the Window, select the partition of the drive that you cannot open and right-click on it.
4. Find the Format option in the menu and click on it. 
5. Ensure that the NTFS file system is selected and click on OK to complete the process.
After successfully formatting it, you can find that the drive is now accessible. However, the data you had will be lost. To get the data back, you can try data recovery software, as it is possible to recover data from formatted hard drives.
Read Also : How Do you Fix a USB Drive That Says it Needs to be Formatted
Fix 5: Check for Malware & Remove Threats
Sometimes, the presence of malware can end up in such error messages which deter you from accessing the drive. If a malware or virus has corrupted your files or added hidden files which alter the regular operation of your system, you can receive a ‘drive not accessible’ message. It is also possible that a malware added an encryption to it, in this case, you need to run a full scan using Windows Defender or a third party software.
Fix 6: Get Permission or Change Drive Ownership
Get permission by changing drive ownership
Use this when you get Access is denied or permission-related errors.
1. Open This PC.
2. Right-click the affected drive → Properties.
3. Go to the Security tab.
4. Click Advanced.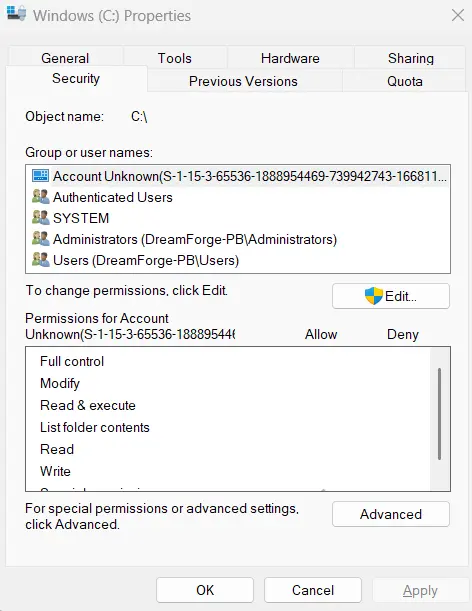
5. At the top, next to Owner, click Change.
6. Type your Windows username Or type “Administrators”
7. Click Check Names → OK
8. Enable Replace owner on subcontainers and objects
9. Click Apply → OK
Fix 7: Check And Repair File System
If the issue is on the main disk –
1. Open Command Prompt (Admin).
2. Type sfc /scannow and press Enter.

3. After it finishes, copy and paste DISM /Online /Cleanup-Image /RestoreHealth followed by Enter.
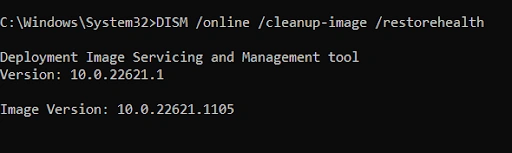
4. This repairs Windows components that interact with file systems.
Fix 8: Check Your Connections (Cable and USB Port)
1. Reconnect the drive.
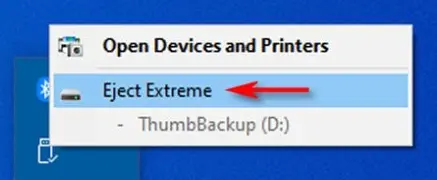
2. Safely eject the drive.
3. Unplug it completely.
4. Wait 10–15 seconds.
5. Plug it back in firmly.
Note : You could also try to use a different USB port, replace the cable or test on another computer.
Fix 9: Connect the Drive Directly to the Motherboards
Some experts have stated that connecting the drive directly to the motherboard helps resolve the issues caused by faulty USB cables, hubs, or external enclosures. A direct connection eliminates any middle-item in the connection and confirming if the hard disk is faulty or not.
Fix 10: For BitLocker Drive Encryption
Users can use the BitLocker Drive Encryption to encrypt and lock the drive. Once locked the contents of the drive cannot be visible unless you use the password or recovery key to access the drive. If you move the drive to another PC, it will not remember the key or password and display the Drive Is Not Accessible error. The only solution to this issue is to unlock the drive using the recovery key or correct password.
Bonus: Can A File Recovery Software Help Recover Lost Files From A Disk Displaying “Drive Is Not Accessible”?
If, unfortunately, you are not able to fix the “Drive Is Not Accessible” error on a Windows PC, then you could use a file recovery software to retrieve your data. This is possible if there is a logical failure on the hard disk, and also in the following scenarios.
- The hard disk is healthy with no beeping, clicking, or buzzing sounds.
- The hard disk has developed a logical error instead of a physical one, which includes accidental deletion of system files or a file system corruption.
- The hard disk can be seen in the Disk Management Tool, but is not accessible by the File Explorer.
We have tried and tested many file recovery apps and found Advanced Disk Recovery to be one of the best software programs to recover files and folders from corrupted, formatted, and hard drives with logical failure. However, recovering files may not always be possible using file recovery software if one of the following situations occurs.
- Physically-Damaged Drive.
- Encrypted Drive by BitLocker or EFS.
- The Disk Management does not recognize the drive.
Note : Contact an In-Lab Data Recovery Professional if you encounter any of the above cases.
How To Recover Files from a Drive that Shows Inaccessible Hard Drive Partition
With the help of Advanced Disk Recovery, the data recovery software for Windows PC, you can restore files from an inaccessible or formatted drive.
For the best outcomes, never store the retrieved data on the same drive you are scanning and avoid using it.
Here are the steps to use Advanced Disk Recovery.
1. Download, install, and launch Advanced Disk Recovery.
2. Select the storage type and drive letter from which you wish to recover data.

3. Next, choose from the two scanning modes – Quick Scan & Deep Scan
The quick scan identifies files from MFT, while the Deep Scan performs sector-wide scanning.

4. Click Scan Now and wait for the drive to be examined.

5. Analyze the scan results. Select the files you want to recover > hit the ‘Recover’ button.

6. Pick a different location where you want to restore the file.

7. Advanced Disk Recovery will show a confirmation message after recovering the files.
This is how, using Advanced Disk Recovery, you can get deleted files from the drive back, which shows the Access is Denied error.
Also Read- How To Recover Unsaved Word Document On Windows 10
Frequently Asked Questions
Fixed: The Drive is Not Accessible
‘The drive is not accessible’ error is mostly caused by data corruption, malware infection, lack of permissions. But there are several other reasons also which come into play due to system or a software malfunction. If you are unable to fix the issue with the aforementioned methods, try to get help from technical support. In case of a physical drive failure, you must take it to the authorized store for repair.
In case you are unable to access the data, use Advanced Disk Recovery to retrieve deleted files. It is a powerful software which can recover deleted files from Windows 11 & 10. We hope you like the information we have shared.
Please share your feedback with us in the comments section. For any product-related questions, you can send an email to support@systweak.com.
Must Read:
How To Fix Cannot Open Volume For Direct Access in Windows
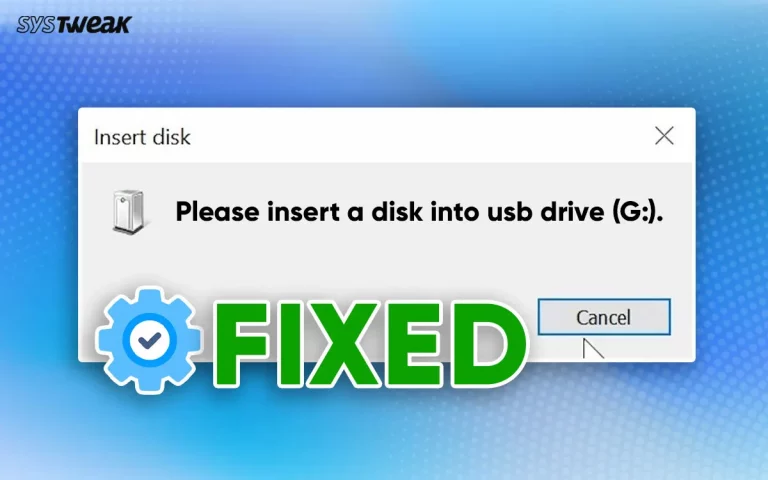
How to Fix ‘Please Insert a Disk Into USB Drive’ Without Losing Data?


2. Click the Security tab > Advanced > Edit> Click the Owner tab and change the ownership.
when I do this,there is NO security tab
thanks
Hello Neil,
Regarding your query, please note if the drive is formatted with the NTFS file system, only then can you see the Security tab. To check the file system, open the elevated command prompt and type get-volume.
You will be able to see the file system.
If it is FAT32 or exFAT Security tab will not be there.
However, if your driver is NTFS, use PowerShell to get the value of the NoSecurityTab registry parameter:
Get-ItemProperty -Path “HKCU:\Software\Microsoft\Windows\CurrentVersion\Policies\Explorer”|select NoSecurityTab
If the NoSecurityTab is set to 1, the Security tab in the properties of files and folders in File Explorer is hidden from the user.
If that is the case, let us know, and we will share steps to enable it.
Thanks and Regards
Changing the ownership worked. Thank you for the information
I cant acces the properties
Dear Ray,
To help you fix the problem we request you to please share the exact error message and if possible share the screenshot. This will help us to assist you better.
Thanks and Regards
Thanks this works real good.
I tried the “What to do if a drive is not accessible?” – when I right clicked on properties – I do not have the “Security” tab up on top.
Dear Jorge,
Thank you for writing to us.
To get the Security tab please follow the step by step instructions given below:
1. Press Windows + R to open the Run window.
2. Type regedit in RUN dialog box and press Enter key.
3. This will open Windows Registry Editor.
4. Here, navigate to – HKEY_CURRENT_USER\Software\Microsoft\Windows\CurrentVersion\Policies\Explorer
5. Now, in the right-side pane, right click > New > DWORD (32-bit) Value.
6. Name it NoSecurityTab and set its value to 0.
This will immediately add “Security” tab for all files and folders properties window.
If it doesn’t help restart the PC and check.
Now that you have the Security tab you can follow the steps given in the post to fix Drive is not accessible “Access is Denied,” error.
Thanks and Regards
Good Job very helpful
Thaks
Hello,
2. Click the Security tab > Advanced > Edit> Click the Owner tab and change the ownership.
when I do this, there is NO Owner tab. Please help; I’m running Windows 11 Home
Dear David,
Thank you for writing to us.
To change ownership of a file or folder on Windows 11 follow these steps:
Step 1: Right-click on the file or folder you want to change the ownership for.
Step 2: Select Properties from the context menu. Under Properties click on “Security” Tab.
Step 3: You will now be able to see permissions. If you cannot see any permissions to change, to Take Ownership of the file or folder, click on “Advanced”.
Step 4: Next, in the window that appears, you have to click on “Change” and enter the object name. Type on your Windows username to which you want to grant permission.
Step 5: Click on “Replace owner on subcontainers and object” and click Apply.
Step 6: Once you click on Apply, you’ll see this warning message. Click on Yes to proceed.
Step 7: Click “OK” twice click Advanced.
Step 8: Now under the Advanced permissions, you will see a change, and you will see the option to add Multiple Objects
Step 9. To add multiple objects and to inherit permission, you can click on “Change Permissions”.
Step 10. To inherit permissions, click on “Enable inheritance”. To add a new object, click on “Add” and click on “Select a Principal” and type in the Object name.
Now you can enable the Basic Permission. If you want to enable advanced permission, click on “Show advanced permissions”.
Once you have made all the changes, click Ok and exit the window.
Try these steps and see if it works.
Thanks and Regards
Thanks Ma’am changing the properties worked.
when i right click and press properties, it wont open. drivew cannot be opened, and whole computer gets slower when drive is plugged in, also when task manager is open my disc % jumps from about 25 to 50. every action i try with the disk makes file explorer stop responding and need to be force closed
Hello Kenneth,
Thank you for contacting Systweak Support.
Regret the inconvenience you have experienced.
Can you please let us know if the drive is part of Internal or External Hard drive?
In the meantime we suggest you try the below mentioned steps and check if it helps you in fixing the issue.
* Restart you PC
* Open ThisPC > right-click on the drive > select Properties.
* Go to Tools tab > click Check
* When you are prompted to make a choice, select Scan drive and follow on screen instructions.
* When done try opening the drive.
This should fix the issue.
Thanks and Regards
Also try to access the drivers through Disk Management. Press Windows Key + X and select Disk Management. There try to double-click or right click on the E: drive to see if it allows you access the drive.
Keep us posted if you require further assistance.
Hi please I really need your help.
I can’t access the local disk on my windows 11 Pro laptop. When I click on it it says “location is not available
C:\ is not accessible.
Access denied. ”
I can’t run cmd as administrator. When I try, it says ” Network Error
Windows cannot access C:\Windows\system32\cmd.exe”
When I go into the properties of the local disk and click on the “Change” current owner, it says ” Can’t open access control editor. Access is denied.”
Please help me fix this.
I would want to take pictures of it and show it to you for better understanding of the problem.
Thank you 😔
Dear Chris,
Thank you for writing to us.
As you cannot run CMD as admin and cannot change the owner you can follow these steps to see if it help:
1. Restart your computer in Safe Mode
1. Hold the Shift key and click Restart.
2. You will now get a blue screen select Troubleshoot → Advanced Options → Startup Settings → Restart.
3. After restarting, select Enable Safe Mode with Networking using the number keys on your keyboard.
Now try accessing your C drive. If this helps some third party program might be causing the issue. If this doesn’t help then
2. Run a Disk Check from Recovery Mode
1. Restart your PC and press F8, F12, or Esc repeatedly while it boots up.
2. Choose Advanced Options → Command Prompt.
3. In the Command Prompt window to run Disk check, type:
chkdsk C: /f /r
Press Enter.
/f fixes errors on the disk.
/r repairs bad areas.
Wait for the PC to check for errors and fix them.
After this create a new admin account as there are chances that the one you have is corrupted.
To create admin account in safe mode follow these steps:
1. Press Windows + R > type cmd > and press Enter.
2. Type the following commands one at a time and press Enter after each:
net user AdminTemp /add
net localgroup administrators AdminTemp /add
3. Restart your computer and log in using the new AdminTemp account.
This should help. If this doesn’t work either try resetting drive permissions
1. Press Windows + R > type cmd in Run window.
2. Type icacls C:\ /reset /T /C /Q in the command prompt window to reset all permissions for the C: drive.
Next repair system files by using sfc /scannow command.
If this doesn’t help run DISM /Online /Cleanup-Image /RestoreHealth
These commands will scan and repair missing or corrupted system files.
Take a backup of files as a safety measure.
If nothing works sadly you will have to reinstall Windows.
Hope this helps fix the issue.
Regards
Systweak Support