It is possible to recover lost files after upgrading to Windows 11! Read the post till the end to learn how that can be done.
To get security updates and use the latest operating system, people upgrade to the newest version of Windows. However, in doing so many lose their important files and the excitement of upgrading to a new operating system turns into a nightmare. If you are sailing in the same boat you’ve come to the right place. In this tutorial, we will learn how to recover lost files using the best data recovery tool.
The process of upgrading to Windows 11 from previous versions of Windows such as Windows 10, is usually smooth. All the files and other data are easily restored. However, at times due to certain reasons, you might lose certain files after upgrading to Windows 11. If you are stuck in similar situations here’s what you need to do.
Must Read- How To Recover Unsaved Word Document On Windows 10
Reasons for Losing Files After Upgrading Windows
- Signed in with a temporary Windows account.
- Administrator account created before the upgrade is no longer active.
- Files are relocated to other locations.
- While upgrading to Windows 11 the files accidentally got deleted.
Due to any of these or some other reasons like power failure and more you can end up losing important files.
How to Recover Files After Upgrading Windows?
Before you assume that the files are gone forever, follow the steps given to find the lost files. In case you are unable to find the files, you can recover files using Advanced Disk Recovery, the best data recovery tool for Windows.
Best Ways to Locate Missing Files
Method 1- Sign out of Temporary Windows Profile
On certain occasions when you upgrade to Windows, a temporary Windows profile is created. Because of which you are unable to see files saved in the old profile. To confirm if that is the reason why you cannot see files, sign out of the temporary profile and sign in with your old profile. To do so, follow the steps below:
1. Press Windows + I & open Windows Settings.
2. Click Accounts > Sync your settings.

If you see the message you are logged on with a temporary profile. Roaming options are currently unavailable, it means you are signed with a temporary profile. To get back lost files sign in again using the old profile.
3. Restart the system > sign in using the old profile and look for missing files.
Note : Before you reboot the system take a backup of files, you save on the temporary files after upgrading to Windows. Sometimes to get things working, you might need to restart the system more than once.
Method 2 – Find Files Using Search Box on Taskbar
If you are signed with the old profile, you can search for files using the search box on the taskbar. To find the missing file, search with the filename or extension as shown in the screenshot below:

Method 3 – Enable Administrator Account
Often after upgrading Windows, the administrator account you created while upgrading gets disabled. If that is the case, you’ll need to enable it to see the files. To do so, follow these steps:
1. In the search box, type Computer Management.
2. Select Local Users and Groups from the left pane under the Computer Management window.

3. Double click Users > Administrator

4. If you see the box next to Account disabled selected, uncheck the box.

5. Click Apply > Ok and restart the system to sign in with the Administrator account. Now try to find the missing file.
See This- How To Recover Photos & Videos From Encrypted Drives
Method 4 – Use Advanced Disk Recovery to Retrieve Lost Files
After following the above steps, if you are still unable to find the missing files, it means they are deleted during the upgrading process. To restore and get back lost files using Advanced Disk Recovery, the best data recovery tool that helps retrieve all types of deleted files.
To use this Windows file recovery tool, follow the steps below:
1. Download and install Advanced Disk Recovery

2. Launch the tool

3. Select the drive partition you wish to scan to recover the lost files.
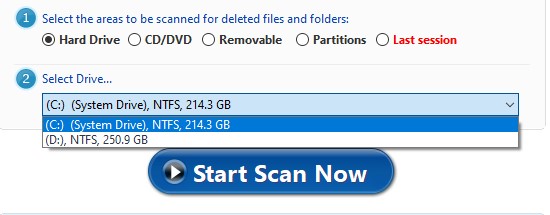
4. Click Start Scan Now > select the scan mode. To retrieve the maximum number of files we suggest choosing Deep Scan and again clicking Scan now.

5. Wait for the scanning to finish.

6. Once done, select the files you want to recover and click the Recover button

7. Click Browse to choose the location where you want to save recovered files. Make sure it is not the same location from which you are recovering the files.
8. Save the files and that’s it. This way using the best data recovery tool you can get back any type of lost file.
Wrap Up
When you upgrade to Windows 11 there are chances that you are unable to locate some files as they have been moved to some other location. Also, the Admin account created while upgrading Windows might be disabled. Due to these reasons, you might think that you have lost files. The post explains the easy way and the best data recovery tool – Advanced Disk Recovery using which you retrieve files. If the files have been permanently deleted or lost use data recovery software like Advanced Disk Recovery, the reliable and trusted option to restore deleted or lost files.
How To Recover Deleted MP3 from your Flash Disk – Windows 11,10
How to Recover Deleted Photos from Years Ago