
System files are the fundamental bricks of your operating system and how it functions. If these files are corrupt or damaged, your PC may start acting up or crash.
That’s why knowing what these files are and keeping them backed up is crucial. So, what are these files? Where can we find them?
More importantly, how can they be backed up and restored in distress? We aim to answer these questions by the end of this post. Keep reading as we look deeper into system files and how to backup and restore them as required.
What are System Files on Windows?
Files necessary for the Windows operating system to process apps and device drivers are called system files. Without them, the apps crash, certain processes show errors, and sometimes hardware stops working. Therefore, keeping a backup of all system files is vital.
Kernel32.dll is a common example of a system file; its primary function is managing memory. Simply put, the file ensures Windows has enough memory to operate the processes and apps. When the Kernel32.dll get corrupted, due to any reason, you can face all sorts of memory-related issues on Windows.

You may be wondering why keeping a Backup of System Files is important. Well, these files are the building blocks of your operating system, meaning nothing can work properly without them. Hence, if by any chance you end up tempering with them or they get corrupt after being attacked by an infectious file, the integrity of your OS is compromised. To avoid these circumstances, a backup of system files is suggested so that whenever something goes south, you can restore them to a previously optimized state.
Why Is It Important To Keep A Backup of System Files
For any operating system to perform, System Files are required. These files, if corrupted, can make the system nonfunctional. Therefore, a copy of system files should be kept.
There are instances when the installation and uninstallation of software cause harm to the system. In such a scenario, you can restore the system using the system file backup.
How do You Back up System Files
Now that we have explored every detail about the system files and their importance let us look at ways to help you back up system files on your PC.
Method 1 – Backup and Restore Files in Windows 10 Through File History
To use the File History option on Windows 10, you will first need to set it up. For that, you need to connect a backup device. To do so, press Windows + I to open Windows Settings > Update & Security > Backup > and click Add a drive. Select the location where you want to save backups.

This will enable File History. You can now set up a few parameters by clicking More Options.
Click the drop-down menu under Back up my files and select how frequently you want to back up your files. Also, you can decide the duration for which you want to keep the files.

File History will now start keeping a backup of Desktop, Downloads, Music, etc. Remove it from the list if you do not want to back up a particular folder.
Please scroll down the Backup Options, review the list > select the folder to delete, and choose Remove to exclude it.

If you want to add any other folder, click the Add a folder under Back up these folders. To exclude specific folders, look for Exclude these folders > click Add a folder and add the folder to exclude.

Once you are done with the settings, click Back up now. Windows will start the backup process, and once it is done, you will see the size, date, and time of the backup created.
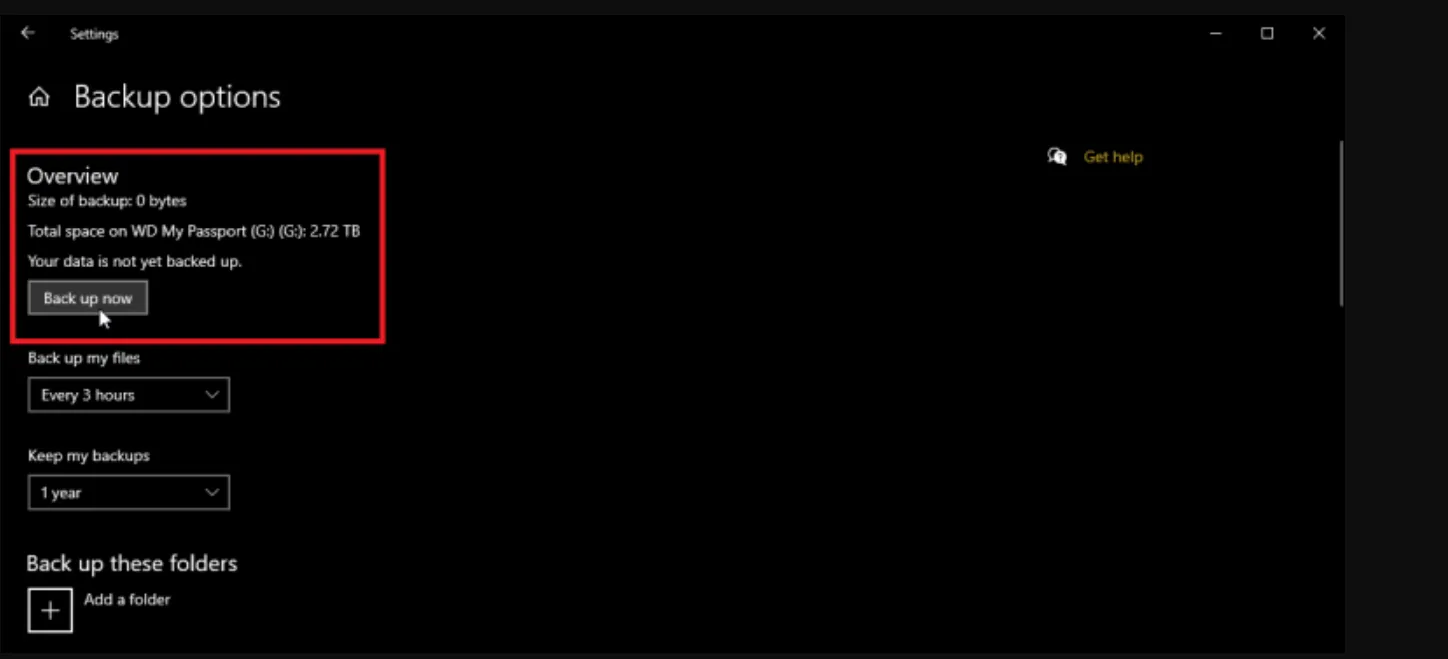
Note – You can change the backup destination whenever you want. Open Backup > More Options > Stop using Drive.

Method 2 – Use Windows Backup Application
If the history settings were off, look up the Windows Backup application on your PC. Go to the Start Menu, search for Windows Backup, open the app you find, and follow the instructions on your screen.
Step 1. Launch the Windows Backup application and select the data you want to back up.
Step 2. Click on the Backup button to initiate the process.
Step 3. Relax; the app will create a backup and store it in your Microsoft account.

Remember that you should log in with the account you rely on for backups.
Method 3 –Using Advanced System Optimizer’s System Files Backup and Restore Feature
If you find the above method a lot of work, we might have a more straightforward solution. The System Files Backup and Restore module offered by Advanced System Optimizer takes a complete backup of all system files needed for Windows to operate. It also facilitates easy restoration options in case of system failures. Furthermore, it has additional features that assist in importing backups taken previously or backups taken by other users to its own Backup List.

Download and Install Advanced System Optimizer on Your PC.

To use the Backup and Restore in Advanced System Optimizer, all you have to do is –
Step 1 – Download and install Advanced System Optimizer on your PC.
Step 2—The Backup and Recovery module may be found in the left pane. Click on it.
Step 3 – Select the System Files Backup and Restore on your PC from the options.

Step 4 – System Files Backup and Restore takes the backup of all system files in three easy steps (see left panel):

1). Welcome
2). Backup Progress
3). Finish
Click on the “Take Backup Now” button in the middle of the screen, which specifies the action. By clicking this button, the system files backup process is initiated.
The lower half of the screen displays the System Summary –
- Date of Last Backup and
- of existing backups
Clicking “Take Backup Now” opens a new window asking where to save the backup. To select a suitable location, click on the icon in the right-hand corner of the box and browse through Windows Explorer.

After that, press the “Start Backup” button. System Files Backup and Restore will start Windows 10 file backup. If you want to stop the process, click the “Cancel” button. This will discontinue the process and take you back to the Welcome screen.
Backup Progress
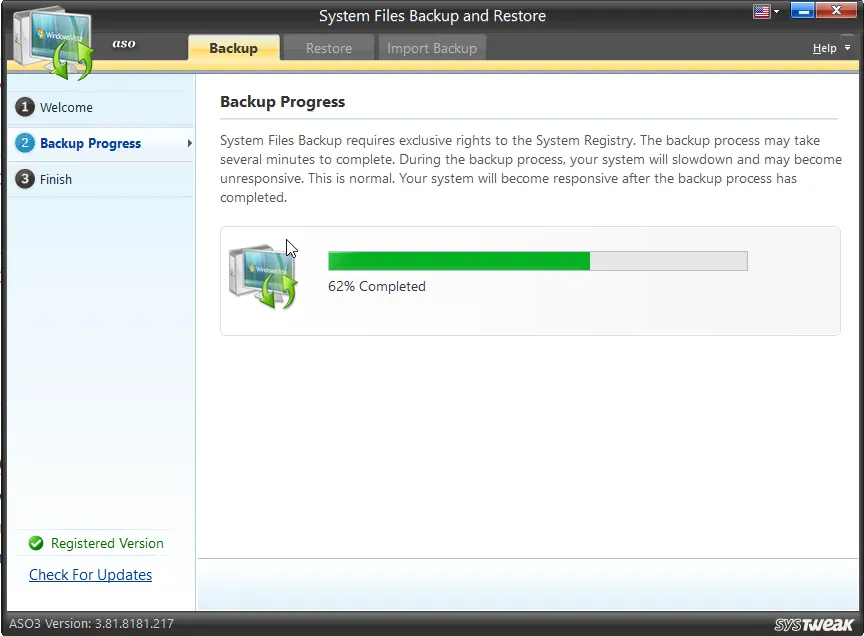
System Files Backup and Restore will now take the complete backup of all system files. The system might slow down while taking the system file backup, but there’s nothing to worry about. Since the system is in use, this happens sometimes. Therefore, we recommend backup Windows 10 files (system files) when the system is idle.
Finish

The last step shows the successful completion of the system file backup. Here, the displayed information shows – Backup time and Backup Location.
You may click on the “Finish” button to restart the process.
Restore Tab

In case of system failures or malware infection, or problems caused due to improper software uninstallation using the Restore tab, the backups taken can be put back
The system can be restored to the last best configuration known in three easy steps (see left panel):
1). Welcome
2). Restore Progress
3). Finish
Step1: Welcome
Restoring System Files
The Welcome screen shows a “Restore Backup,” a button clicking on, which helps view the Backup List. This list consists of all the backups taken so far, with the date, time, and path to which the backups are stored.
You can select any backup that you consider suitable from the list and restore the system to that configuration by clicking on the “Start Restore” button.

Note: If you think some backups are too old, remove them from the Backup List by clicking the “Delete” button. Clicking the “Cancel” button helps you return to the previous screen.
Step2: Restore Progress

Restoring the selected backup system requires restarting; you will see this message. Click “Yes” to continue.
Step3: Finish
After the system restarts, your system will be restored.
Read Also: Best PC Cleaner Software for Windows
How To Import Backup?
You can use this section if the Backup List in System Files Backup and Restore does not contain the system backups taken.

Explanation: When system backups are taken using some other applications, these backups might not be seen under System Files Backup and Restore. But using this option, these backups can be imported.
Note : One should be careful while restoring these imported backups. Some backups might take you to unhealthy system configurations that may be fatal for the system. In extreme situations, the operating system may have to be reinstalled. Therefore, when importing and restoring a backup, be very careful.

This operation is divided into 2 steps (see left panel):
1). Welcome
2). Finish
Step1: Welcome
Restore the Previous Backup
System Files Backup and Restore assists in adding the previously taken backups on the same system to the existing Backup List. For this purpose, click on the “Restore Previous Backup” button.
After that, select the location where backups have been stored > and click on the “Start” button.

You can see the import progress in the lower half of the screen.
During the import process, two cases might encounter.
1). If the backup to be imported already exists in the Backup List, it will not be imported.
2). If the backup to be imported does not exist in the Backup List, it will be imported and added.
Once backups are imported to the Backup List, these can be restored if necessary. But this should be done with full caution. Restoring unknown backups may prove fatal because Windows must be installed again.
Step2: Finish
Import Backup Summary
After successfully importing backups, the import summary shows the Import Details and Import Location.
To return to the Welcome screen, click the “Finish” button and repeat the process.
Writer’s Tip – Take Backup on Windows 11
If you are a Windows 11 user, then also using Advanced System Optimizer, you can take a backup. However, if you want to use the File History option follow these steps:
- Press Windows + S and type Control Panel in the search field.
- Look for the File History option in the Control Panel. If you are unable to find it change the view to Icon
- Connect the drive > and enable File History to start taking backups.
You can use the Select drive option to change the drive at any time. Also, you can customize settings from the Advanced settings option.
Backup and Restore System File With Ease
This is it; you can back up and restore your Windows 10 file backup using these simple steps. We hope you find the information helpful and will try backing up your system files. If you have any questions about this or the product, please get in touch with our support team at support@systweak.com.
Also, share your feedback in the comments section.
Recommended-


One thought on “How To Backup & Restore Windows 10 System Files”