
To get your wireless Logitech mouse working, update the Logitech Mouse Driver using the different ways explained in the post below. Here, we explain how to download the latest and compatible version of the Logitech wireless mouse on Windows.
Why Update Logitech Mouse Driver?
Tip : Even after adding new batteries and connecting to the right port, if your Logitech mouse suddenly stops working or the Logitech mouse is not working, you need to update the USB and Logitech mouse driver to fix issues that might be interfering with the working of the mouse. The easiest way to update drivers is to use Advanced Driver Updater. The driver updating software detects and helps update outdated drivers without any hassle. To get Advanced Driver Updater, click the button below.

Logitech is well known for providing the best-in-class computer accessories. But sometimes, when we fail to update the drivers, the nifty pointing device (mouse) stops working. This means your productivity will decline, you won’t be able to play games seamlessly, and your work will be interrupted.
If you can relate to what we are saying, let’s read ahead: what to do when the Logitech mouse stops working, and how to update Logitech mouse drivers for Windows 11 & 10.
Must See- How to Download the Logitech M510 Mouse Driver
Before Updating the Mouse Driver, Try These Basic Fixes
When you encounter a Logitech mouse not working issue, follow these basic fixes.
1. Disconnect the mouse and reconnect.
2. Restart the PC
3. Refresh the Mouse
4. Change the Mouse Battery
5. Connect the Mouse Receiver to an Alternate USB port
6. Move the Mouse away from other electric gadgets
7. Scan for Hardware Changes
8. Perform a Clean Boot
9. Scan the PC for malware infections
10. Connect the Mouse to Another PC
See Also- How to Fix Logitech Mouse Lagging in Windows 11, 10
System Requirements to Download the Driver
The operating system requirements for the Logitech Mouse are as follows:
Windows – Windows 10 or later.
macOS – macOS 13 (Ventura) or later.
How to Set Up a Logitech Mouse on Your PC
1. Open the Logitech Mouse and the wireless adapter from the box, and remove the polythene.
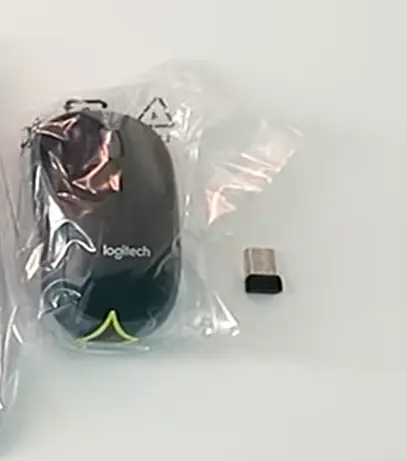
2. Next, remove the pull-out paper tabs so that the battery becomes functional. In case you did not receive the battery, then you have to place one yourself.
3. Switch on the Logitech mouse by sliding the toggle button towards the right.
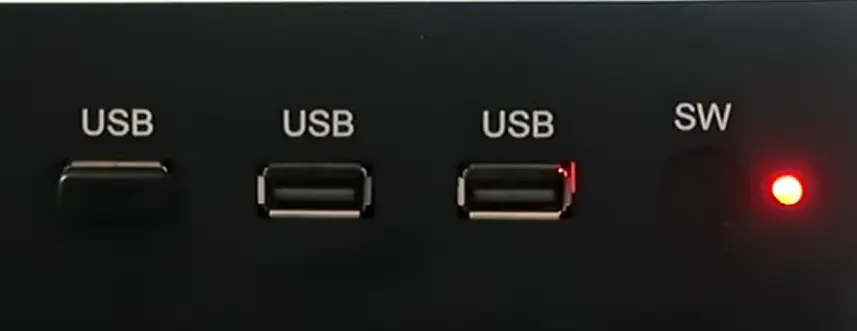
4. Plug the USB receiver into your PC’s USB port.

5. A message will pop up in the right corner of your screen within a few seconds stating that “Setting Up A Device.”
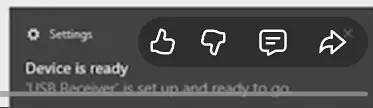
6. Wait for some time until the “Device is ready” message pops up
That’s It! Your Logitech mouse is now ready to use. To customize the buttons, we need to install the Logi Options software.
Best Ways to Download/Update Logitech Mouse Driver Windows
The driver can be updated either manually or automatically.
To update manually, you will need to head to Device Manager. To update automatically, Advanced Driver Updater is the best driver updater for Windows.
Note : Updating drivers manually is daunting and requires patience. Also, the chances of downloading and installing incorrect Logitech driver updates are more. If you are okay taking these risks, move with manual steps.
But if you are smart, you will not want to spend time updating drivers – a task that can be done automatically using a third-party driver updating tool called Advanced Driver Updater.
Method 1: Download Drivers From Logitech Official Website.
All hardware and device manufacturers maintain an official website to provide drivers, software, and other resources to their customers. You can always visit the Logitech website and download the updated driver for your mouse for free. Here are the steps.
1. Navigate to the Logitech website.
2. You can download the Logi Options Customization software that includes all features.

3. After the download is complete, double-click the file and follow the instructions to install Logitech Mouse drivers.
Note : After you install the Logi Options Customization software, you can customize and remap the button of the mouse.
Method 2: Manually Updating Logitech Mouse Driver Via Device Manager
1. Open the Run window by pressing the Windows + R keys.
2. Type devmgmt.msc and hit the Enter key.

2. Go to Mice and other pointing devices option.
3. Explore the category by double-clicking it.
4. Right-click Logitech mouse or wireless mouse > Update driver.

5. This will open a new window; click “Search automatically for updated driver software.”

6. Wait for Windows to look for an available update. If available, it will be installed automatically.
However, if Windows cannot find the update, you must reinstall the Logitech mouse driver.
Method 3: Automatically Update Logitech Mouse Driver Using Advanced Driver Updater (Recommended)
If you are wondering where to download Logitech mouse drivers without wasting time, use Advanced Driver Updater.
Advanced Driver Updater is one of the popular third-party tools that help update drivers automatically. To use the tool, you need to download, install, and run the tool; the rest of everything will be taken care of by the Advanced Driver Updater.
This professional driver updater will automatically learn about the operating system and outdated drivers and show the latest updates.
Note : If you are using the Free version of the tool, you will have to update each driver manually by clicking the Update driver option next to each outdated driver. If you have the paid version, you may use the Update All option to update all missing, corrupt, and troublesome drivers at once.
To perform Logitech Mouse Driver update on Windows 10, follow the steps below:
1. Get Advanced Driver Updater
2. Launch the driver updater tool for Windows to scan the PC for outdated drivers.

3. Click Start Scan Now to scan the system for outdated, corrupt, and missing drivers.
4. Wait for the scan to finish.

5. Once you have the scan result look for the Logitech mouse driver or HID Keyboard Device and click Update driver to update all other outdated drivers also next to it.

6. Wait for the download to finish.
7. Reboot the computer to apply the Logitech mouse driver update changes.
Now try to use the Logitech wireless mouse. You should not face any problems.
Must Read- How to Download the Logitech M510 Mouse Driver
Get the Logitech Mouse Driver Updated and Fix Driver Related Issues
We hope to use the methods explained above. You can get Logitech mouse drivers working and be able to update Logitech drivers for Windows 11,10. The easiest way to update the driver is to use Advanced Driver Updater. Hopefully, you will give it a try. If you have queries regarding the product, feel free to send them to support@systweak.com.
Also, share your feedback and suggestions in the comments box below.
Frequently Asked Questions
Related:-
How to Fix Logitech Mouse M310 Driver Errors
How to Fix Logitech Mouse Lagging in Windows 11, 10
How to Download Logitech G Pro X Superlight Wireless Gaming Mouse Drivers


This article on updating Logitech mouse drivers in Windows 11 and 10 is incredibly helpful. It offers clear, step-by-step guidance that simplifies a potentially daunting task. Thanks for providing such an informative guide, ensuring a smoother user experience for Logitech mouse owners. Great job!