Is your system unable to detect the Razer Deathadder mouse? You have landed on the correct page, here we will discuss how to fix the Razer Deathadder mouse malfunctioning.
The most common reason for this problem is outdated or missing mouse drivers. With that being said, to enjoy the glitch-free performance of the Deathadder mouse, you will need to update the Razer Deathadder Elite driver. For this, you can try using Advanced Driver Updater.
In this article, we will discuss easy and effective ways to update the Razer Deathadder driver. However, before we get into technical details, let us do a basic check of things.
How to Fix Razer Deathadder Issues Windows 10
Besides outdated, missing, or corrupt drivers, and loose cable connection, the weak battery also contributes to Deathadder mouse issues. This means, before we learn how to update Razer Deathadder driver Windows 10, we should do some initial checks.
Fix 1 – Mouse Not Responding
If your system is not recognizing the mouse, follow these fixes:
1. Connect the mouse to another PC and check if it is working. If it works fine, you know there is some problem with the USB port of your PC.
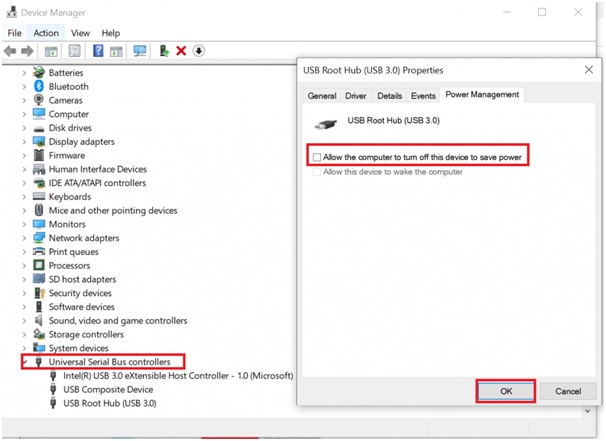
2. In addition to this, check USB port settings. To do so, press Windows + X > Device Manager > look for Universal Serial Bus Controller > double click it > right-click USB port > Properties > Power Management tab > uncheck the box next to Allow the computer to turn off this device to save power.

Fix 2 – Mouse Lagging Issue
Check if the mouse sensor
You can face mouse lagging issues if the sensor is blocked. To fix this, unplug the mouse and clean the sensor using a clean muslin cloth, and a Q-tip dipped in alcohol.
Reset Surface Calibration
If cleaning the mouse doesn’t work, try recalibrating it using Surface Calibration (Razer Deathadder software). To do so plugin the Razer mouse into the USB port, and place it on your mouse pad. Simultaneously, hold the left and right mouse buttons along with the wheel to reset the calibration.
Read Also: How to Fix Bluetooth Peripheral Device Driver Issue for Windows 11,10,8,7
Once you have done this, check if the mouse is working properly. If not, then you will update the driver to fix the Razer Deathadder driver issue.
How to Update Razer Deathadder Driver Windows 10
If the above methods did not help, then there’s a possibility that the issue is related to corrupt, or missing drivers. To fix this, we will need to update the Razer Deathadder Elite driver. This can be done both manually and automatically.
Here is the step-by-step guide to updating the Razer Deathadder driver.
Manually updating Razer Deathadder Driver
Remember manually updating Razer Deathadder requires technical knowledge, time, and patience. This is because to manually update a driver, you need to know the system configuration and device model number, only then you will be able to download the compatible driver. Follow the step-by-step guide to learn how to do it.
1. Visit the Razer support website
2. Search for the latest version of the Razer Deathadder mouse driver.

3. Check for the compatible version based on the operating system and bit, you are using
4. Double click on it and follow on-screen instructions to download it.
5. Install the driver and restart the PC to apply changes.
6. Now try using the Deathadder mouse to see if the issue is fixed or not.
In case you are not comfortable with the manual steps, move to the next method and learn how to update Razer Deathadder software.
Automatically Updating Razer Deathadder Elite driver
Updated and latest device drivers play an important role in the proper functioning of the system. Therefore, to avoid any issues we should keep them updated. The best way to update drivers without spending too much time is to use a driver updating tool like Advanced Driver Updater.
Developed by Systweak this professional driver updater before updating drivers takes a backup of old drivers. Also, it allows scheduling driver updates and adding incompatible drivers to the exclusion list. To use it follow the steps below:
1. Download and install Advanced Driver Updater.
2. Run the feature-rich driver updating tool.

3. Click Start Scan now to scan the system for outdated drivers.

4. Wait for the scanning to finish
5. Review scan results to update drivers. If you are using a trial version of the product, you will need to click the Update driver option next to the mouse. Note, using the trial version, you can update one driver at a time. However, using the paid version, you can update all outdated drivers at once by clicking Update All.

6. Once done, restart the system and try using the mouse, it should work flawlessly.
Read Also: Fixed – Wireless Mouse Isn’t Working On Windows
Razer Deathadder Driver Updated
We hope after using the preliminary steps and updating drivers, you were able to fix the issues with the mouse Razer Deathadder. Do let us know which method worked for you. If this post has helped, share it with others and help them.
In case you have tried some other steps, do share the same in the comments box. We love hearing from you.
For any product-related queries, you can contact the technical team at support@systweak.com. Advanced Driver Updater offers a 60-day money-back guarantee.
Next Read : How To Solve Generic Non-PnP Monitor Driver Issues


