The automatic locking feature of Windows was designed to minimize unauthorized access to your PC and keep your data private and secure at all times. This feature was for those who leave their PCs unattended and walk off from their desks. We recommend pressing the Win + L keys to lock your PC before going elsewhere. However, there are situations where you are working on multiple machines simultaneously, working on your personal computer alone, or working in a lab with restricted access. In these cases, automatic computer locking can be a curse rather than a boon. This guide will help you stop Windows from turning off automatically with different expert-recommended methods.
Different Ways To Stop Windows From Locking after Inactivity
Method 1: Change The Sign-In Options
Turning off Windows’ sign-in feature can help prevent your PC from locking automatically when inactive. You should also turn off Dynamic Lock feature, that auto-locks your computer if a paired Bluetooth device, like your smartphone, moves out of range. Here are the steps::
1. Right-click on the Start button, choose Settings, and navigate to Accounts > Sign-in options.

2. Select Never in the Additional Settings section.
3. Also turn off the Dynamic Lock feature by unchecking the box before the Allow Windows to automatically lock your device when you’re away.
Method 2: Turn Off Sleep Mode
Windows OS is designed to go into sleep mode when not being used, and this, in turn, locks the PC. To stop automatically locking, you can adjust the settings so that Windows does not enter sleep mode when inactive. Here is what you need to do to turn off the sleep mode on your PC:
Read Also: Windows 10 PC Won’t Sleep: Reasons & Fixes [100% Working]
1. Press Win + I to open the Settings app and go to System > Power & battery.
 2. Click on the Screen and Sleep option to expand the options.
3. For both “On battery power, put my device to sleep after” and “When plugged in, put my device to sleep after,” select Never from the dropdown menus.
Method 3: Disable Screen Saver
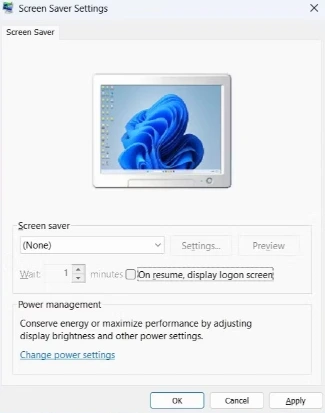
Disabling screen saver mode is also advisable because it can occasionally trigger Windows automatic locking. To do this:
1. Press the Windows + S keys to open Windows Search.
2. Type Turn screen saver on or off* and select the result under Best Match.
 3. In the Screen Saver Settings window, set the screen saver to None, uncheck On resume, and display the logon screen.
Method 4: Make Changes In Windows Registry
Editing the Windows Registry can prevent a computer from turning off automatically which involves modifying registry settings. Here is what you need to do:
Step 1: Press Win + R to open the RUN box and type “regedit” followed by the Enter key.
Step 2: In the Registry Editor window, copy and paste the following path in the address bar and press Enter.
HKEY_LOCAL_MACHINE > Software > Policies > Microsoft.
Step 3: Right-click on Windows (Under Microsoft in the left pane), select New > Key, and rename the new key DisableAutoLock.
 Step 4: Right-click on DisableAutoLock, choose New > DWORD (32-bit) Value. Rename this DWORD to NoLockScreen.
Step 5. Double-click NoLockScreen, set the Value data to “1”, click OK, and reboot your PC.
|
Editor’s Tip: Use Advanced System Optimizer To Maintain Your Windows Registry. Advanced System Optimizer is a complete optimization tool that helps maintain your PC and keeps it running optimally. Many modules are associated with this app, like system cleaner, disk optimizer, duplicate file remover, driver updater, and many more. But today’s highlight is Registry Optimizer module. There are two features under this app namely – Registry Cleaner and Registry Optimizer. The first feature will help users to repair Registry issues and stop app crashes whereas the second feature optimizes and reduces the size of the registry by deleting unwanted entries and ensuring better PC performance. Moreover, using the Registry Cleaner module, you can back up the registry before making any changes to it. |
How To Autolock PC Screen?
To set your PC to lock the screen after a period of inactivity automatically, follow these steps:
Step 1: Press Win + I to open the Settings app.
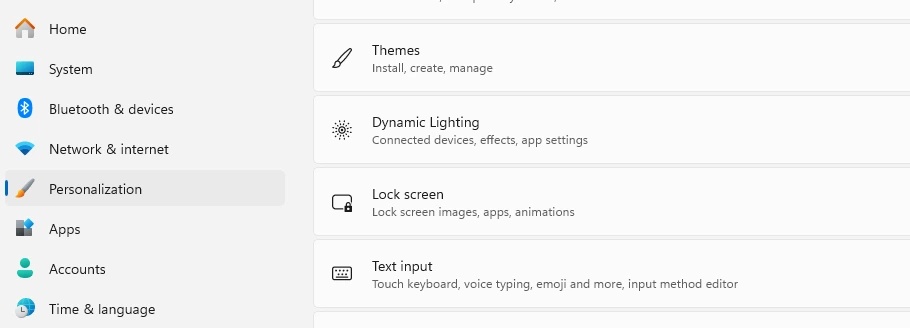
Step 2: Select Personalization tab in the left panel.

Step 3: Click on the Lock screen in the right section.

Step 4: Scroll down and click on Screen Saver.
Step 5: Select a screen saver from the dropdown menu in the Screen Saver Settings window.
Step 6: Check the box for On resume, and display the logon screen to ensure your PC locks when the screen saver activates.
Step 7: Set the Wait time to specify how long the PC should be inactive before the screen saver starts.
Step 8: Click Apply, then OK.
Step 9: Go to System > Power & sleep.
Step 10: Under Screen and Sleep, set the desired time intervals for when the screen should turn off and when the PC should sleep.
[Solved]
We hope that the above steps have enabled you to stop your PC from automatically locking itself. Do write to us in the comments section about which method worked for you.
Read Also: How To Remove PIN And Password On Windows PC


