
We all know that the Windows operating system has a fantastic function called a mobile hotspot that lets you share your network connection with other devices. However, some Windows users claim they cannot activate the mobile hotspot. They encounter the following issues when attempting to enable mobile hotspots on their systems:
“We can’t set up mobile hotspot because your PC doesn’t have an Ethernet, Wi-Fi, or cellular data connection.”

This means they cannot use the mobile hotspot and connect to the internet. In such a situation, you either look for an alternative to go online and if that isn’t an option, you look for ways to fix it, right? If you are solution-oriented and want to troubleshoot what is broken, you are reading the right post. Here, we will discuss expert-recommended solutions to troubleshoot. We can’t set up a mobile hotspot.
Best Ways to Fix Mobile Hotspot Not Working in Windows 10,11
Method 1: Verify whether network sharing is turned on or off
Your machine can share the Internet with nearby computers thanks to network sharing. Therefore, if it is off, the mobile hotspot on your computer will not work. The feature is typically enabled by default but sometimes gets automatically disabled due to an update or incorrect configuration. In such a situation, you must manually activate the feature by taking the following actions.
Step 1: Press Win + S to open the search box and type Control Panel. Click on the best match result.

Step 2: Switch to Large Icons in the View menu.
![]()
Step 3: Locate and click on the Network and Sharing Centre icon.
 Step 4: Click on Change Adapter Settings on the left side.
 Step 5: Now click on the network adapter for your hotspot. You may find it as Microsoft Wi-Fi Direct Virtual Adapter or Microsoft Hosted Network Virtual Adapter.
Step 6: Make right-click and choose Properties.

Step 7: Select the Sharing tab and place a checkmark in the checkbox labeled Allow Other Network Users to Connect Through This Computer’s Internet Connection.

Method 2: Launch The Network Adapter Troubleshooter
The network adapter troubleshooter is a built-in feature of Windows that automatically identifies and fixes common network issues. This tool checks the PC for incompatible network settings and incompatibilities with other networked devices and automatically fixes them. Running the network adapter troubleshooter requires you to follow the provided instructions:
Step 1: Press Win + R to open the RUN box.
Step 2: Type ms-settings: troubleshoot and hit the Enter key.

Step 3: Click Other Troubleshooters when the troubleshooting window appears.

Step 4: Locate the Network Adapter and click the Run button next to it.

Step 5: Wait until the scan is finished, choose the necessary network adapter from the list, and click the Next button.

Step 6: It will display the message “Apply this fix” if it discovers any problems. To resolve the network adapter problem, click on it.
Step 7: Restart the computer and check if the problem has been resolved.
Read Also : Here’s How To Fix Wi-Fi Network Not Showing Up Issue On Windows PC
Method 3: Update Drivers
Updating network drivers is another method of resolving this problem. You can always update your drivers using the Device Manager app, but that method has a major limitation. The Device Manager does not search for driver updates beyond the Microsoft Servers, which have a slow process of authenticating and updating drivers. Instead, we recommend using Advanced Driver Updater, which can update your PC’s drivers to the latest versions provided by the device’s manufacturers. Here are the steps to update drivers using Advanced Driver Updater:
Step 1: Download and install Advanced Driver Updater.

Step 2: Launch the app and click on Start Scan Now.

Step 3: Look for your Network drivers in the list of drivers presented after the scan.
Step 4: Click the Update driver link next to the drivers you wish to update.

Step 5: After the process completes, reboot your PC to ensure the changes take effect.
Read Also: How to Fix Unidentified Network Error on Windows 11
Method 4: Activate The Microsoft Wi-Fi Direct Virtual Adapter
When you turn on the hotspot, a new virtual adapter called Microsoft Wi-Fi Direct Virtual adapter is added to the list of available network connections. And this adaptor gives you access to the Internet. But occasionally, users cannot access the internet even when this adaptor is activated. We must disable and enable the Microsoft Wi-Fi Direct Virtual Adapter to fix any short-term issues.
Step 1: Press Win + R to Open the RUN box
Step 2: Type devmgmt.msc and press the Enter key.

Step 3: Click the View tab at the top of the Device Manager window and select Show Hidden Devices.

Step 4: Select Microsoft Wi-Fi Direct Virtual Adapter after expanding the list of network adapters.
Step 5: Make a right click on the Microsoft Wi-Fi Direct Virtual Adapter and select Disable device.

Step 6: After a few seconds, right-click again and select Enable.
After this toggle, the Microsoft Wi-Fi Direct Virtual Adapter will auto reset and resolve your issue.
Method 5. Enable the Internet Connection Sharing service
Step 1: Press the Windows key + R to open the Run window.
Step 2: Type services.msc and click OK.

Step 3: Look for Internet Connection Sharing and double-click it.

Step 4: Check whether the service is enabled or disabled. If disabled, select Automatic from the Startup type drop-down.

Step 5: Click Start to start the service and press OK.
Method 6: Configure Wireless Network Adapter Properties
Step 1: Press the Windows key + X > select Device Manager.

Step 2: Double-click Network adapter and unhide the adapter list.

Step 3: Double-click the network adapter you are using and open its properties.
Step 4: Select the Advanced tab.

Step 5: Select 802.11d and Enable (or Long only) from the Value drop-down menu > click OK.
Step 6: On the Device Manager window, click View and select Show hidden devices.

Step 7: Double-click the Microsoft Hosted Network Adapter and open its properties.
Step 8: Select the Power Management tab and uncheck Allow the computer to turn off this device to save power.
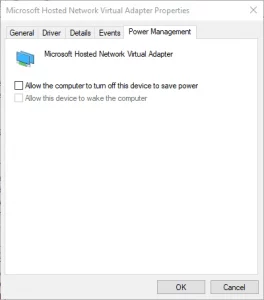
Step 9: Click OK to exit the window.
Method 7: Update Windows and .Net Framework
Step 1: Press Window + I to access Windows settings.
Step 2: Select Windows Update from the left side.
3. To check for Windows updates in Windows 11 updates, select Check for updates.
Windows 11 will automatically run a scan and update the Windows and .Net framework.
Windows 10 will download and install updates automatically.
Once Windows and .Net Framework are updated try to connect your device, you should no longer face We can’t setup mobile hotspot issue.
Method 8: Turn Bluetooth off
Step 1: Press Windows + S, and in the search field, type Bluetooth.
Step 2: Open the settings and disable Bluetooth.
You should no longer face we can’t setup mobile hotspot error.
The Final Word On How To Fix “We Can’t Set Up A Mobile Hotspot” On Windows PC
We hope that you were able to fix the “We Can’t Set Up A Mobile Hotspot” On Windows PC with the methods mentioned above. Once the issue is resolved, you can share the internet connection on multiple devices.
Please let us know in the comments below if you have any questions or recommendations. We would be delighted to provide you with a resolution. We publish advice, tricks, and solutions to common tech-related problems. You can follow us on Facebook, YouTube, and Instagram,
Recommended: Fix the “Windows Could Not Automatically Detect This Network’s Proxy Settings” Error


 Secure Download

Just update your Windows and the Netframe. Go to settings, click Updates & Security, then click on Windows Update on the top left. On the top right, update the Netframe and Windows. This method worked for me.
Hello John,
Thank you for sharing an additional solution.
We have updated our post 🙂
Thanks and Regards