
Trying to load a website on Chrome, but it is too slow to load. The issue might not be your internet but the browser you are using. In such situations, you should first try using the same website on another browser. If it works properly on any other browser, your PC’s accumulated DNS is likely causing it.
The issue usually appears when your Chrome has collected many faulty DNS data, and you have not cleared it for a while. It is like cache memory, but it slows down the entire process for your DNS. The best way to ensure your PC has optimized browsing is to maintain your Chrome DNS information using the net-internals/#dns tool.
This guide explains what it is, how to use it, and other fixes you can use to troubleshoot Clear DNS Cache Chrome errors and what to do if the internal clearing of Chrome DNS stops working.
What is chrome://net-internals/#dns?
Net-Internals or the net-internals/#dns is a NetLog event stream visualization tool that creates a dedicated DNS log, allowing you to check real-time and old usage logs. It is used to troubleshoot network issues and debug problems like –
– Unable to access a website on Chrome
– DNS servers for your network adapter are changed and you are unable to use Google Chrome.
– When you try to browse some common websites but get the message they can’t be trusted.
The tool is helpful and allows you to DIY the entire troubleshooting process. More than a solution, the chrome://net-internals/#dns is an optimization tool that helps you track the DNS host cache and clear at at different intervals, as required.
How to use Chrome://net-internals/#dns to clear the DNS cache in Chrome – Windows?
To use it on Windows follow these steps:
1. Open Google Chrome > enter chrome://net-internals/#dns in the browser’s address bar and press the enter key.
2. You will now get DNS settings window here, click Clear host cache to clear old DNS logs.
3. Restart Chrome browser.
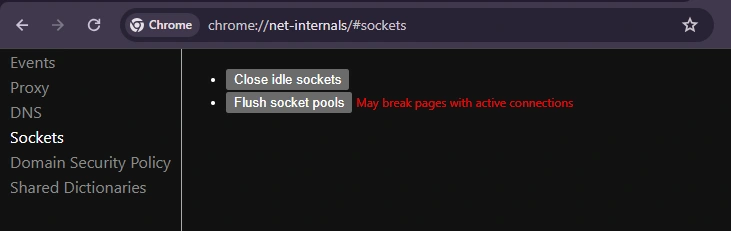
4. Copy and paste chrome://net-internals/#sockets and click Flush socket pools.
This way you will be able to flush DNS cache in Chrome when running on Windows. You can use the above steps to clear DNS cache on Linux and macOS.
Note : Use the command only when you face DNS issues. Avoid using it for regular cleaning of browsing data.
How to use chrome://net-internals/#dns Mobile devices and fix DNS error?
Whether you are using Google Chrome on Android, iPhone or iPad following these steps you can clear DNS and fix browser errors.
1. Launch Google Chrome on your mobile device.
2. In the address bar copy and paste – chrome://net-internals/#dns > tap Clear host cache.
3. Restart Chrome > copy and paste chrome://net-internals/#sockets and tap Flush socket pools.
This way you can clear host cache on Chrome when running it on your smartphone or iPad.
If these steps don’t work follow the steps given below:
1. Open Google Chrome browser on your Android, iOS, tablet or iPad.
2. Tap More > History > select All time from the time range > check mark the box next to Cookies and site data and Cached images and files and tap the Clear data button.
3. Restart Chrome and try to access the website. It should work.
You can use Chrome without issues as the above command clears all browsing data, cache, and cookies.
How to Fix Chrome DNS Errors When chrome://net-internals/#dns is Not Working
The Domain Name System is responsible for establishing an interpretive connection between user inputs and the results. Hence, flushing DNS is the ultimate way to handle browser-related issues. However, when the tool chrome://net-internals/#dns stops working things can get tricky. Here are some alternate ways to fix it.
Fix 1: Clear DNS Cache Using Command Prompt
Sometimes, the Chrome Net Internals error appears when there is a conflict in the DNS cache of your Chrome and overall Windows system. The ideal way to resolve the issue is by clearing the Windows DNS cache. Here are the steps to do so –
Step 1. Press the Start key on your keyboard and search for CMD
Step 2. The results should return Command Prompt as an option. Open the same as admin.

Step 3. In the Command Prompt, use the following commands individually (press enter after every line).

ipconfig /release
ipconfig /flushdns
ipconfig /renew
Step 4. Once the process is over, restart your PC.
This way, you can clear the DNS cache on Windows.
Tip : If you are Mac user to clear Chrome DNS cache, open Terminal application > copy and paste - sudo dscacheutil -flushcache; sudo killall -HUP mDNSResponder and press the Return key > enter the password > press Return key. Restart browser and access the website it should work.
Fix 2: Disable Chrome Flags
If the excitement of trying new features led you to enable Chrome flags on your PC, try disabling it. Chrome Flags are an integrated way offered by Google to activate features that are not yet available in the official releases. You can think of it as a beta mode.
The Chrome Net Internals DNS error may appear if Chrome Flags are enabled.
The easiest way to disable Chrome Flags is given below –
Step 1. Open a Chrome on your PC.
Step 2. Enter the following URL – chrome://flags and hit the Enter key.
Step 3. Once you have opened the Chrome Flags page, find the reset button in the top right corner and click on it.

After disabling the Flags, log back to – chrome://net-internals/#dns and clear DNS again. It should work fine this time as the Net Internals DNS error is resolved.
Fix 3: Restart Your PC’s DNS Service
If you are still struggling with the DNS error on Chrome, restart the PC’s DNS service. To do so,
Step 1. Press the Start key on your keyboard and search for CMD
Step 2. The results should return Command Prompt as an option. Open the same as admin.
Step 3. In the Command Prompt, use the following commands individually (press enter after every line).
net stop dnscache
net start dnscache
Other than these fixes, you always have the option to uninstall and reinstall the application. Also, ensure you are using the latest version of Chrome, as an outdated version may also cause Chrome Net Internals DNS errors on your PC.
Fix 4: Use Advanced System Optimizer to Clear Browser Data
Faulty browser data, such as corrupt cache and cookies, is often the culprit behind your Net Internals DNS error. Wiping it helps fix the issues. However, when Chrome tools stop working properly, Advanced System Optimizer a third-party application comes to the rescue. Using its handy Privacy Protector module feature you can wipe personal browsing data without opening the application.
Step 1. Download and install the app from the link below.

Step 2. Click Security & Privacy option preset in the left panel.

Step 3. Click Privacy Protector module.
Step 4. Click Start Privacy Scan to initiate searching for privacy-exposing traces.

Step 5. Wait for the scan to finish. When done ensure the browser is close and wipe all detected traces.

This way, you can wipe cache, cookies and search data from Chrome that might be creating issue.
Advantages and Disadvantages of using chrome://net-internals/#dns tool
Advantages
-You can clear DNS cache in Chrome and fix connectivity and website loading issues (if any)
-Anyone even a beginner can clear cache using the
chrome://net-internals/#dns command.
– No additional software is required to run the tool.
Disadvantages
– Clearing DNS using chrome://net-internals/#dns may delete saved website domain name and IP address which can cause an increase in website loading time.
– Beginners can get confused with the feature as they are unaware about the internal workings of the browser.
– Using features incorrectly might lead to data loss and some issues.
Additional Information: Ways to Clear DNS Cache on Safari, Firefox and Opera
Clear DNS Cache on Safari
On Safari you do not have a dedicated button to clear DNS. However, there is a hidden setting that you can use to clear caches including DNS caches.
Step 1. Launch Safari.
Step 2. Click Safari > Preferences
Step 3. Go to the Advanced tab and select the box next to Show Develop menu in menu bar.

Step 4. You will now see the Develop menu. Click on it and select Empty Caches.

Restart Safari and access the website you were facing issues with.
Clear DNS Cache on Firefox
Step 1. Launch Firefox and in the address bar copy and paste: about:networking#dns.
Step 2. Click Clear DNS Cache button to clear the browser’s DNS cache.

Clear DNS Cache on Opera
Step 1. Launch Opera > copy and paste : opera://net-internals/#dns in the address bar.
Step 2. Click Clear host cache button. This will flush the DNS cache.

Step 3. Next, go to the link: opera://net-internals/#sockets > click Flush socket pools button.
Step 4. Restart Opera the DNS issue should now be fixed.
What is the DNS Cache?
It is a tiny piece of information about the frequently used domains and websites that helps speed up browsing, and access those website when remote or ISP DNS servers are down. However, when a website changes its DNS entry or there is a fault in the network condition, you might need to clear DNS to reach to correct IP address and access the website.
What exactly is DNS cache Flushing?
Getting rid of existing cached data that has DNS entries is DNS cache flushing.
What are some of the features of Chrome://net-internals/#dns?
- DNS Lookup
This tool allows performing a DNS query for a specific domain name and see the resulting IP address. It helps in troubleshooting network connectivity issues.
- DNS resolver cache
It displays a list of cached DNS entries and their time-to-live values. It provides information whether or DNS cache refresh is required.
- DNS prefetching
It is a method used by Google Chrome to speed up web browsing helping reduce webpage loading time.
- Sockets
The information about open network sockets and their state is also provided by “chrome://net-internals/#dns” command.
Chrome Net Internals DNS Error FIXED!
You may be wondering what all this information has to do with Chrome Net internals. You must understand what you are dealing with to fix it properly. With the information about these terms, you can easily maintain a healthy DNS cache on your PC, optimizing your PC’s internet browsing experience to its best.
The Net Internals tool on Chrome and other browsers is the best way to resolve DNS-related issues on your PC. Hence, all the information shared above can help you achieve the best results. Try them out and let us know what worked the best for you. If this tool cannot fix the Chrome browsing issues, you should check out the fixes to DNS_PROBE_FINISHED_NXDOMAIN and resolve it yourself.
With that, we have reached the end of this post. We hope we were able to explain Chrome Net internals DNS command clearly. If you have any questions or doubts about the methods shared, drop us a line in the comments section, and we will respond. Thanks for reading. Good luck!
Recommended :


 Secure Download

Hii chrom mere ko pura history delete karana hai
Dear Anul,
To clear Chrome history from your PC follow these steps:
1. Launch Chrome.
2. In the address bar copy and paste – chrome://history/ or you can press Ctrl + H keys.
3. This will open Chrome History for you. .
4. Click Clear browsing data.
5. Select how much history you want to delete.
6. To clear everything, select All time. Check the boxes for the information you want to clear, including Browsing history.
7. Click Clear data.
8. Exit Chrome and re-launch it.
This should help.
Thanks and Regards
Hi chorm mere phone ki purani history delete karns hai
Dear Govind,
To clear Chrome history on phone follow these steps:
1. Open the Chrome app Chrome.
2. At the top right, tap More More and then History.
3. Tap History.
4. Tap Clear browsing data.
5. Next to “Time range:”
6. To clear a portion of your history, select the dates.
7. To clear everything, tap All time.
8. Check the box next to “Browsing history.”
9. Uncheck any other data you don’t want to delete.
10. Tap Clear data.
This way you can delete Chrome history from Android phone.
Thanks and Regards
History Chrome history
Dear Mohit,
To clear Chrome history on phone follow these steps:
1. Open the Chrome app Chrome.
2. At the top right, tap More More and then History.
3. Tap History.
4. Tap Clear browsing data.
5. Next to “Time range:”
6. To clear a portion of your history, select the dates.
7. To clear everything, tap All time.
8. Check the box next to “Browsing history.”
9. Uncheck any other data you don’t want to delete.
10. Tap Clear data.
This way you can delete Chrome history from Android phone.
To clear Chrome history from your PC follow these steps:
1. Launch Chrome.
2. In the address bar copy and paste – chrome://history/ or you can press Ctrl + H keys.
3. This will open Chrome History for you. .
4. Click Clear browsing data.
5. Select how much history you want to delete.
6. To clear everything, select All time. Check the boxes for the information you want to clear, including Browsing history.
7. Click Clear data.
8. Exit Chrome and re-launch it.
This should help.
Thanks and Regards