The prompt “There’s a problem with this drive, scan and fix now” usually appears when you connect a USB drive to your computer. It gives the user an idea that the drive is unsafe to use as it may have corrupt files or a virus. However, sometimes it is a false alarm too. There are several reasons why the error may appear out of nowhere.
This means even if your drive is OK, you may get the error message that says there’s a problem with the drive. But then, that does not mean that there is no issue. Some of the common errors that cause the prompt to appear are –
- Abrupt disconnection of the USB drive from the previous PC.
- An incomplete copy/paste process was performed on the drive.
- The drive has a corrupt file system/virus/malware.
No matter which of the above reasons is causing the issue, if you have got the prompt as soon as you connect the drive, you should take it as a warning as your data may be at risk and try to fix it. How? Well, that is what this post is about!
Check out the next section where we have listed a bunch of ways you can try to fix the issue with your USB drive.
Ways to Fix There’s a Problem with this Drive, Scan and Fix Now Error
Fix 1 – Use the Scan and Fix Utility
As soon as the error prompt appears, you get a default “Do you want to scan and fix Removable Drive()” option on clicking the error. It is an internal utility of Windows that ensures that no problematic file makes it to your PC.
Step 1 – In the prompt, click the Scan and Fix (Recommended) option to initiate the process.

Step 2 – If the scan finds an error, the prompt will ask whether you want to repair the drive. Click on the Repair drive option and let the process run.
Step 3 – Do not unplug the drive or try to open it via the explorer as it may ruin the chances of recovering the drive.
After the scan and fix is complete, you can access the drive easily. You may also try to eject the drive and plug it in again to see if the issue persists. Keep in mind that you may also access the drive by simply clicking on the continue without scanning option; however, that is not recommended as it may be harmful to your PC.
Read Also: Problem Ejecting USB Mass Storage Device on Windows – [Solved]
Fix 2 – Use the Error Checking Via Properties
The next thing you should try is running the error-checking utility. It is available in the properties for your drive and can assist when you are uncertain about opening the drive.
Step 1 – Open the Windows Explorer and navigate to This PC to find your drive.
Step 2 – Right-click on the drive to find the properties and open it.
Step 3 – In the Properties, navigate to the Tools tab.

Step 4 – From the Tools tab, click the Check button under the Error Checking section.

Step 5 – A pop will appear. Click on the instructions shown on it to continue with the process.
Let the process run and check for errors on the drive. It can fix the drives properly; hence, you should be ready.
Fix 3 – Use the CHKDSK Command
The CHKDSK command is the ultimate method one can use to get rid of disk-related issues on a Windows PC.
Step 1 – Connect your USB drive to the PC.
Step 2- Open the Command prompt as an administrator via the start menu.

Step 3 – Use the command – chkdsk *: /f and hit enter.
Run the command and check if there’s a problem with this drive error appearing again once the process is complete.
If none of these fixes work, you might have a corrupt file system on your drive. Formatting the drive using the NTFS file system is the only option you are left with!
What to Do if Data is Lost in Resolving There’s a Problem With Drive Error?
You should be careful with how you try to resolve the issue, as there are high chances that you may lose your data in the process. Sometimes, you have no choice but to format the connected drive.
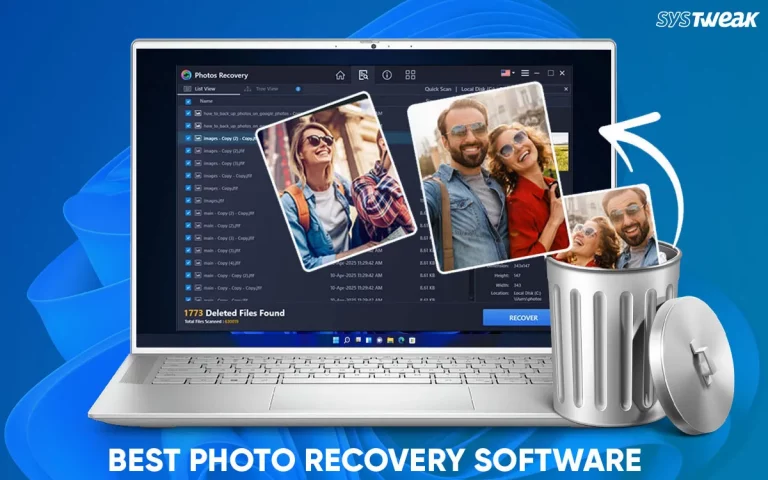
But what do you do if you need the data? You should try recovering the data using the Advanced Disk Recovery by Systweak Software. It is a tool that allows you to choose the drive you want to recover data from and recover even the deleted data as you see fit. This means if by chance the above fixes have led to formatting of your drive, you can get back your data.
All you have to do is –
Step 1 – Download the application via the link below and install it.

Step 2 – Launch the app and click Removable to highlight the USB you have connected. If multiple drives are connected, use the drop-down to select the drive.

Step 3 – Choose the scan mode. Since you have just formatted the drive, recovery should be easy; hence, a Quick scan will work.

Step 4 – After the Scan, you may find a table of deleted files that can be recovered.

Step 5 – Mark the files you want to recover and click the Recover button. If you are a bit confused, you can preview the files.
Choose the directory where you want to save the file. We recommend you use a local storage drive to recover the file, as recovering at the same path might overwrite the drive, reducing the chances of further recovery.
Try these methods out, and we assure you that your data and drive will stay intact from the “There’s a problem with this drive” error. In case of any confusion, feel free to reach out! That will be all for this post. Thanks for reading. Good luck!
Recommended :
Fix: Hard Disk Serial Number Changer Unable to Write to This Disk in Drive