Communication ports, commonly known as COM ports, are crucial PC components. They are responsible for maintaining and establishing external device connections using a system’s physical and emulated ports. When these ports malfunction or are not detected on a PC, error messages like Unable to open serial ports appear, which is not good news.
Some users have also shared that they cannot find the drivers on the system. These missing ports can also cause multiple problems on your PC. Hence, finding and fixing all the issues related to the COM port is crucial.
Wondering how to get rid of missing COM port errors in the Device Manager? Well, you are at the right place! check out the methods below that will allow you to fix the error instantly!
Why Does The COM ports Missing in Device Manager?
The missing COM ports are a common issue faced by many Windows users and can be fixed with swift and simple steps. But before we jump to the troubleshooting methods, here are the common reasons for this error.
- Missing or incompatible USB-to-Serial drivers.
- BIOS serial ports have been disabled.
- Select wrong power management may turn USB devices off.
- Corrupt or “stuck” COM port assignments can happen after swapping devices.
How to Fix Missing COM Ports in Device Manager Issue?
The COM ports not appearing on your PC can mean multiple things. Usually, to fix the error, you need to restore the COM ports on your PC. However, many users have shared that they are unable to find the drivers to perform troubleshooting. Check out the list of fixes below, as they will allow you to find and fix the errors easily.
Fix 1: Enable Show Hidden Devices
Sometimes, a configuration changes the COM ports into hidden devices in the Device Manager. This is also the reason why users are unable to find these drivers. Here are some steps to reveal hidden drivers in the device manager.
Step 1: Press Win+R to open the Run search.
Step 2: In the Run search box, use the command devmgmt. msc to open Device Manager.

Step 3: In the Device Manager, click on View from the top bar to find options.
Step 4: Click on Show Hidden Devices to unveil the drivers usually hidden from the user.

With these simple steps, you can access all the hidden devices, including the COM ports on your PC.
Fix 2: Update COM Port Drivers
Sometimes, these ports are temporarily unavailable because of their outdated definition. The best way to ensure that these drivers are working properly is to keep them updated. Most of you may think, “How do you update the COM port driver when it is not visible?”. Well, you have two options here –
Step 1: Use the steps mentioned in Fix 1 to find COM ports and then update them using the Windows Driver Update utility.
– After you have found the drivers, simply select and right-click on it to find the update driver option.
– Follow the steps on the screen, and initiate the process by selecting the Search Automatically for drivers.
– Let the updates install, and restart your PC manually once the process finishes.
Step 2: Use Advanced Driver Updater that finds all the drivers irrespective of their hidden nature and updates them instantly.
– Download and install the Advanced Driver Updater on Your PC.

– Click on Start Scan Now to initiate a search for all the outdated drivers on your PC.

– Check the results to see if the COM ports were detected in the result.
– Click on Update All to instantly update the drivers.

– Once the installation is over, the software will automatically restart.
Since finding the COM port driver can be challenging, let the tool handle the updates.
Please note that you can also use your motherboard driver disc to update these drivers, as they are directly connected with the same. Updating motherboard drivers is also a way to fix the missing COM port error on Windows, depending on your device.
Fix 3: Add COM Port to Device Manager
If showing the hidden drivers or updating them does not work, you can manually add these devices to your PC. Here’s the complete process of how to add the COM port on your PC.
Step 1: Press Win+R to open the Run search.
Step 2: In the Run search box, use the command devmgmt. msc to open Device Manager.
Step 3: Click Action from the top menu bar in the Device Manager.
Step 4: Click on Add Legacy Hardware from the Action menu.

Step 5: A pop will appear asking you to choose the legacy hardware you want to add; click next to initiate the process.
Step 6: On the next page, choose Install the Hardware that I Manually Select and click Next.

Step 7: After clicking Next, you may find options related to the device drivers you want to install.

Step 8: Look for COM & LPT ports from the list. Select and click on next to move ahead with the process.
Step 9: Choose your motherboard manufacturer so the best drivers can be fetched to support the same. 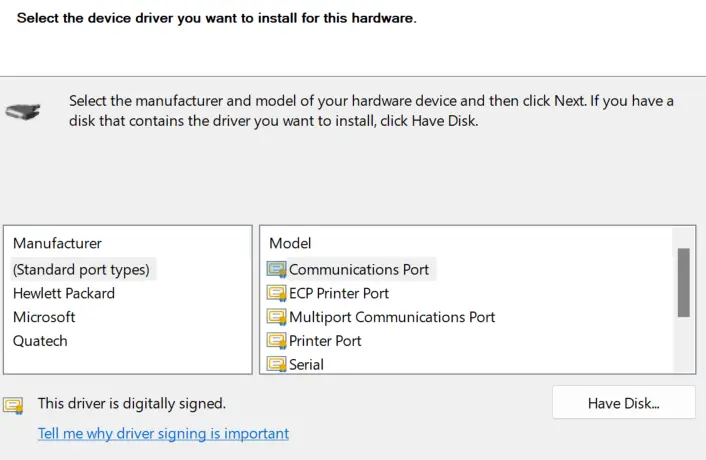
Step 10: Click on the Finish button and voila! You have successfully added the drivers to your PC.
Fix 4: Scan For Hardware Changes
Sometimes, the Windows OS needs a push to detect the hardware attached to the PC. Here is what you need to do.
Step 1: Press Win + X to open the Power Menu and select Device Manager.

Step 2: Click on the Universal Serial Bus Controllers category and then click on the Action tab at the top to choose “Scan for hardware changes”.
Step 3: The COM ports should appear in the Device Manager.
Fix 5: Check BIOS/UEFI settings
Step 1: Restart your PC and tap on the relevant key (F2, F10, F11, etc) to enter the BIOS/UEFI environment.
Step 2: Make sure the Serial Port / COM Port is set to Enabled.
Step 3: Save changes and reboot
Fix 6: Update chipset & USB controllers
Experts suggest that you should install the latest motherboard chipset drivers. Here are the steps.
Step 1: Launch Device Manager by pressing Win + X and selecting it.
Step 2: Locate the USB Root Hub and USB Serial Controllers categories.
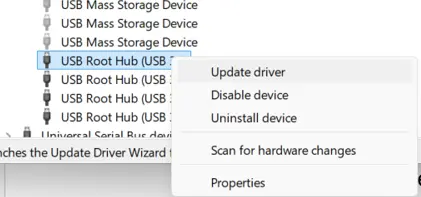
Step 3: Click on them to view the dropdown.
Step 4: Click on each entry mentioned and choose Update Driver from the context menu.
Fix 7: Disable USB Power Saving
Step 1: Open Device Manager and click on Universal Serial Bus controllers to expand it.
Step 2: Double-click on each USB Root Hub to open the Properties box.
Step 3: Click on the Power Management tab and uncheck the mark before the “Allow the computer to turn off this device to save power” option.
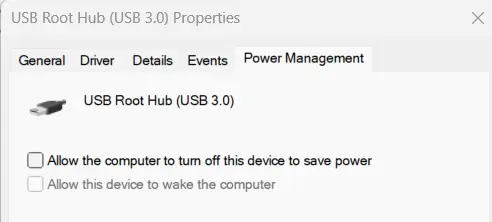
Step 4: Do this for all USB Root Hub entries.
Read Also : Understanding Encrypted USB Flash Drives: How to Protect USB
Fix 8: Remove Old Or Conflicting COM Ports
Step 1: Open the Device Manager and click on the View tab.
Step 2: Click on Show Hidden Devices.
Step 3: Make a right-click on all the greyed-out COM ports and choose Uninstall device.
Step 4: Reboot and reconnect your adapter.
Fix 9: Assign a COM port manually
Step 1: In the Device Manager, right-click the serial device and choose Properties.
Step 2: Under the Port Settings tab, click on the Advanced tab.
Step 3: Choose an unused COM number like COM 5, COM 9, etc.
Fix 10: Update Windows
Windows Updates have resolved many issues as they provide updates, fixes, and patches to fix PC errors. Here is what you need to do to update your Windows PC.
Step 1: Press Win + X to open the Windows Power Menu and choose Settings.
Step 2: Click on the Windows Update Tab in the left panel.
Step 3: Next, click on the “Check For Updates” button on the right side.
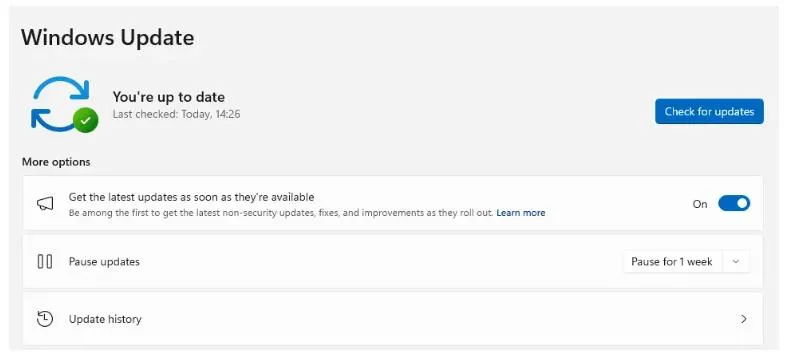
Step 4: Windows will automatically check for updates, download, and install them on your PC.
Step 5: Next, click on Advanced Options.
Step 6: On the new page, click on Optional Updates under Advanced Options.

Step 7: Finally, click Driver Updates and check the box before the drivers you wish to update.
Step 8: Click on the Download & Install button and wait for the update process to complete.
Step 9: Restart the computer.
Read Also: How to Fix Windows Update Error Code 0x80073712?
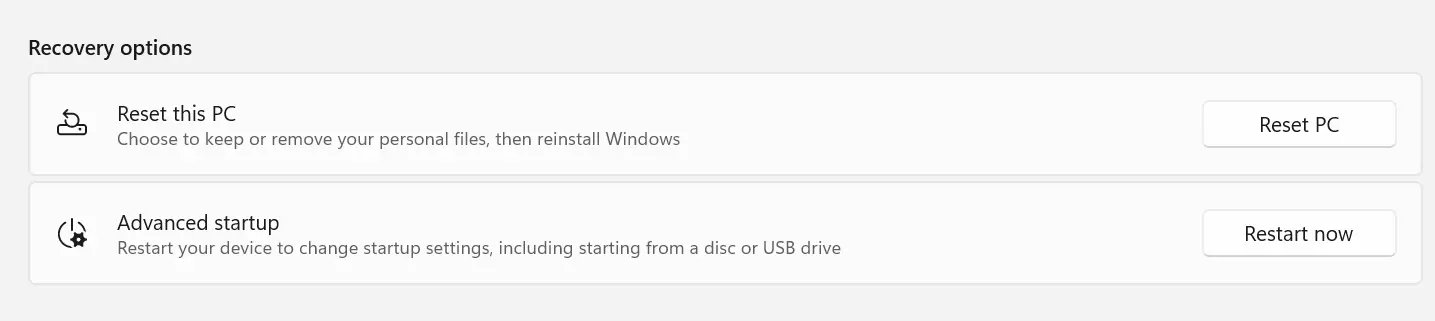
Fix 11: Reset Windows (Last Resort)
The final method we recommend is to reset Windows if none of the above steps work. Here is what you need to do –
Step 1: Press Windows + I to open the Settings box.
Step 2: In the top left corner, type “Reset This PC” and click on the search result that matches your text.

Step 3: Locate the Reset This PC option and click on the Reset PC button.
Step 4: In the next box, choose between Keep My Files and Remove Everything.
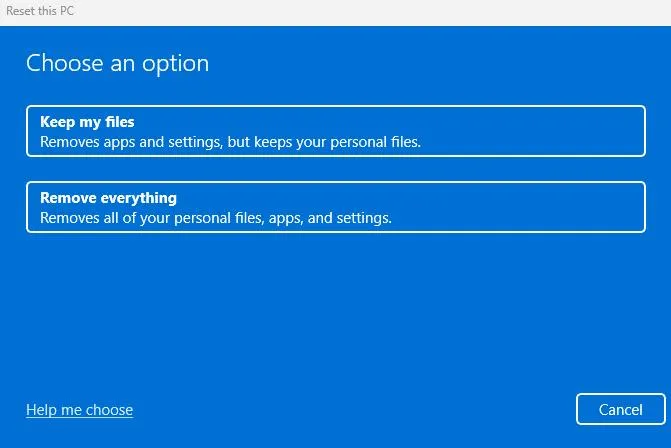
Step 5: Follow the instructions that appear on your screen.
Step 6: PC will be restored to factory default settings.
COM Ports Missing on Your PC? NOT ANYMORE!
Simply implementing the above fixes should do the job for you. If you are facing driver issues while using the USB ports or any other connectivity issue, updating all the drivers on your PC can be helpful. Hence, installing the Advanced Driver Updater is recommended to finish the job for you.
And with that being said, we have reached the end of this post. Hope you find the steps shared clear and helpful for any further product-related queries; you can email support@systweak.com or leave comments.
We are glad we could help you with COM ports missing errors. Good luck!
Frequently Asked Questions
Recommended :
‘PAGE FAULT IN NONPAGED AREA’ Error On Windows – FIXED
A D3D11 Compatible GPU is Required to Run the Engine – FIXED!