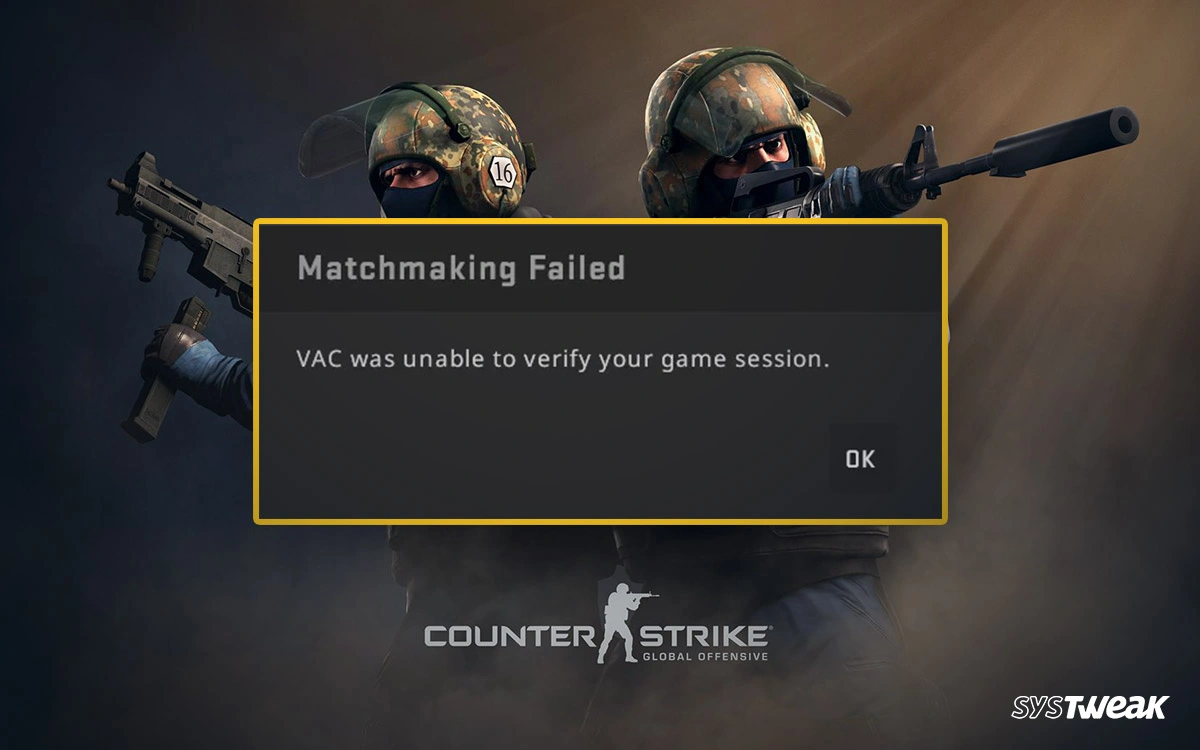
Are you facing the VAC was unable to verify error while playing CS: GO? Well, you have reached the correct post!
Recently, many users have reported how this error is becoming a permanent issue and hampering their experience while playing CS GO. For those unfamiliar with the game, VAC is the Valve Anti-Cheat program that ensures that no unfair means are being used to manipulate the game’s stats or controls. It is crucial and comes with all major online games. The idea is to create a level playing environment for gamers across the globe.
Since online gaming is quite competitive, manipulating the results using bots, mods, and botnet attacks is a common practice. Hence, VAC is crucial software for the game. So, what does the VAC unable to verify error mean? More importantly, how can you get rid of this error? That is exactly what we are going to discuss in this post. So keep reading as we unravel the mystery behind this error.
CS:GO “VAC was Unable to Verify”: Why Does the Error Appear?
The basic issue that causes the Valve Anti Cheat to malfunction and show errors is a third-party application interfering with your gameplay. However, that is not the only reason. Some of the common issues that may be responsible for the error are –
- Corrupt game files
- Issues with installed VAC files.
- Game version conflict
- VAC permission errors
Either way, managing this issue becomes extremely difficult. Fortunately, there are several fixes that you can use to get rid of the error. Check out the next section, where we discuss the fixes in detail.
5 Ways to Fix CS:GO – Valve Anti-Cheat Unable to Verify the Gaming Session
Fix 1 – Restart Your PC
The first thing that you should do is restart your PC. Go to the start menu and open the shutdown options to find the restart button. Or simply use the Alt+F4 combination to find the power menu and select restart.
This will help your PC refresh the memory registers, allowing your PC to refresh any file that may be having an issue comprehending VAC’s functionality.
Fix 2 – Try Launching the Game as Administrator
Sometimes, when you get the VAC error on your PC while playing CS GO, it is because the PC is not allowing VAC to send the correct reports to the server. The idea of VAC is to verify that the player is not cheating or using unfair means. When there are issues with the permissions, errors like the VAC was unable to verify your gaming session may appear. Hence, make sure that the game is always run as an admin.
Step 1 – Spot the game launcher. Right-click on the icon and open its properties.
Step 2 – In properties, navigate to the compatibility tab.
Step 3 – Check the box that says Run this program as administrator and save the changes
The next time you launch the game, it will be launched with administrator access, making all the permissions available to VAC. If permissions are the factor causing VAC error, this should resolve the issue.
Fix 3 – Use Command Prompt to Repair Steam
Try running other games like Valorant and identify if the error is still present. If yes, the issue may be with your Steam client, not with VAC. The best way to resolve this is to use the Command Prompt to run a repair on Steam. Here are the steps that you need to follow –
Step 1 – Go to the Start Menu and launch Command Prompt as Administrator.
Step 2 – Use the following command (Copy and Paste the following command) and press enter.
C:Program Files (x86)SteambinSteamService.exe”/repair.
Step 3—Let this command run successfully. It will eventually look for and remove all the file-related errors in the Steam application.
After the command is run, restart your PC and launch CS GO. Find out if the unable-to-verify error appears again due to VAC. It should be resolved after the command. However, if it still exists, do not worry; we have more fixes in the list.
Fix 4 – Verify the Game Files Integrity Using Steam
If the issue is limited to CS GO only, you must check the game files, as corrupt files are the most common reason for this error. Thanks to Steam, all the corrupt files can be repaired and replaced using the integrity verification feature in the client. All you have to do is –
Step 1 – Open Steam and navigate the game library to find CS GO.
Step 2 – Open properties for CS GO in the Steam Client and navigate to the Local Files section.

Step 3 – In the Local Files Section, you may find the button that says Verify Integrity of Game Files.

Step 4 – Let the process run for a while. Depending on how many corrupt files it finds and replaces, this may take a long time.
After fixing the game files is completed, the process stops automatically and refreshes your games on Steam. Restart your PC and relaunch Steam to play CS GO. Only this time the issue will be resolved, and you will have better and smoother gameplay.
Read Also: Vanguard Not Initialized in Valorant- Here’s How to Fix It!
Fix 5 – Ensure You Have Updated/Signed Drivers
Lastly, make sure that all your PC drivers are authentic and up to date. Sometimes, when you try to update the drivers manually, you end up downloading unsigned copies that may not be safe for your PC. While playing a game like CS GO, multiple drivers are involved, from the basic display drivers to advanced system drivers that ensure that the game performance is optimal.
In such a situation, your best bet is the Advanced Driver Updater. Since it may be difficult to determine which driver is not authentic and which is causing the error, this tool can be a game changer.
All you have to do is –
Step 1 – Download and Install the Advanced Driver Updater.

Step 2 – Run a quick scan to find the list of drivers that require an update.

Step 3 – Once the scan is complete, use the Update All button, and the tool will sort the issues with listed drivers.
Not only that, but you can even take a backup of the drives on your PC just in case an issue occurs, and you are unable to use the Internet. Then, you can roll back to the stable versions.
Updating the drivers will smoothen your gameplay and resolve the VAC problem.
If none of the fixes above work for you, we recommend you uninstall your CS GO version and install the latest one, as that may be the only problem to address. Hopefully, all of these fixes will serve the purpose and help you eliminate the VAC unable to verify gaming session, error with CS GO.
Let us know if you have any questions, queries, or suggestions for the above fixes and steps. That’s all for this post. Thanks for reading, and Good luck!
Recommended :