
When you are logged into a Windows PC as an Administrator, but are unable to delete a folder due to the error message:
Folder Access Denied
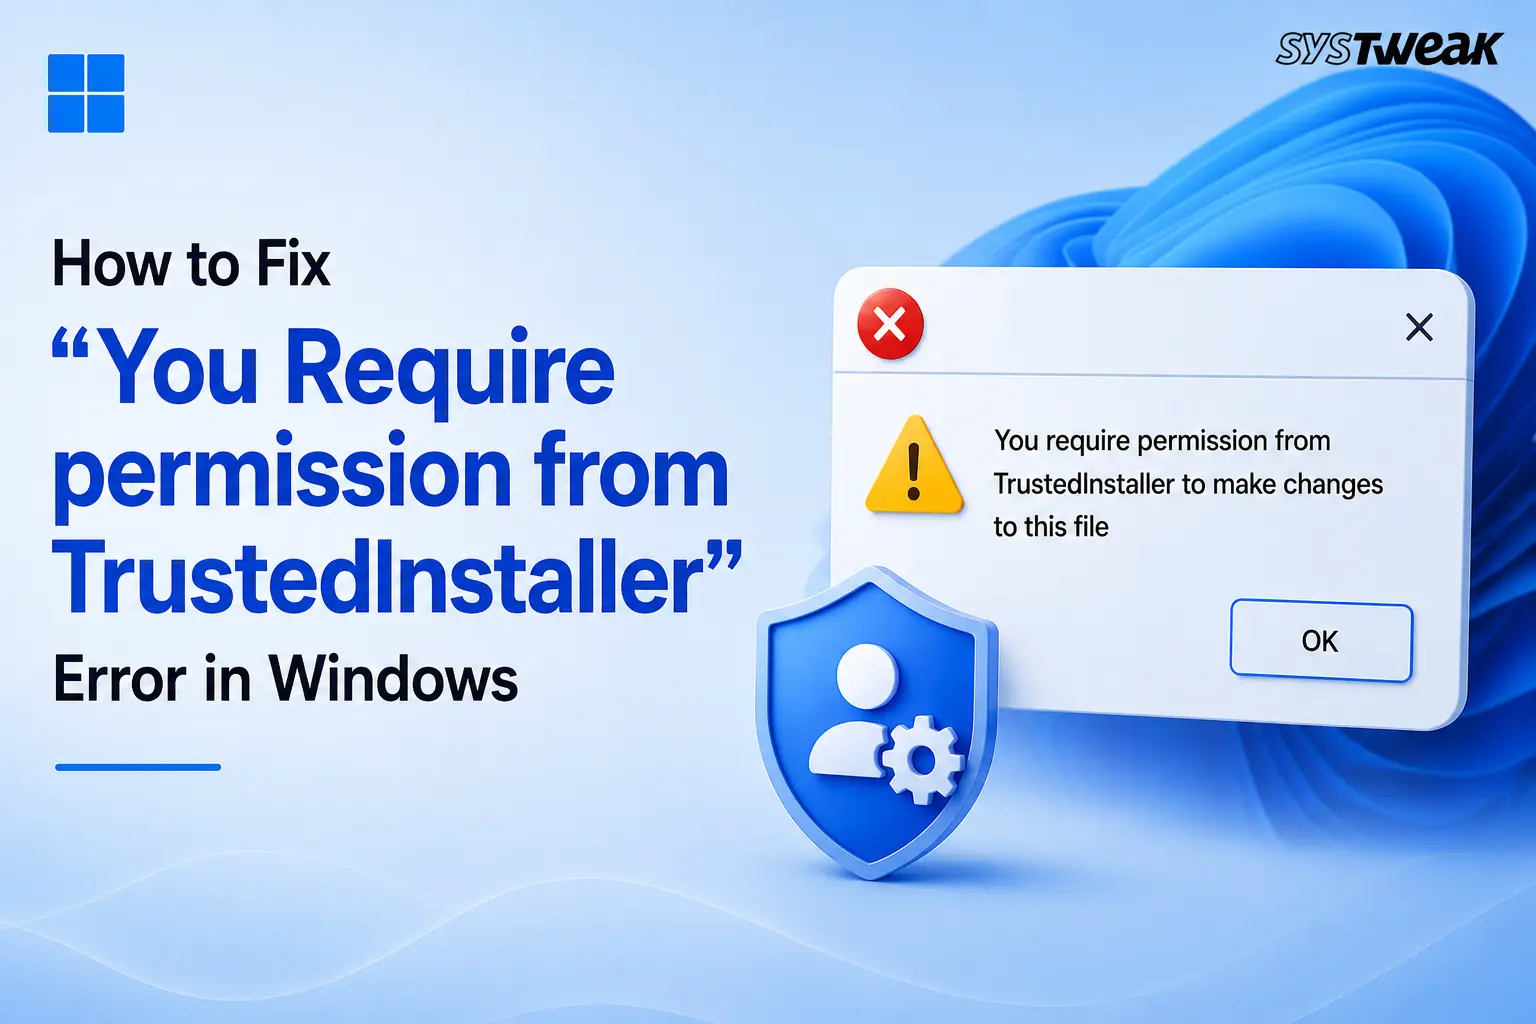
You require permission from TrustedInstaller to make changes to this folder.
It must feel unreasonable, since you are the only user with an account with administrative rights.
Well, the error message has nothing to do with administrative privileges, bugs, or malware. You get it because of TrustedInstaller, a built-in Windows account/ service (NT SERVICE\TrustedInstaller) that doesn’t let anyone make changes to Windows Resource Protection files, especially if it is the Windows old folder, leftovers from an old driver, or an antivirus install.
If so, will it be right to take ownership from TrustedInstaller?
If you are deleting a leftover folder like Windows. old, files associated with an uninstalled program, or an old update cache, you can delete it by taking full ownership, as it is low risk.
However, if the file is part of a running Windows component, overriding TrustedInstaller can cause instability issues.
Hence, before you clean any file manually, always ensure you know what it does, and if you are uncertain, you can always use a PC optimization tool like Advanced System Optimizer, which offers a junk cleaner, registry cleaner, disk optimizer, defragger, and uninstaller, which will help keep the system clutter- and junk-free.

Things to Keep in Mind Before Changing Ownership
If you are deleting a file just because you don’t recognize it and you get a TrustedInstaller error, don’t start changing ownership.
TrustedInstaller protects Windows files, and this is why sometimes malware disguises itself to look like a system process.
When deleting a folder or file, if the name, location, or behavior seems suspicious, scan the system for infection before changing ownership. If it’s a genuine file but is in use, changing ownership will also not help unless you close it.
How to Fix the “Permission from TrustedInstaller” Error
To fix this error, you will first need to take ownership of the folder and then grant your user account the permission to control it. To learn more about how to do it, follow these steps:
Step 1 – Change Ownership
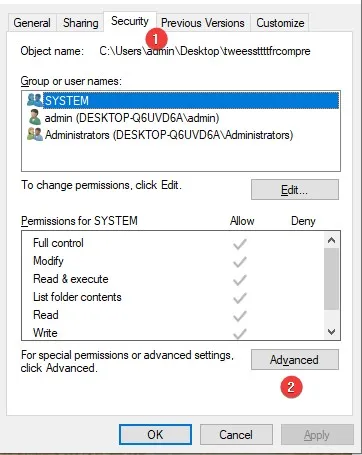
- Right-click the file or folder that you are unable to delete and select Properties.
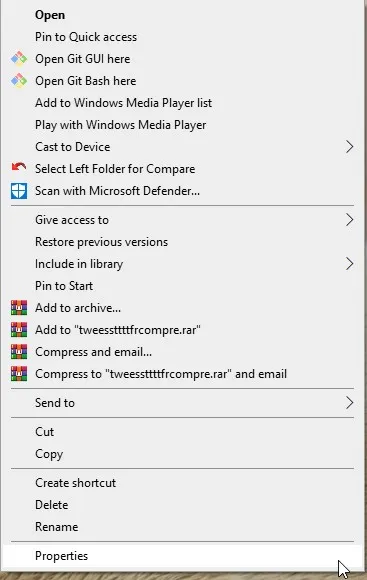
- Click the Security tab and click Advanced.
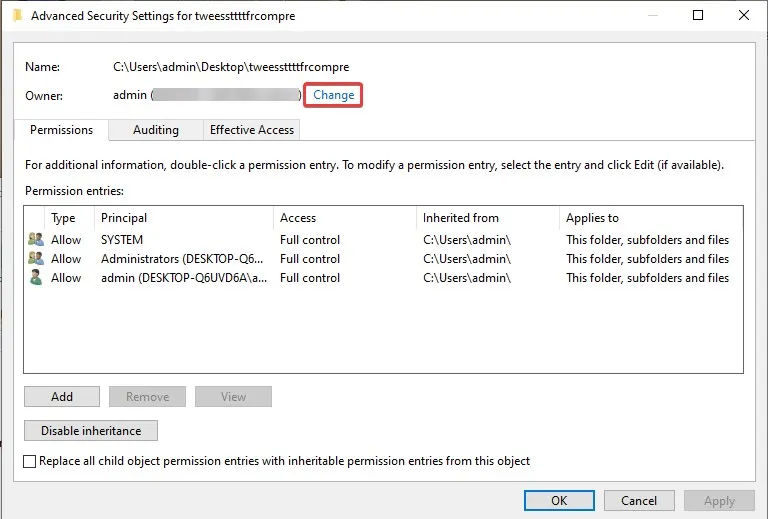
- Next to Owner, click Change.
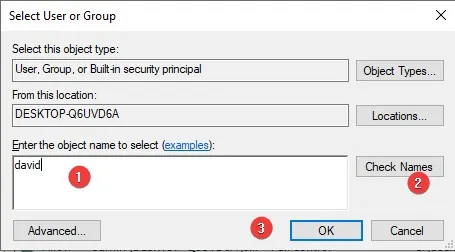
- Type your username, click Check Names, then OK.
- If it’s a folder, check Replace owner on subcontainers and objects before clicking the Apply button.If you don’t want all the files within the folder to inherit the change, keep the box unchecked.
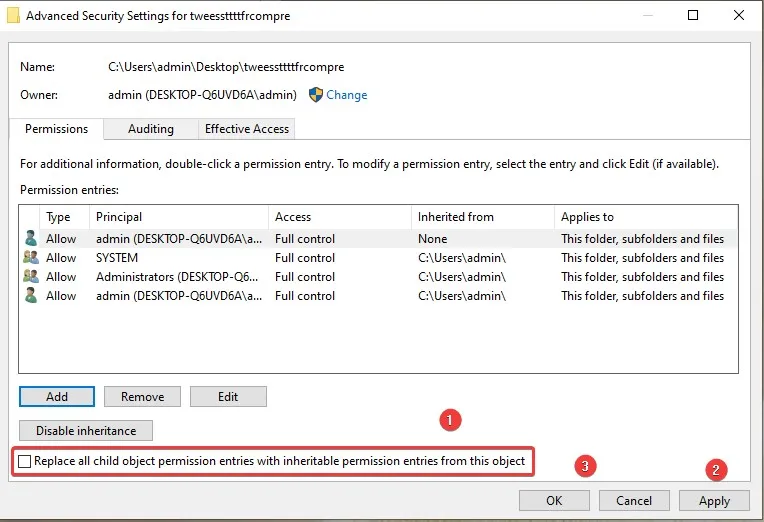
- Click Apply, then OK.
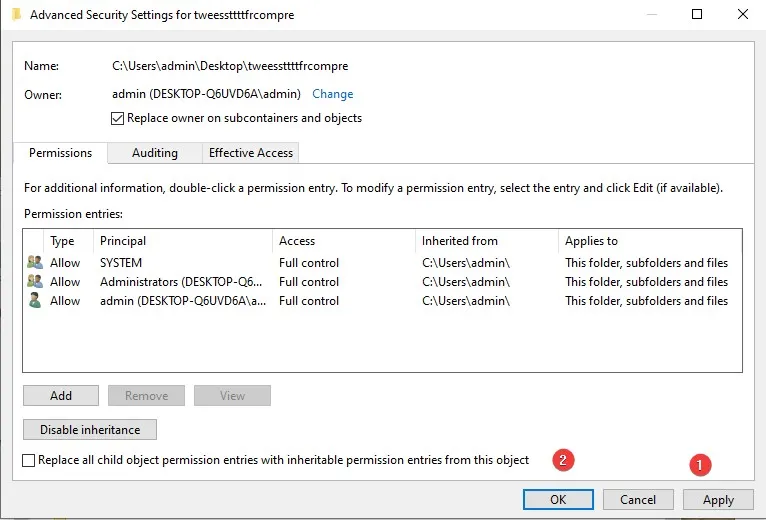
Step 2 – Grant Full Control to your User Account:
- Right-click the folder. Select Properties.
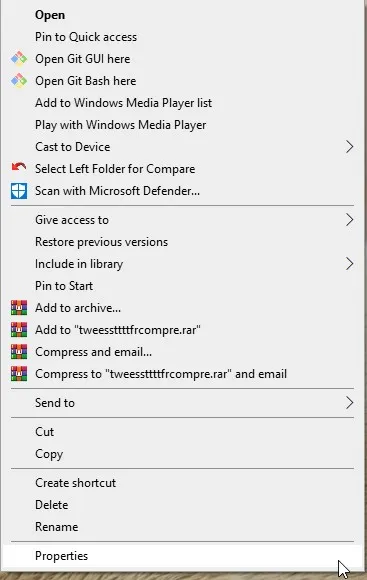
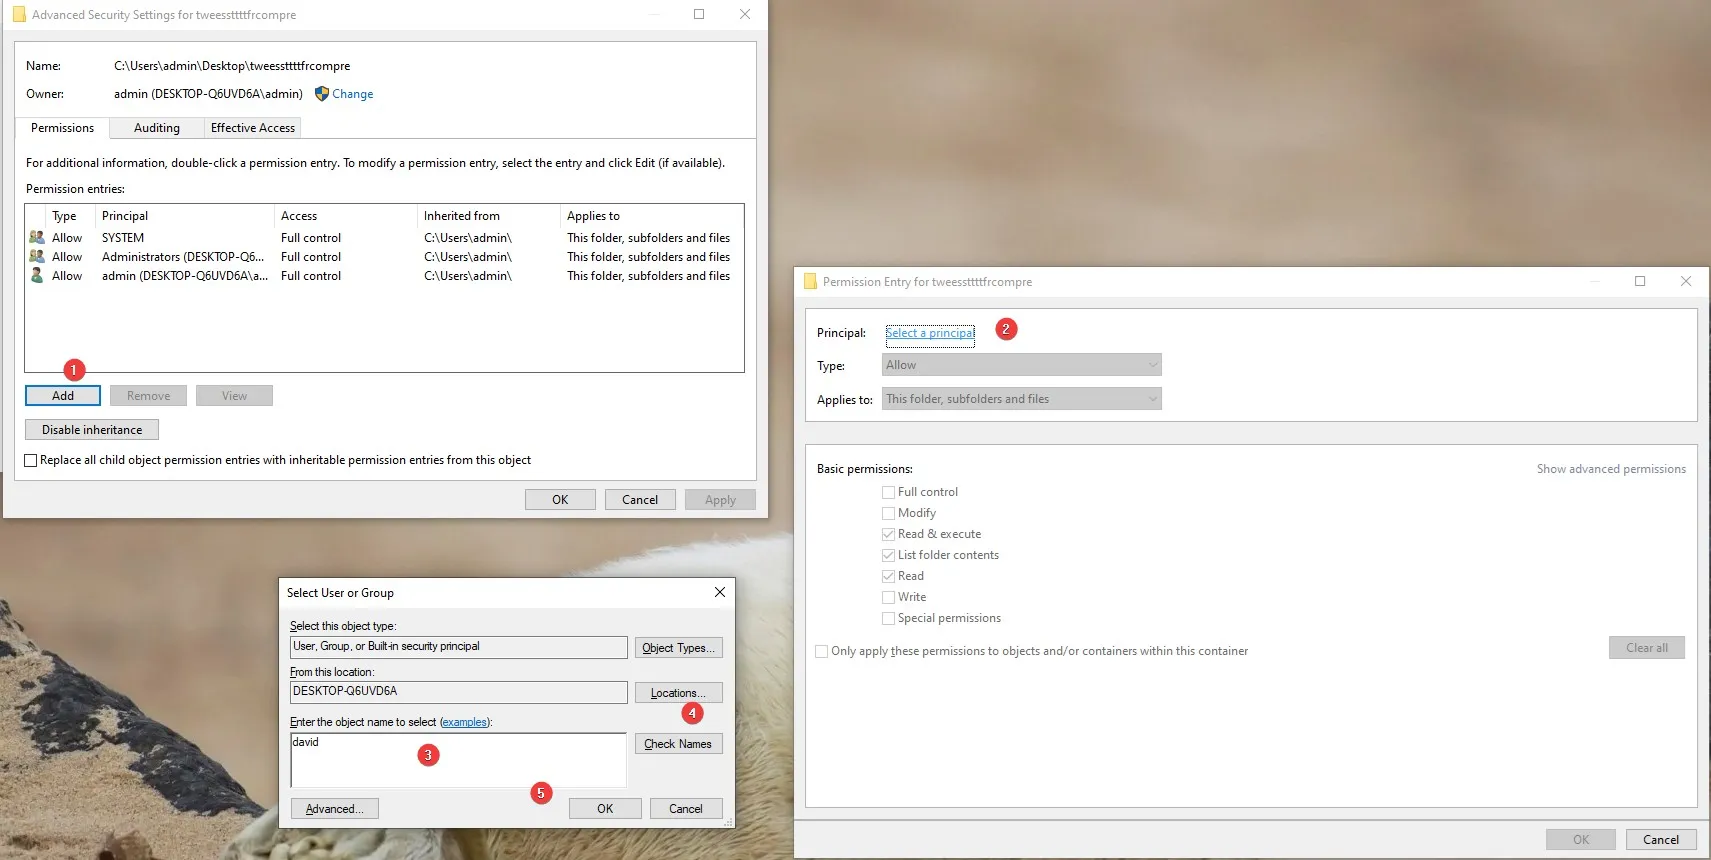
- Click the Security tab > Advanced.
- Click Add. In the new window that opens, click Select a principal, and enter your username > Check Name > Ok.
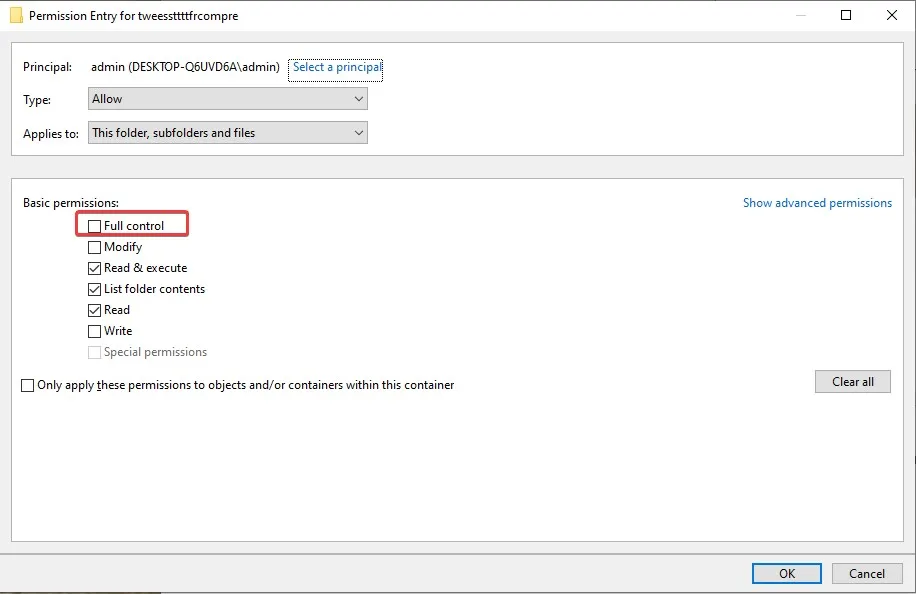
- Check the box next to Full control and click Ok.
- Check the box next to Replace all child object permission entries with inheritable permission entries from this object. Click Apply and Ok.
Once you have followed both steps, try deleting the folder.
Method 2 – Take Ownership Using Command Prompt (CMD)
If you are okay using the command line and want to change the permission for multiple folders, run Command Prompt as an administrator:
Once you have it open, follow these steps:
1. Copy and paste: takeown /f “C:\Path\To\Your\Folder” /r /d y to take ownership of the folder and all its contents
Here:
/f: Specifies the target file or directory path.
/r: Changes ownership across all subdirectories and files inside the folder.
/d y: Automatically answers “Yes” to confirmation prompts if you don’t have permission to view subdirectories.
2. Next, copy and paste icacls “C:\Path\To\Your\Folder” /grant %username%:F /t to grant the user account Full Control.
/grant %username%:F: Auto-detects the logged-in username and assigns Full Control.
/t: Applies the permission change to all files and subfolders.
Once both commands are successfully executed, close Command Prompt and try deleting the folder.
Method 3: Take Ownership Using PowerShell
If you cannot access Command Prompt, you can use PowerShell commands.
- Right-click the Start Button and select Windows PowerShell (Admin).
- Copy and paste the following command to change ownership
Set-Acl -Path “C:\Path\To\Your\Folder” -AclObject (Get-Acl “C:\Path\To\Your\Folder”)
Method 4: Use Advanced Recovery Command Prompt:
Sometimes even after following all the steps, Windows still shows an access-denied error. In such cases, bypass the active operating system entirely using the Windows Recovery Environment (WinRE).
- Hold down the Shift key on your keyboard and click Restart in the Start Menu.
- Your PC will boot with a blue screen with options. Go to Troubleshoot > Advanced options > Command Prompt.
- Select your account and enter the password if prompted.
- Identify the drive letter because in WinRE, the C: (where the OS is installed) is sometimes assigned D: or E:. To check, type the following commands:
dir C:
dir D:
- Once you have the correct drive letter containing your target file, type the following command to delete the folder
del “D:\Path\To\File.ext”
To delete an entire folder:
rmdir /s /q “D:\Path\To\Folder”
Note : In WinRE, Windows protection services and background drivers are inactive, so without changing ownership you can delete files locked by TrustedInstaller.
Also Read: Complete Guide to Remove Windows Services in Windows 11
Still Getting Errors After Changing Permissions?
If you have followed both the steps and still are unable to delete the folder due to a permission error, chances are you missed one of the following three things:
1. You forgot to check either “Replace owner” or “Replace all child object permission entries.”
These two are separate checkboxes, and both need to be selected. The first changes ownership, and the second actually applies the change to every file inside it.
2. Ownership automatically reversed
If you were able to delete the folder after making the changes as suggested above but cannot do it now, probably Windows has reset protected files back to their original owner. Follow the steps again and retry.
3. The file is in use
Ownership and permissions only change file controls. If a service or process is using the file, you cannot delete it even when the permissions are correctly set. To delete files that resist removal, use WinRE method 4.
Restore TrustedInstaller as Owner
Once the changes are made, restore TrustedInstaller as the owner:
- Right-click the folder, select Properties > Security > Advanced > Change (next to Owner).
- Enter NT SERVICE\TrustedInstaller.
- Confirm and apply.
This will reapply the original protection.
Alternative Fix to Troubleshoot Leftover Problem
If you are deleting certain folders and files to clear junk, associated files from an already uninstalled program, you can either use Storage Sense / Disk Cleanup. Press Win + R, type cleanmgr, select your system drive, and click Clean up system files, or you can use a cleanup utility like Advanced System Optimizer that helps uninstall files without leaving leftovers, clean invalid registry entries, junk files, and more without needing you to change ownership or permissions.
Download Now
Frequently Asked Questions
Conclusion
It is safe to clear leftover files as they just take up unnecessary space. However, if you are deleting a file just because you don’t recognize or think it is taking up space, always check its functionality. Deleting a file that helps in the working of Windows is not safe. TrustedInstaller is not dangerous but before you change ownership as you got the message be sure you are deleting the file that is not required.