
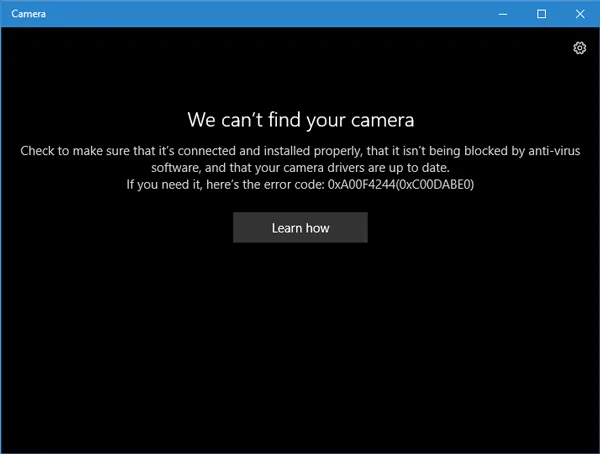
When you open the camera app for a Zoom, Teams or Skype call instead of opening, you get
| We can’t find your camera. Check to make sure that it’s connected and installed properly, that it isn’t being blocked by anti-virus software, and that your camera drivers are up to date. If you need it, here’s the error code: 0xA00F4244 (0xC00DABE0). |
Or may be a different error code 0xA00F4244 <NoCamerasAreAttached> or error code 0xA00f4243 <CameraReservedByAnotherApp> stating another app is using the camera. Or no error, just a black screen and a dropdown where the name of your camera used to be.
In most cases, the camera worked fine until Windows was updated or a new app was installed and it changed something. Either way, the working camera is no longer working.
The general assumption is that there is a driver failure, hardware damage or you need to perform a factory reset. That’s not what it should be because in most cases it is caused because a permission is disabled, a driver is outdated, or an app running in the background is not letting the camera to run and all of this can be fixed using the instructions given below.
Why Camera Stops Working on Windows 11
To work a webcam needs –
- Hardware
- Driver
- System and app level permissions
When any of these break, the camera stops working which makes it difficult to point to the exact reason.
In addition to this, by separating camera permissions into two layers – device and app access Windows 11 has also complicated things. This means when one app is using the camera the other cannot use it and you get 0xA00F4243 <CameraReservedByAnotherApp>. From a privacy point of view it is fine but the error message doesn’t explain what needs to be fixed.
Due to this most troubleshooting ideas share fixes in no specific order which wastes time. We understand you looking for quick and workable fixes and this is what we will explain below.
Ways to fix Webcam not working on Windows 11
Checklist – When to Which Fix
| Condition | Most Likely Cause | Fix |
| When the camera is working with other apps like Discord but not with Teams, etc. | There is either an app conflict or app-level permissions issue. | Check app permissions and close the conflicting app. |
| After windows Update the camera is not detected | It can be due to a privacy settings reset or some driver conflict | Enable privacy settings and update the driver. |
| Camera doesn’t appear in Device Manager | Either the driver is missing or BIOS has disabled it | Update the driver manually or using a driver updating tool like Advanced Driver Updater and also enable the driver from the BIOS. |
| You see a black screen when camera is “on” | Privacy shutter is closed or lens is obstructed | Check the shutter and clean the lens. |
| External camera is not working | There can be an issue with the cable or the driver | Check the cable, try connecting to a different port, and instead of using generic driver install manufacturer driver |
| Works on one laptop but not another | Hardware is not compatible with your device or there is a configuration issue | Check Device Manager on both the devices ensure you have the driver installed for that model number. |
Fix 1: Check the Camera
Before we make any changes to the settings, let’s rule out the obvious reasons:
1. Ensure privacy shutter is not on – Business laptops from Dell, Lenovo, and HP have a tiny slider over the camera lens to close it when not in use. If it is closed you see a black screen or get the error like “camera unavailable.”
Open it. If already open, close it, reopen and test your camera.
2. Clean dust from the camera lens as it blocks the camera.
3. Check the cable if using an external USB camera or plug it into a different USB port to ensure the USB port is not faulty.
4. Check keyboard shortcut. Some laptops have a Fn key combo that toggles the camera on and off. Look at your keyboard to see if there is a camera icon on one of the F keys. If yes, hold Fn and press it.
After every check, test your camera.
Note : When the camera shutter is on but users don't know they go to Windows settings and toggle on privacy settings thinking that is the problem. You don’t make the same mistake. To avoid this open camera app and look for your image. If it is black if the laptop has the shutter either it is closed or the lens is obstructed. Open the shutter and test again and also clean the lens.
Fix 2: Check Windows Privacy Settings
For camera access Windows 11 has two separate permission layers: one at the device level and other at app level. When either of them is disabled camera stops working. Ensure both are enabled.
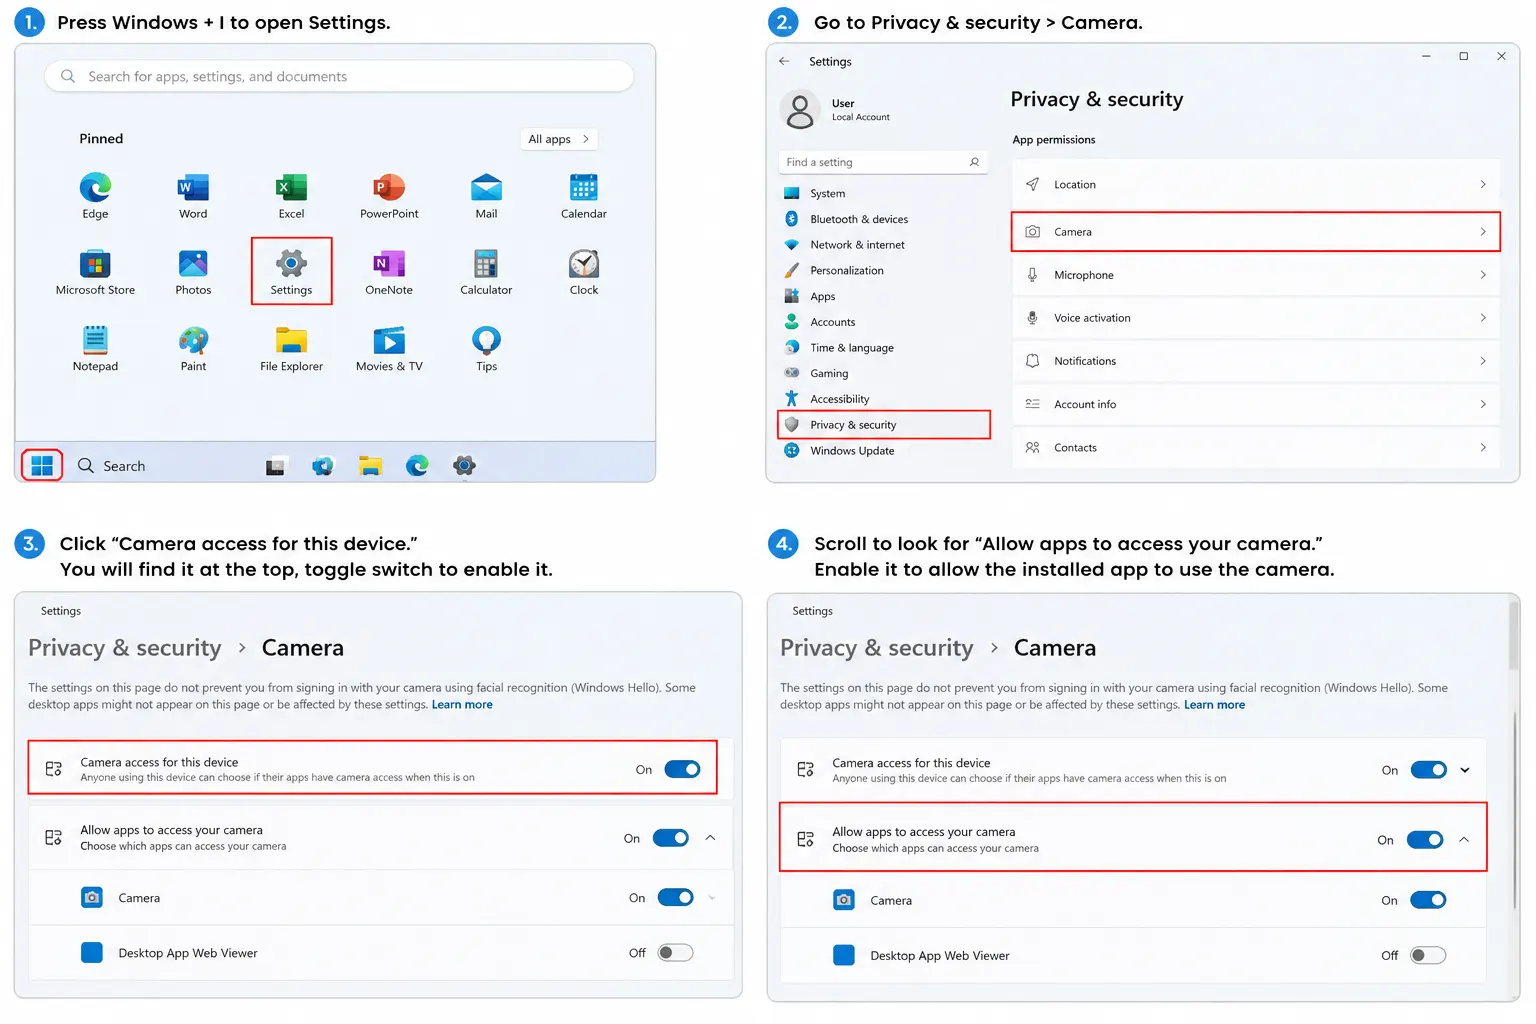
1. Press Windows + I to open Settings.
2. Go to Privacy & security > Camera.
3. Click “Camera access for this device.” You will find it at the top, toggle switch to enable it.
4. Scroll to look for “Allow apps to access your camera.” Enable it to allow the installed app to use the camera.
Note : When you update Windows this setting is disabled as part of privacy-first approach.
Fix 3: Check Camera Usage
Windows 11 only allows one application to use the camera at a time. For example, if Discord is using the camera then other applications like Zoom, Teams etc will not be able to use the camera and you will get a message “camera in use by another application.”
How to find which app is using the camera:
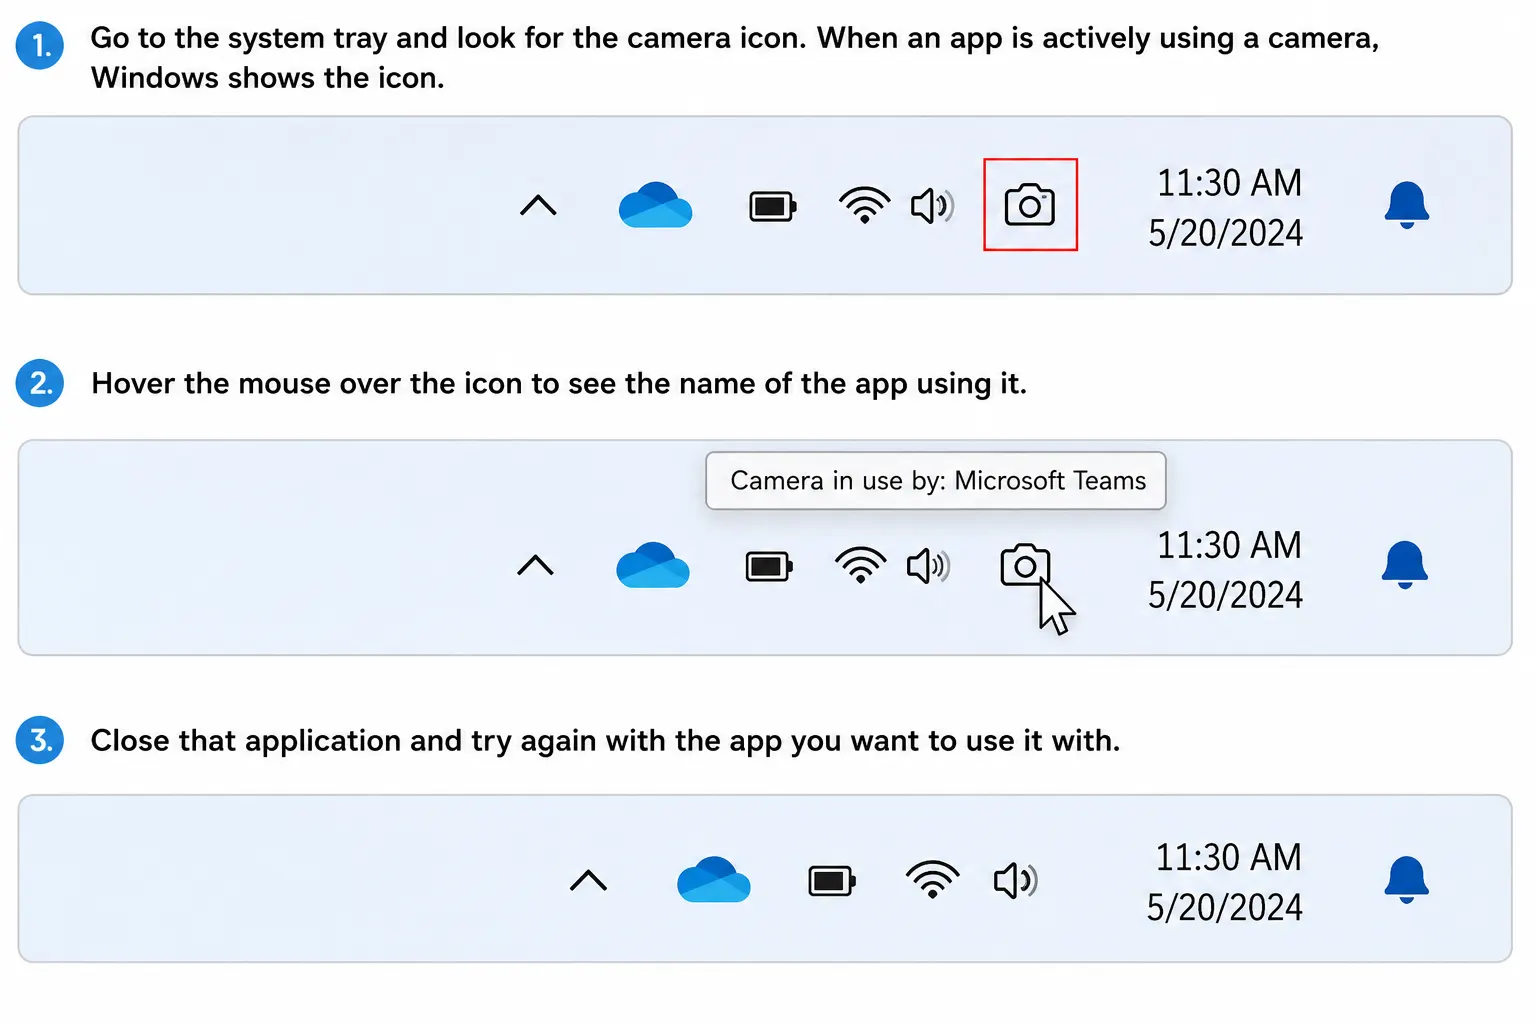
1. Go to the system tray and look for the camera icon. When an app is actively using a camera, windows show the icon.
2. Hover the mouse over the icon to see the name of the app using it.
3. Close that application and try again with the app you want to use it with.
However, if you there is camera icon but an app still claims “camera in use” follow these steps:
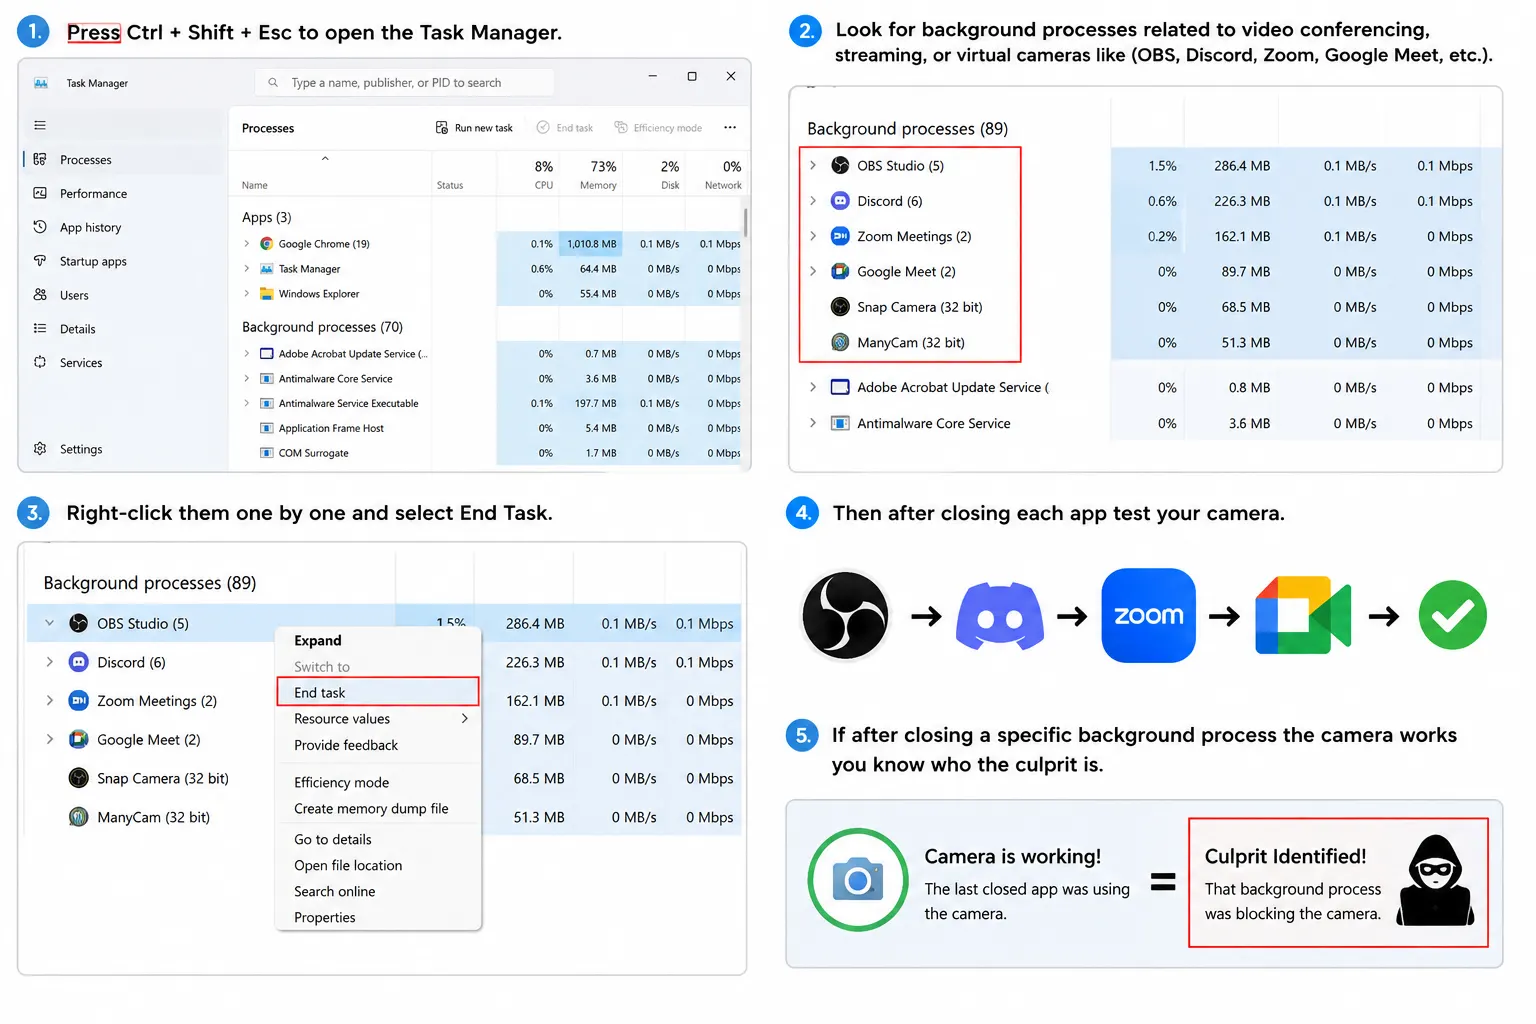
1. Press Ctrl + Shift + Esc to open the Task Manager.
2. Look for background processes related to video conferencing, streaming, or virtual cameras like (OBS, Discord, Zoom, Google Meet, etc.).
3. Right-click them one by one and select End Task.
4. Then after closing each app test your camera.
5. If after closing a specific background process the camera works you know who the cultprit is.
Background Apps Grayed Out on Windows? Here’s What You Can Do!
Note : Virtual camera apps like OBS or Manycam, help clone webcam feed so multiple apps can use it simultaneously. But if you use this workaround there can be complexity and latency. Only use it when it is necessary to use the camera when multiple apps are accessing it.
Fix 4: Update Your Camera Driver
A missing or outdated driver can also prevent Windows from recognizing your camera. To update your camera driver follow these steps:
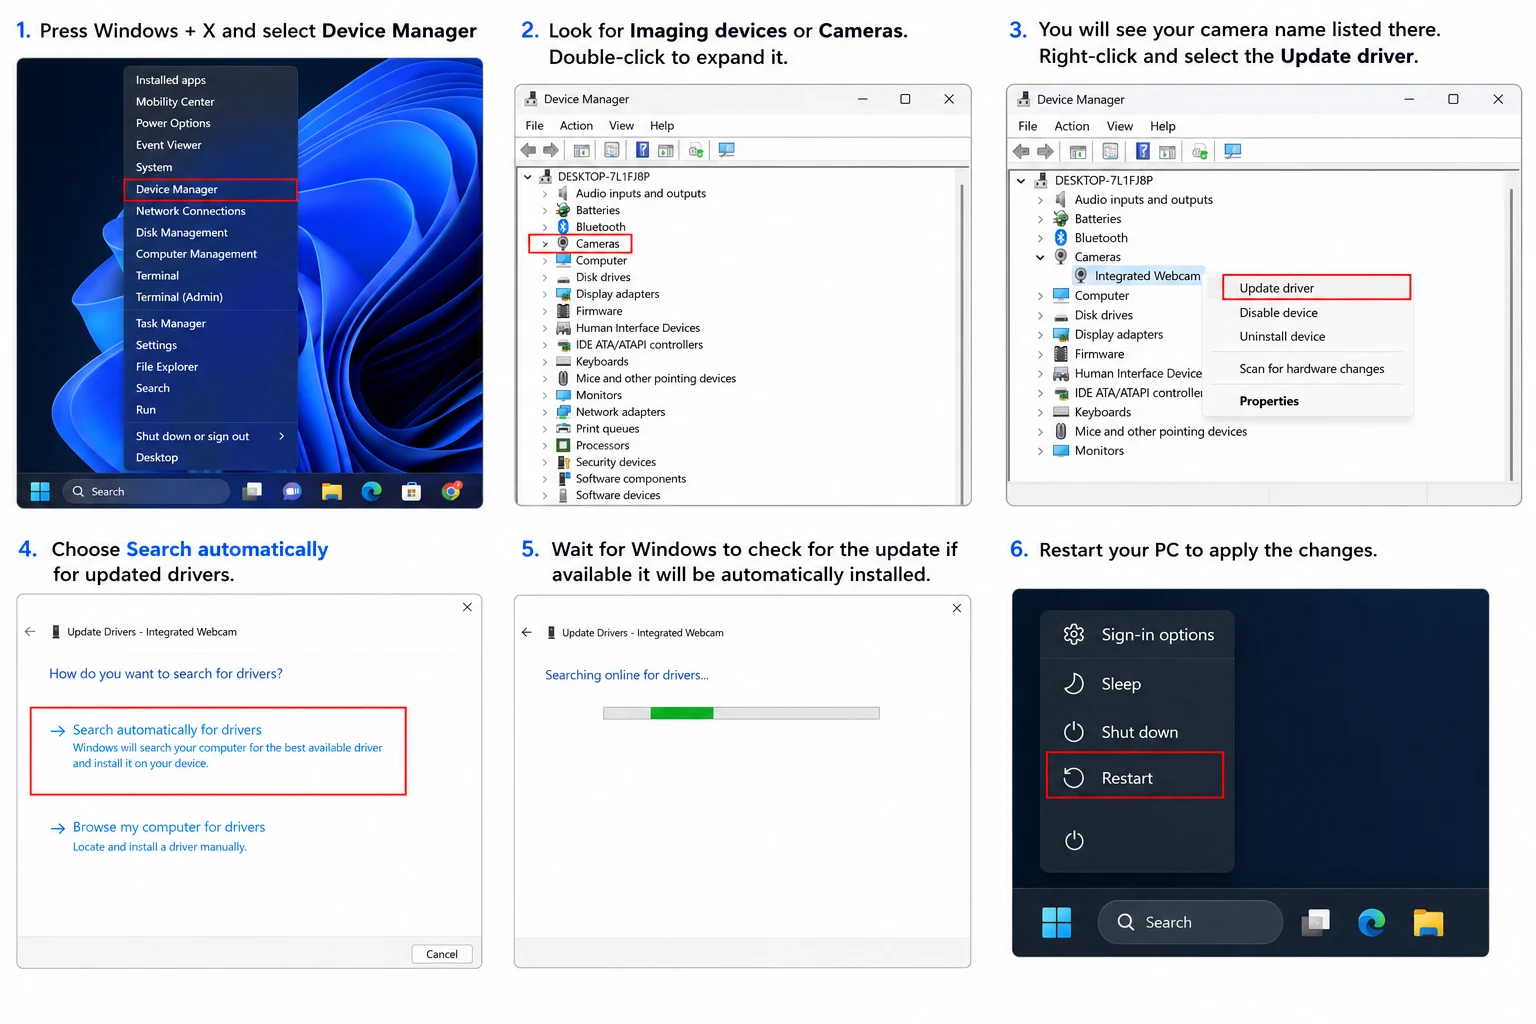
1. Press Windows + X and select Device Manager
2. Look for Imaging devices or Cameras. Double-click to expand it.
3. You will see your camera name listed there. Right-click and select the Update driver.
4. Choose Search automatically for updated drivers.
5. Wait for Windows to check for the update if available it will be automatically installed.
6. Restart your PC to apply the changes.
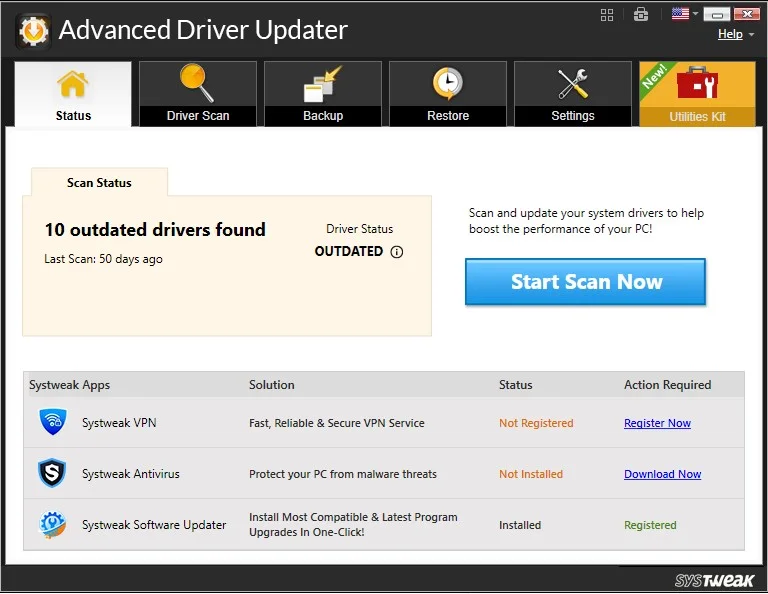
If you don’t want to install a driver manually you can use a driver updating tool like Advanced Driver Updater to identify outdated drivers and update them. The trial version of the tool allows updating one driver at a time while using the paid version you can update all drivers at a time.
Click the button below to download and install the tool.

Once installed click Start Scan Now to scan the system and update the outdated camera driver.
Restart the system to apply changes.
If the camera is not listed or updating didn’t help follow these steps:
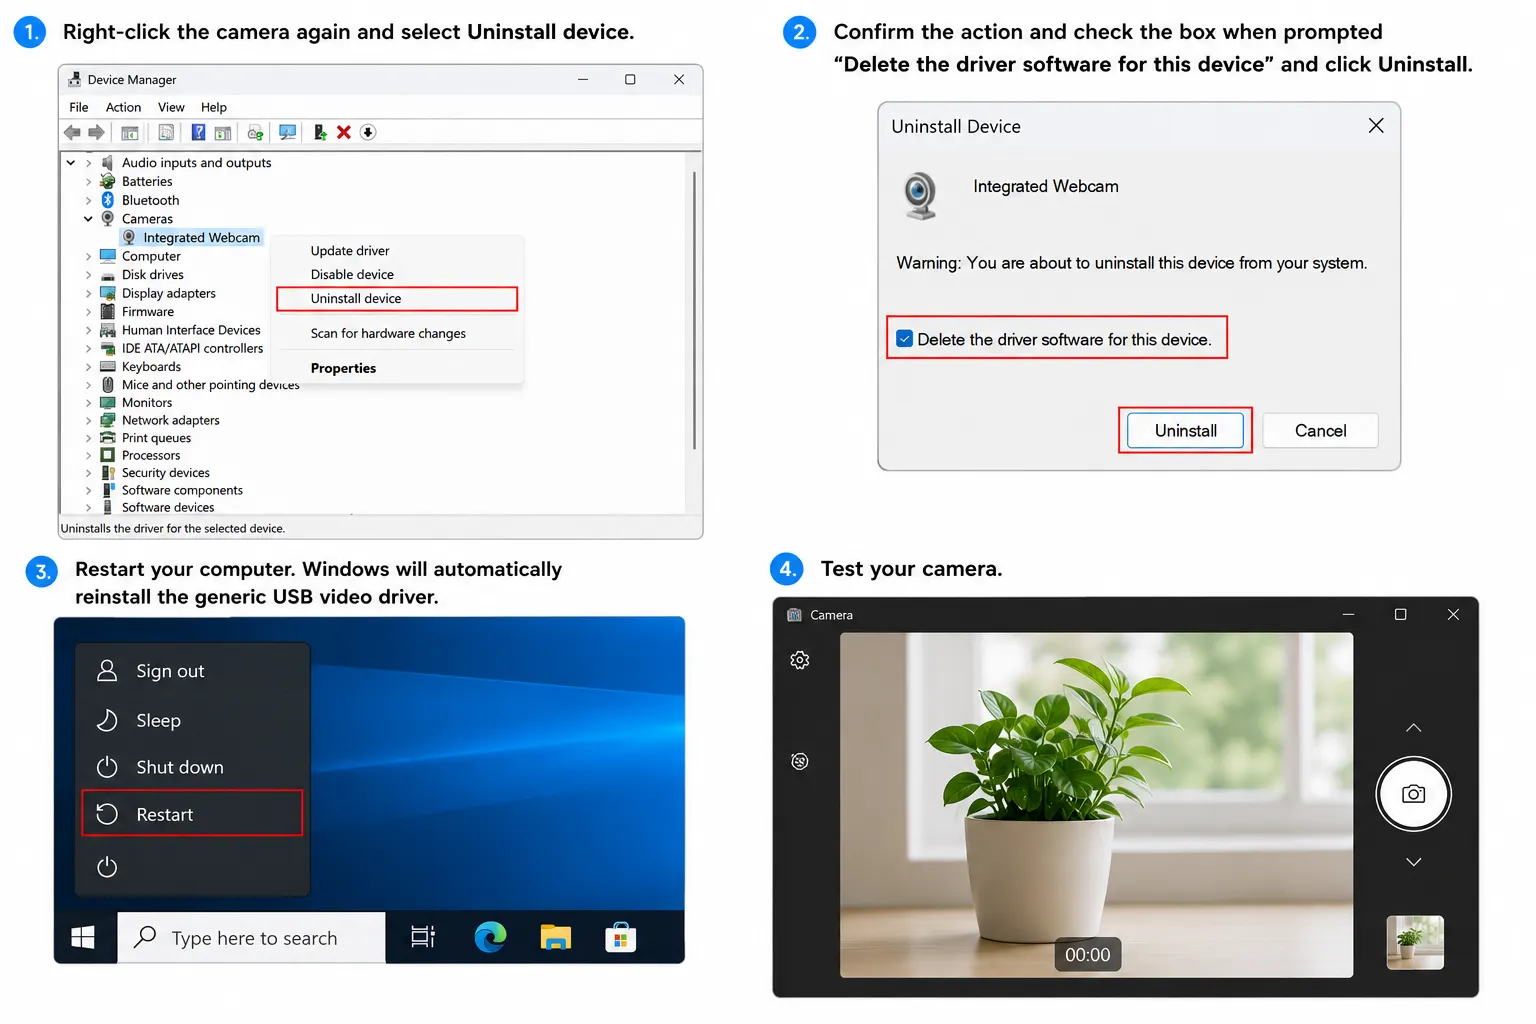
1. Right-click the camera again and select Uninstall device.
2. Confirm the action and check the box when prompted “Delete the driver software for this device” and click Uninstall.
3. Restart your computer. Windows will automatically reinstall the generic USB video driver.
4. Test your camera.
Fix 5: Check Windows Update
Windows 11 24H2 update (specifically KB5050009 is related to camera detection failure)
How To Force Update Windows 11 24H2
If the camera stopped working soon after the Windows Update, roll back it.
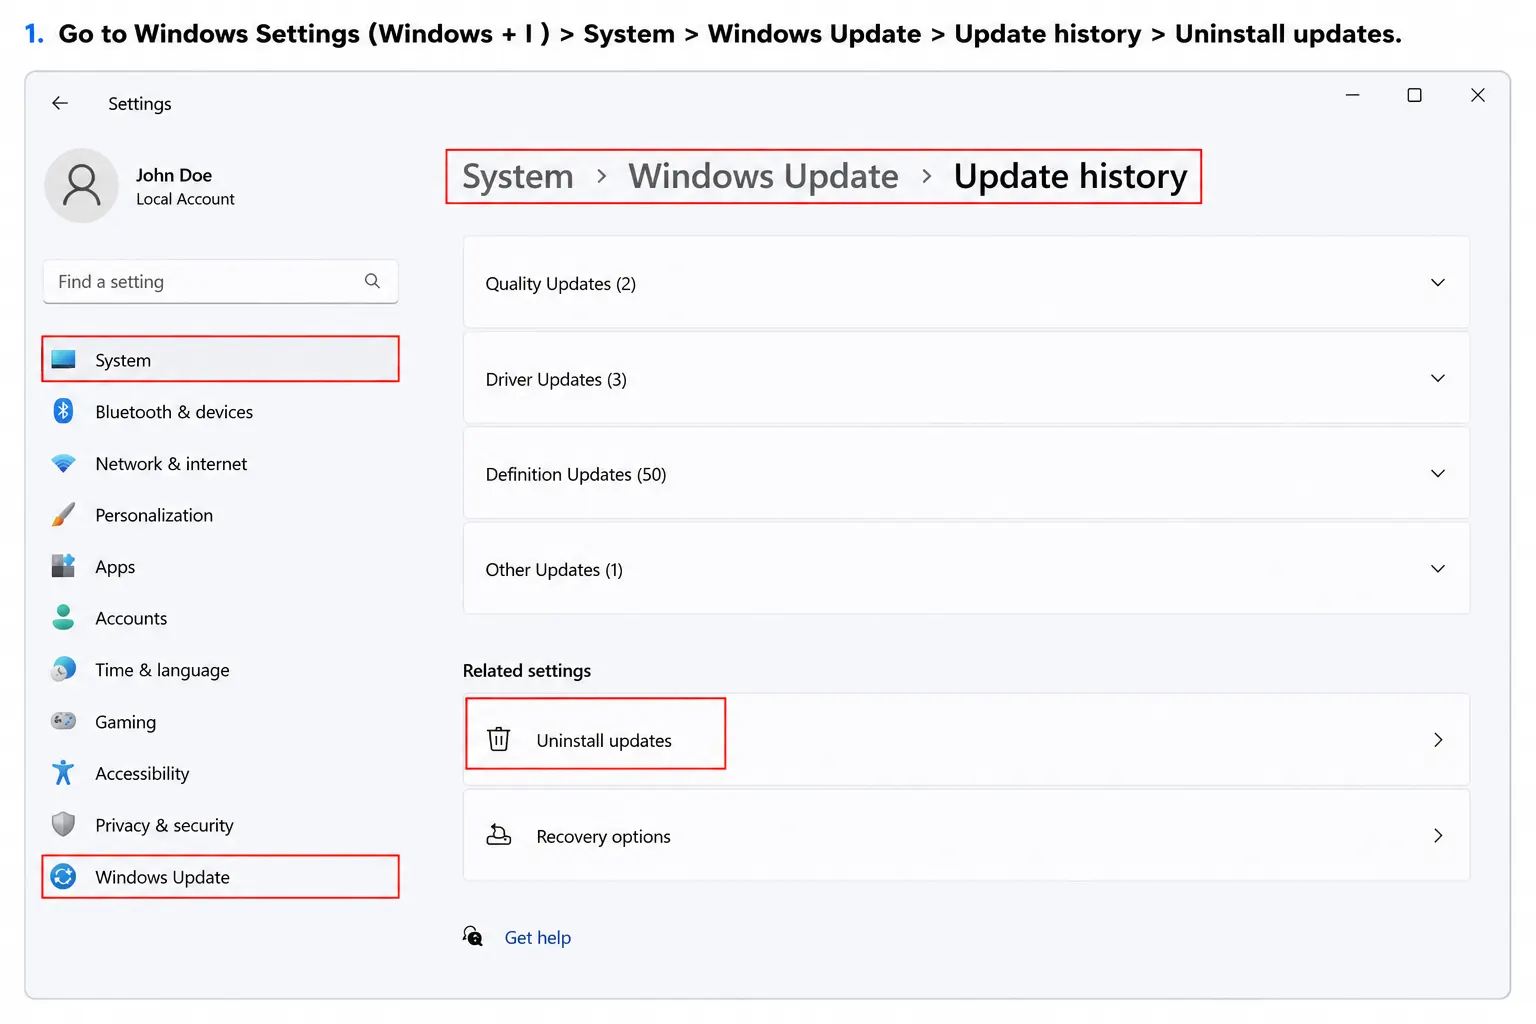
1. Go to Windows Settings (Windows + I ) > System > Windows Update > Update history > Uninstall updates.
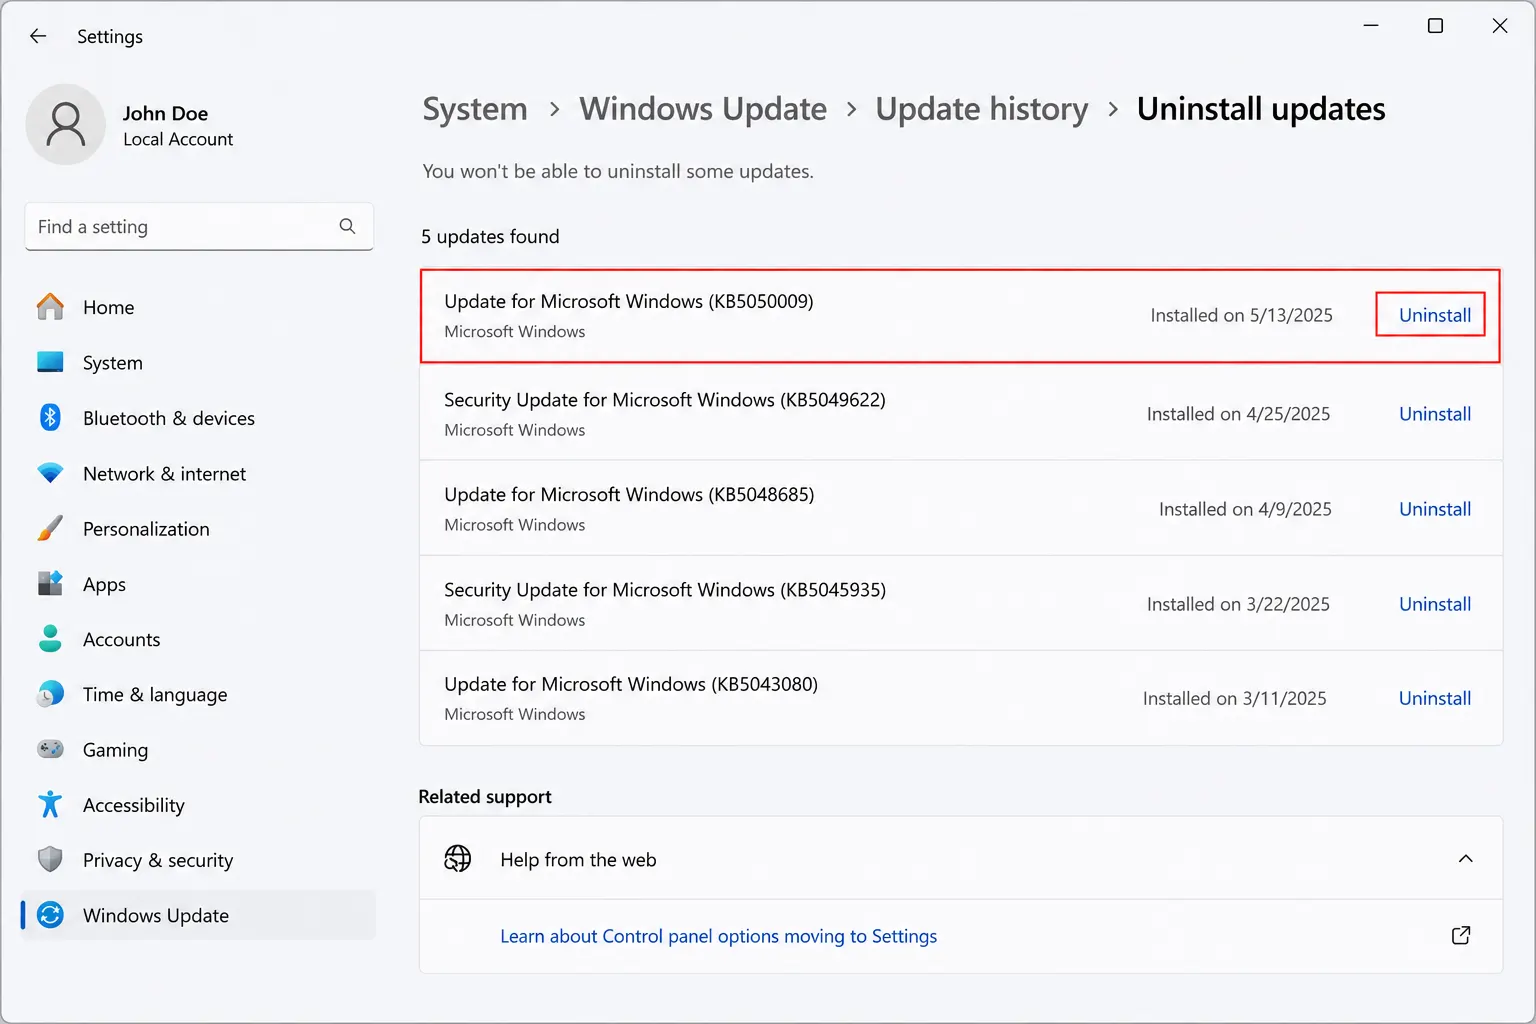
2. Look for KB5050009 or similar recent KB numbers and click Uninstall.
3. Restart your computer.
4. Test your camera.
Fix 6: Run Windows Camera Troubleshooter
To fix issues like this Windows 11 includes an automated troubleshooter. To run it follow these steps:
1. Open Windows Settings > System > Troubleshoot > Other troubleshooters.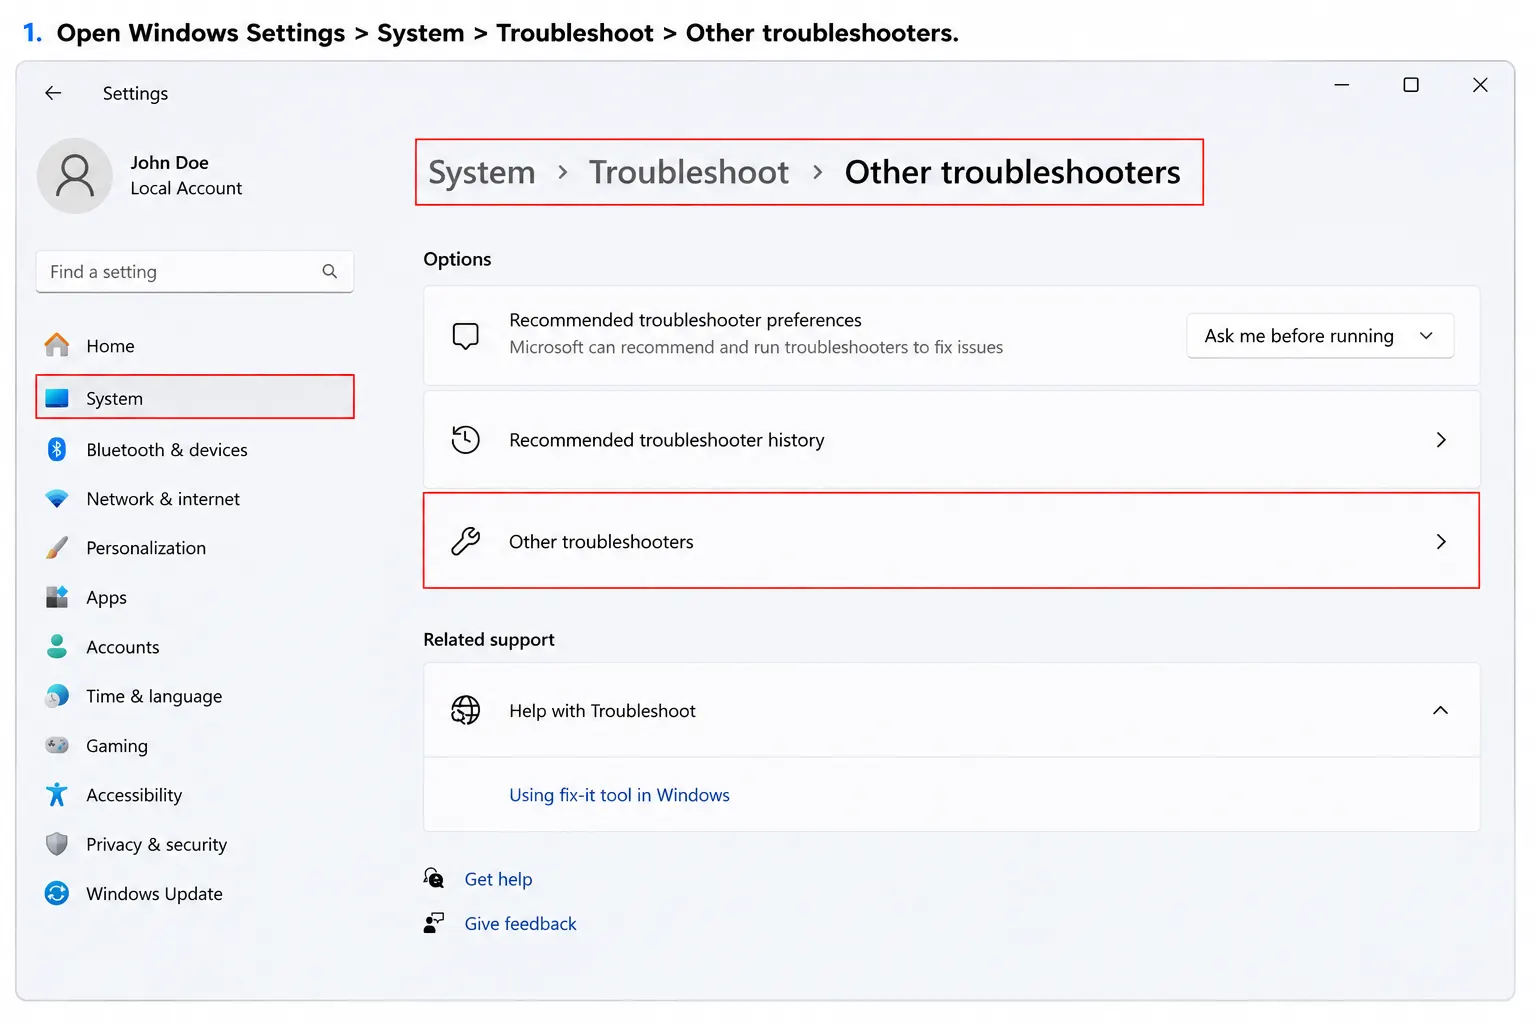
2. Scroll and find Camera.
3. Click the Run button.
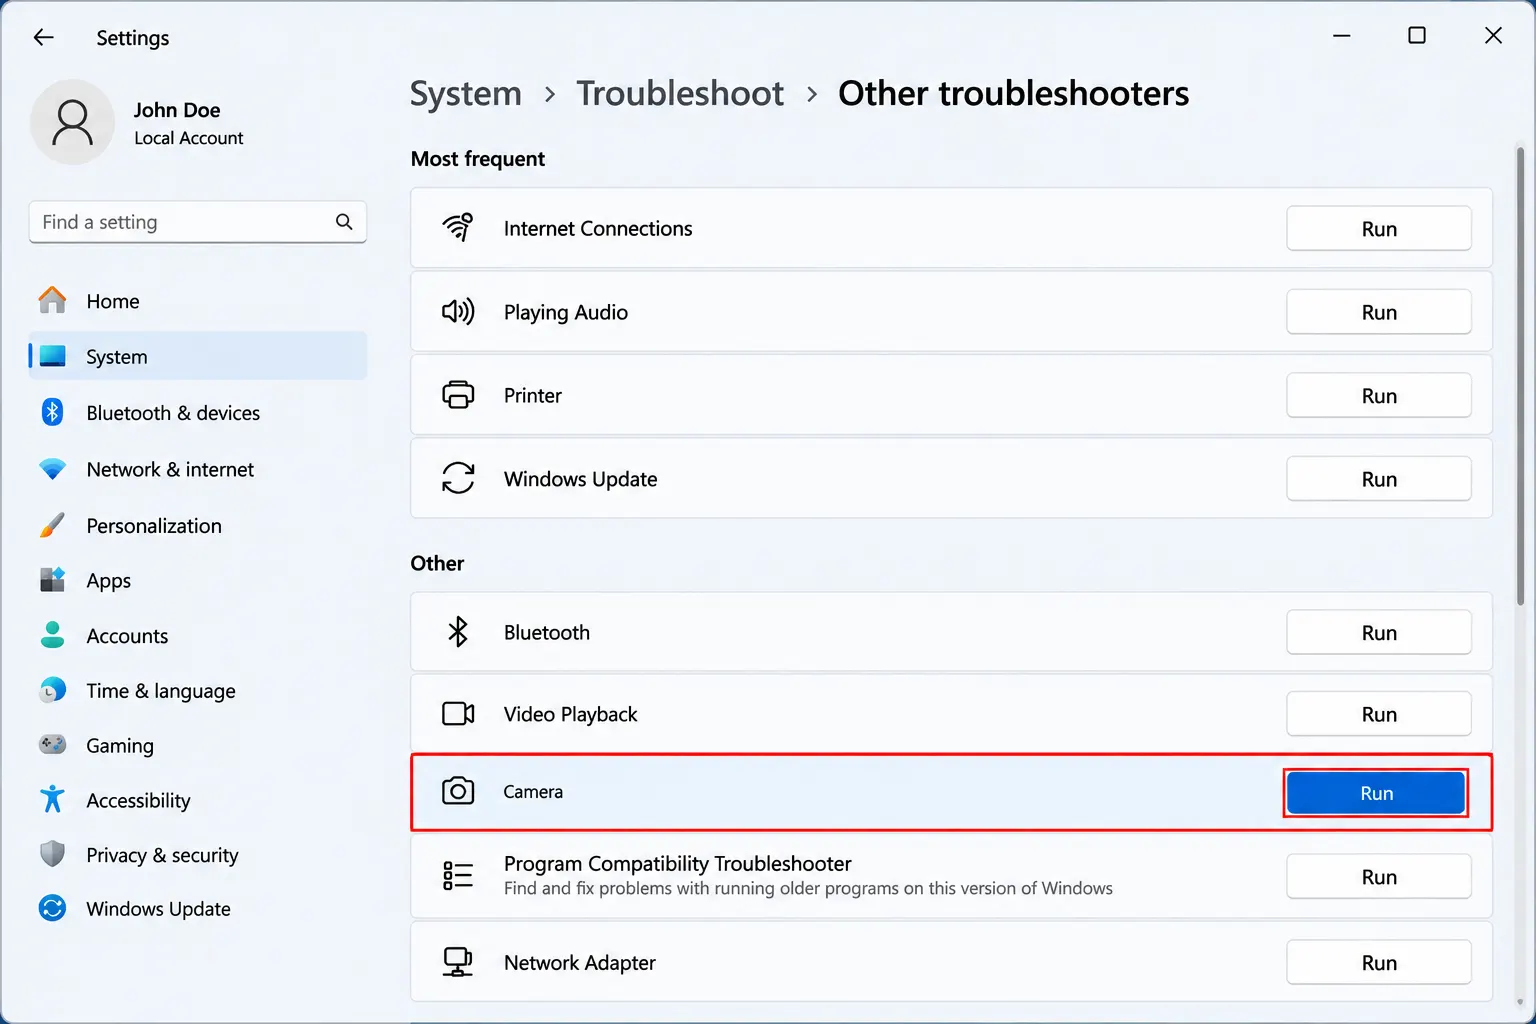
4. Follow the on-screen instructions. The tool will run diagnostics and attempt to fix common issues automatically.
Fix 7: Check BIOS
Some laptop manufacturers disable the camera at the BIOS level. This is rare, but if nothing has worked so far there is no harm in checking BIOS.
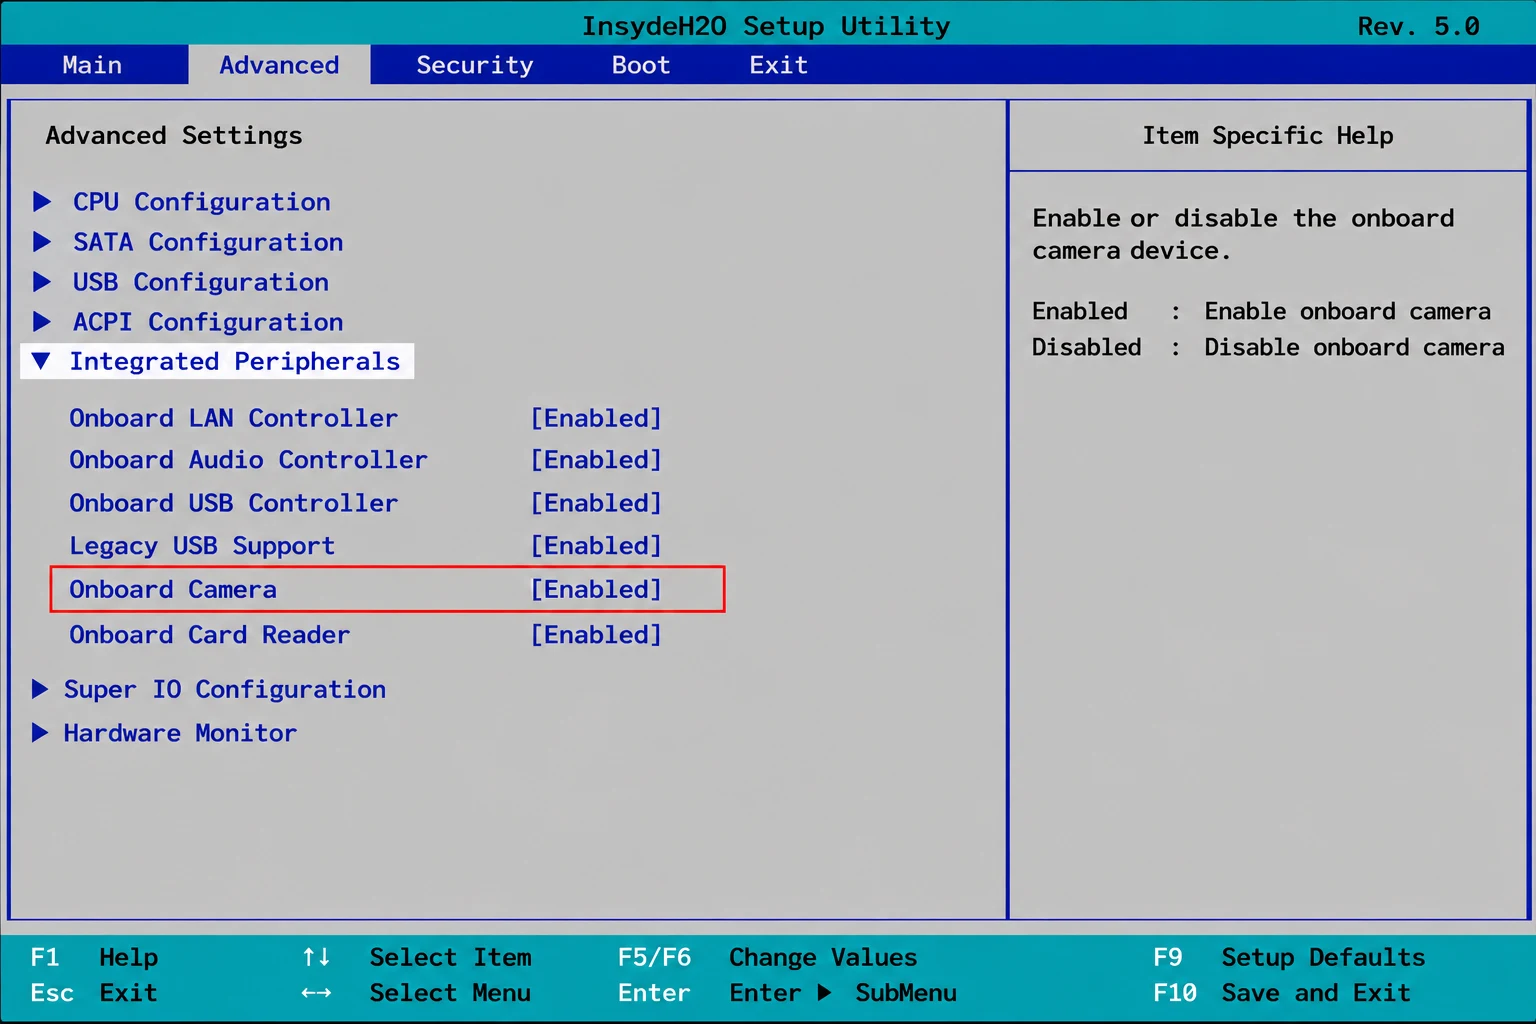
1. Restart your computer. As soon as it starts, press Delete or F2 (varies by manufacturer to manufacturer). This will open the BIOS.
2. Look for Integrated Peripherals, Onboard Devices, System Devices, or Advanced. Camera setting names may vary.
3. If it’s disabled, enable it.
4. Save and exit.
5. Restart your computer. Test your camera.
Fix 8: Disable and Re-enable the Camera
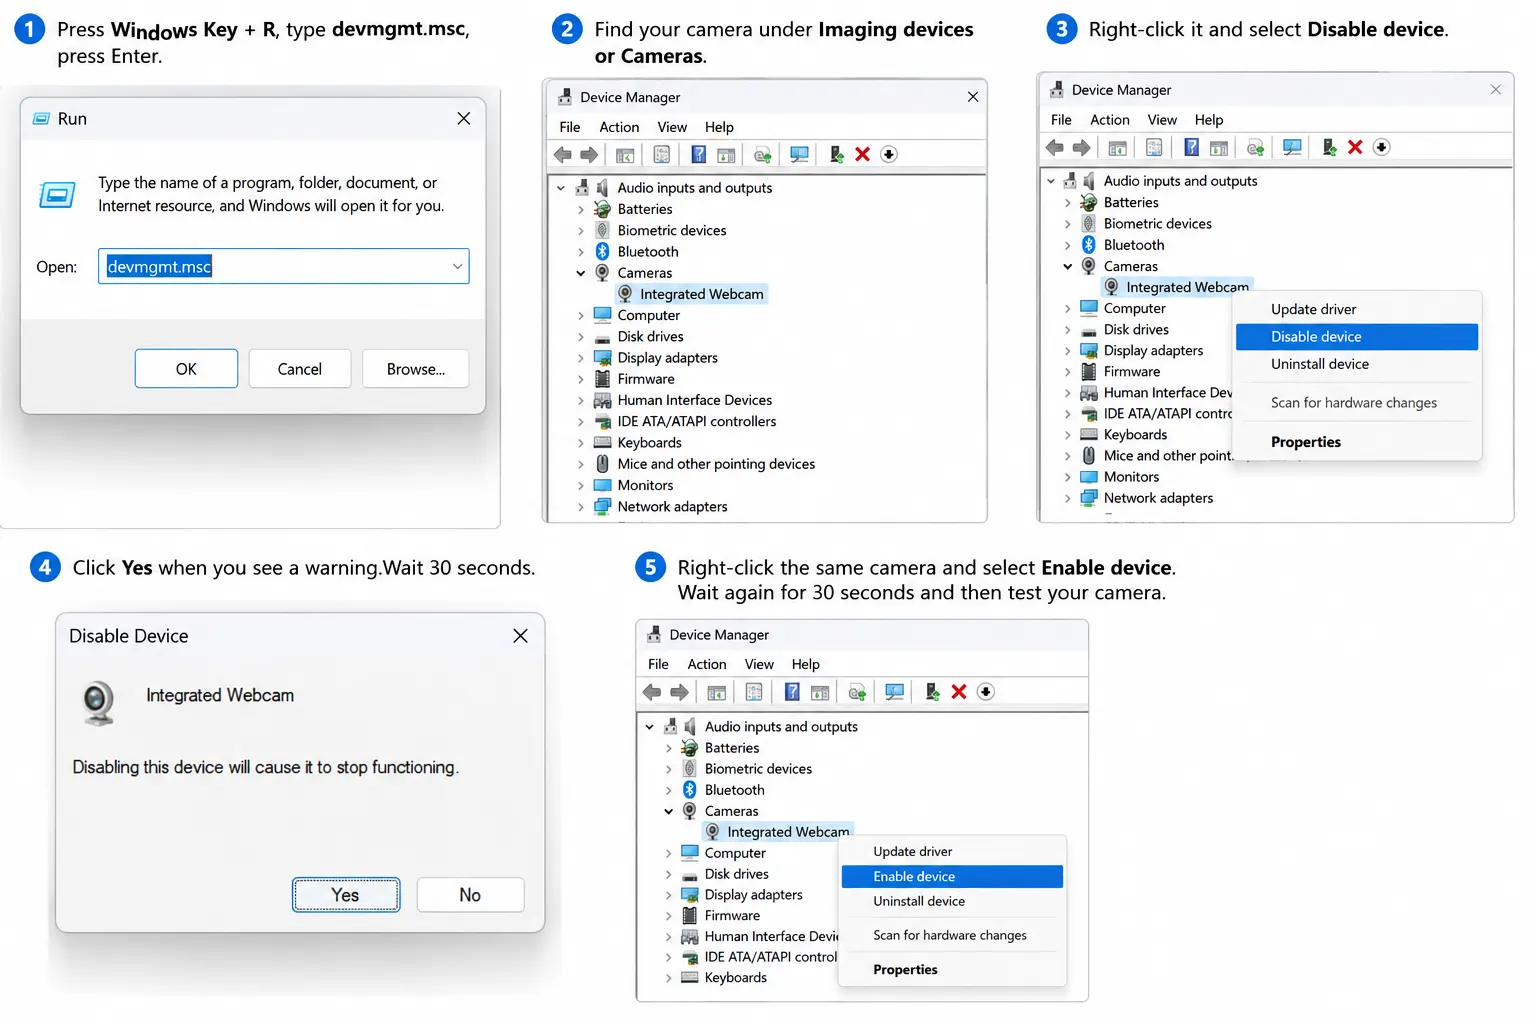
1. Press Windows Key + R, type devmgmt.msc, press Enter.
2. Find your camera under Imaging devices or Cameras.
3. Right-click it and select Disable device.
4. Click Yes when you see a warning.Wait 30 seconds.
5. Right-click the same camera and select Enable device. Wait again for 30 seconds and then test your camera.
If You Have Performed Factory Reset and Camera Still Doesn’t Work follow these steps:
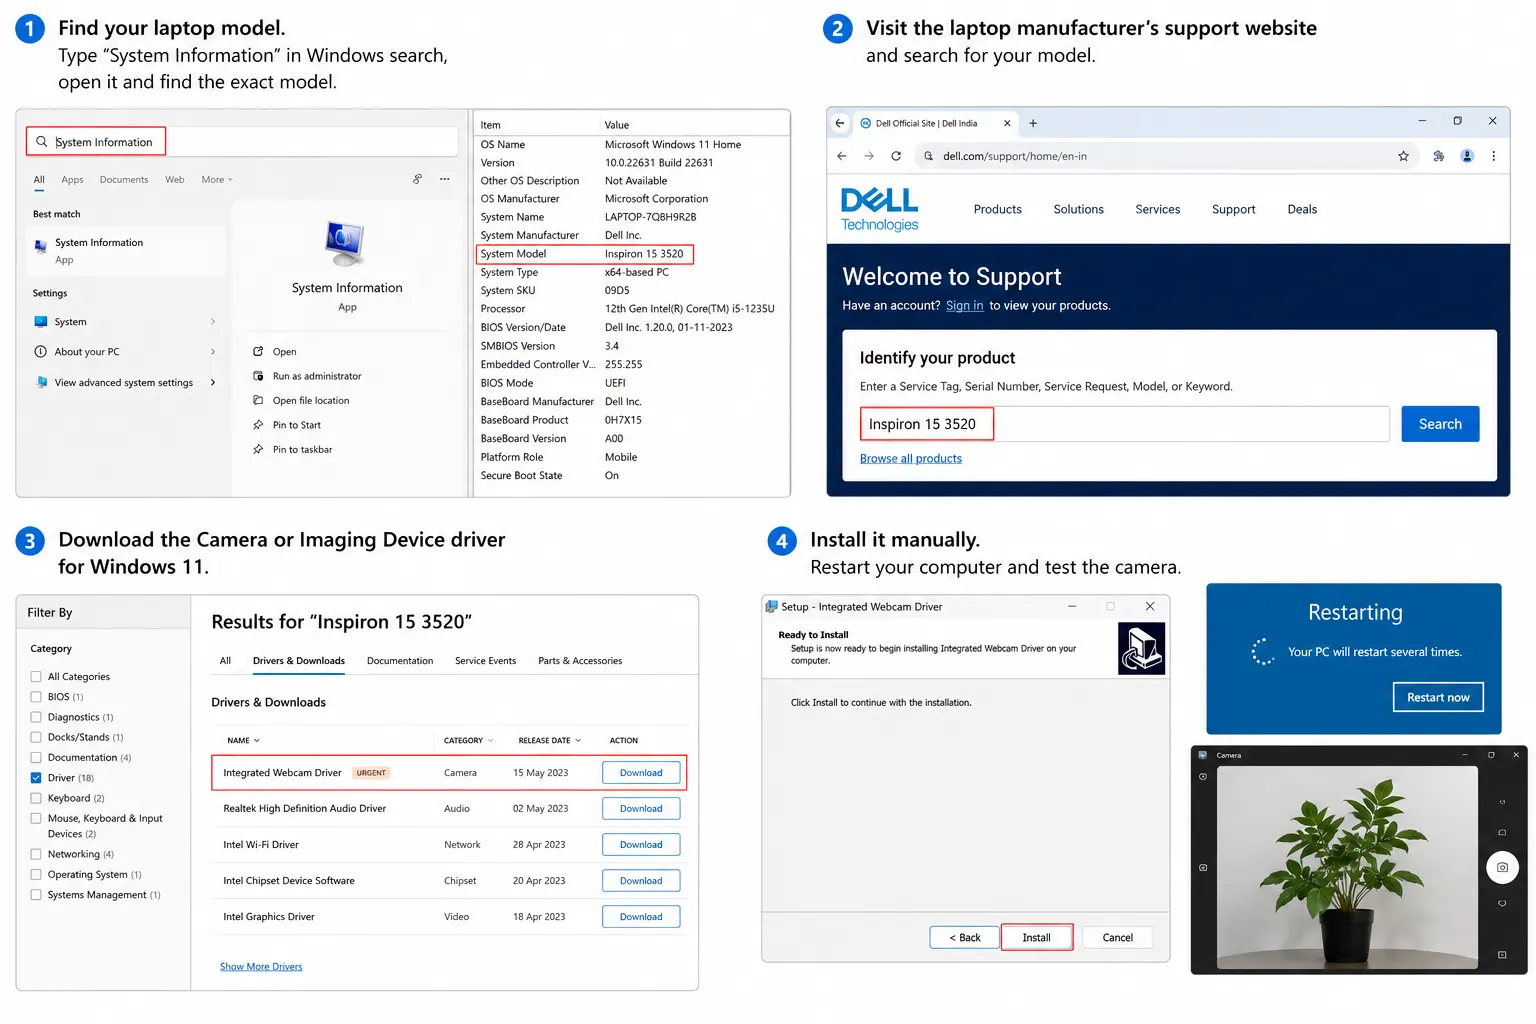
1. Find your laptop model. Type “System Information” in Windows search, open it and find the exact model.
2. Visit the laptop manufacturer’s support website and search for your model.
3. Download the Camera or Imaging Device driver for Windows 11.
4. Install it manually.Restart your computer and test the camera
Things To Remember When Using External USB Cameras
- When the camera is not working try connecting it to a different USB port.
- Check cable condition and replace damaged, or broken cables.
- If you are connected to USB 2.0 try connecting to USB 3.0
- Ensure you have manufacturer specific drivers installed, not just the generic one.
- Turn on the physical camera power switch if available.
Frequently Asked Questions
Bottom Line
When the camera stops working on Windows 11 it can be because Windows settings were disabled, the shutter is closed, the driver is outdated, another app is using it or if it is the external camera the USB cable or port can be broken. You can fix it by following the steps explained above and update the driver manually or using Advanced Driver Updater.